
Homemade Pumpkin Pop Tarts Recipe | Flaky Fall Pastries,There’s something magical about the first cool morning of autumn when you realize it’s finally pumpkin season. Last October, I found myself craving those nostalgic breakfast pastries from my childhood, but I wanted something more sophisticated, more homemade, and decidedly more pumpkin. That’s when I decided to create my own pumpkin pop tarts from scratch, and let me tell you, the result was nothing short of spectacular.
These homemade pumpkin pop tarts combine a buttery, flaky pastry crust with a sweet, spiced pumpkin filling that tastes like autumn in every bite. Unlike their store-bought cousins, these pumpkin breakfast pastries are made with real ingredients, genuine pumpkin puree, and a level of care that transforms a simple breakfast into a memorable experience. The golden-brown exterior, the tender filling, and that delicate sprinkle of coarse sugar on top create a symphony of textures and flavors that will make your morning feel like a celebration.
Why You’ll Love These Pumpkin Pop Tarts
Making pumpkin pop tarts at home might seem ambitious, but I promise you, the process is surprisingly straightforward and incredibly rewarding. These handheld pumpkin pastries are perfect for busy mornings, weekend brunches, or even as an afternoon snack with your favorite hot beverage.
What sets these pumpkin hand pies apart is their versatility. You can make a batch on Sunday and have breakfast sorted for the entire week. They freeze beautifully, reheat perfectly in the toaster, and taste absolutely divine whether served warm or at room temperature. Plus, there’s something deeply satisfying about biting into a pastry you’ve made entirely from scratch, knowing exactly what went into it.
The filling strikes the perfect balance between sweet and spicy, with warm notes of cinnamon, nutmeg, and ginger complementing the earthy sweetness of pumpkin. The pastry itself is tender yet sturdy enough to hold the filling without becoming soggy, and that crimped edge gives each pop tart a professional, bakery-quality appearance.
Essential Ingredients for Pumpkin Pop Tarts
Creating the perfect pumpkin pop tarts requires quality ingredients and a bit of patience. Here’s everything you’ll need to make approximately 8-10 pastries:
For the Pastry Dough:
- 2½ cups all-purpose flour, plus extra for dusting
- 1 tablespoon granulated sugar
- 1 teaspoon salt
- 1 cup (2 sticks) cold unsalted butter, cut into small cubes
- 1 large egg
- 2 tablespoons cold milk
- 1 teaspoon apple cider vinegar
Pumpkin Filling:
- 1 cup pumpkin puree (not pumpkin pie filling)
- ⅓ cup brown sugar, packed
- 2 tablespoons cornstarch
- 1 teaspoon ground cinnamon
- ½ teaspoon ground ginger
- ¼ teaspoon ground nutmeg
- ⅛ teaspoon ground cloves
- Pinch of salt
- 1 teaspoon vanilla extract
Egg Wash and Topping:
- 1 egg, beaten
- 2 tablespoons coarse sugar or regular granulated sugar
- Pinch of cinnamon (optional)
The quality of your butter makes a significant difference in the flakiness of your pastry, so don’t skimp here. Similarly, using real pumpkin puree rather than pie filling gives you control over the sweetness and spice level of your pumpkin pop tarts.
Step-by-Step Guide to Making Pumpkin Pop Tarts
Preparing the Perfect Pumpkin Pastry Dough
The foundation of excellent pumpkin pop tarts is a tender, flaky pastry dough. I’ve learned that keeping everything cold is the secret to success.
Start by combining the flour, sugar, and salt in a large mixing bowl. Add the cold butter cubes and use a pastry cutter or your fingertips to work the butter into the flour until the mixture resembles coarse breadcrumbs with some pea-sized butter pieces remaining. These butter chunks are what create those beautiful flaky layers in your pumpkin hand pies.
In a small bowl, whisk together the egg, cold milk, and apple cider vinegar. The vinegar might seem unusual, but it helps tenderize the dough and adds a subtle tang that balances the sweet filling. Drizzle this mixture over the flour and butter, then use a fork to gently bring everything together. Don’t overmix – you want to see some streaks of butter still visible.
Turn the dough out onto a lightly floured surface and gently knead it just a few times until it comes together. Divide the dough in half, shape each portion into a flat disk, wrap tightly in plastic wrap, and refrigerate for at least one hour. This resting period allows the gluten to relax and the butter to firm up, making the dough easier to roll and ensuring flaky pumpkin pastries.
Creating the Spiced Pumpkin Filling
While the dough chills, prepare your pumpkin filling. This step is quick and easy, but it’s where the magic of these pumpkin pop tarts truly comes alive.
In a medium saucepan over medium heat, combine the pumpkin puree, brown sugar, cornstarch, cinnamon, ginger, nutmeg, cloves, and salt. Stir constantly for about 5-7 minutes until the mixture thickens significantly. You’ll know it’s ready when it pulls away from the sides of the pan and holds its shape when you draw a spoon through it.
Remove from heat and stir in the vanilla extract. Transfer the pumpkin filling to a bowl and let it cool completely before using. This cooling step is crucial – warm filling will make your pastry soggy and difficult to work with. I usually make the filling the night before I plan to assemble my pumpkin breakfast pastries.
Assembling Your Homemade Pumpkin Pop Tarts
This is where your pumpkin pop tarts really start to take shape, and I find this part particularly enjoyable. It’s almost meditative, working with the dough and seeing each pastry come together.
Preheat your oven to 350°F (175°C) and line two baking sheets with parchment paper. Remove one disk of dough from the refrigerator and let it sit for about 5 minutes to soften slightly – this makes rolling easier.
On a lightly floured surface, roll the dough to about ⅛-inch thickness. Using a sharp knife or pizza cutter, cut the dough into rectangles approximately 3×4 inches. You should get about 8-10 rectangles from each disk of dough. Gather and re-roll scraps as needed, though the first rolling always produces the flakiest pumpkin hand pies.
Place half of the rectangles on your prepared baking sheets, spacing them about 2 inches apart. These will be your bottoms. Spoon about 1½ tablespoons of the cooled pumpkin filling onto the center of each rectangle, leaving a ½-inch border around the edges. Don’t overfill – trust me, I learned this lesson the hard way when my first batch oozed filling all over the baking sheet!
Brush the exposed edges with beaten egg, then carefully place a second rectangle of dough over each filled bottom. Press the edges firmly to seal, then use a fork to crimp all around the perimeter. This crimped edge not only looks beautiful but also ensures your pumpkin pop tarts stay sealed during baking.
Use a sharp knife to cut 3-4 small slits in the top of each pastry to allow steam to escape. Brush the entire surface with egg wash and sprinkle generously with coarse sugar. If you want an extra touch of autumn flavor, mix a pinch of cinnamon with the sugar before sprinkling.
Baking Your Pumpkin Breakfast Pastries to Perfection
Slide your assembled pumpkin pop tarts into the preheated oven and bake for 25-30 minutes, until they’re golden brown and the edges are crispy. The aroma that fills your kitchen during baking is absolutely intoxicating – warm pumpkin spices mixed with buttery pastry is the essence of autumn comfort.
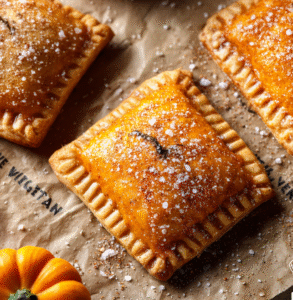
When you pull them from the oven, the pastries will look absolutely stunning. The golden-orange tops glisten with that sparkly sugar coating, and if you look closely at the images of these beauties, you can see exactly what you’re aiming for: a perfectly golden exterior with visible crimped edges, delicate steam vents on top, and that gorgeous sparkle from the coarse sugar. The cross-section reveals layers of flaky pastry surrounding a thick, smooth pumpkin filling that holds its shape beautifully.
Let the pumpkin hand pies cool on the baking sheet for 5 minutes before transferring to a wire rack. They’re delicious warm, but I actually prefer them after they’ve cooled for about 15 minutes – the filling sets up perfectly and the contrast between the crispy pastry and tender filling is ideal.
Nutritional Information for Pumpkin Pop Tarts
While these pumpkin pop tarts are certainly a treat, they’re not as indulgent as you might think, especially compared to store-bought versions. Here’s the approximate nutritional breakdown per pastry:
- Calories: 285
- Total Fat: 15g
- Saturated Fat: 9g
- Cholesterol: 65mg
- Sodium: 280mg
- Total Carbohydrates: 35g
- Dietary Fiber: 2g
- Sugars: 12g
- Protein: 4g
The pumpkin filling adds beneficial vitamin A, fiber, and antioxidants to these pumpkin breakfast pastries, making them a more nutritious option than many commercial breakfast items. You’re also controlling the sugar content, which I appreciate greatly.
Presentation Tips for Stunning Pumpkin Pastries
The beauty of these pumpkin pop tarts lies in their rustic, homemade charm. Here are my favorite ways to present them:
For Casual Breakfasts: Simply stack them on a plate and serve alongside fresh coffee or tea. The visual appeal of those golden tops with their sugar sparkle needs no enhancement.
For Brunch Gatherings: Arrange your pumpkin hand pies on a wooden cutting board with small bowls of maple syrup or vanilla glaze for dipping. Add fresh apple slices and a few cinnamon sticks for decoration.
For Special Occasions: Create a beautiful tiered display on a cake stand. Place a small card describing the homemade pumpkin pop tarts, and consider offering them alongside other autumn pastries like apple turnovers or cinnamon rolls.
For Gift-Giving: Wrap individual pumpkin breakfast pastries in parchment paper, tie with twine, and attach a small tag. They make wonderful neighbor gifts or teacher appreciation treats.
The photograph shows exactly how appealing these pastries look when plated – the way the light catches that sugar topping, the golden-brown color that promises buttery flavor, and those perfectly crimped edges that show the care put into making them.
Perfect Pairings for Pumpkin Pop Tarts
These versatile pumpkin pastries pair beautifully with various beverages and complementary foods:
Beverage Pairings:
- Spiced chai latte or pumpkin spice latte
- Strong black coffee or espresso
- Apple cider (hot or cold)
- Vanilla rooibos tea
- Creamy hot chocolate
Complementary Foods:
- Crispy bacon or turkey sausage for a sweet-savory breakfast
- Greek yogurt with honey and granola
- Fresh fruit salad with apples, pears, and grapes
- Scrambled eggs with fresh herbs
- Whipped cream cheese spread
For an elegant autumn brunch, I love serving these pumpkin pop tarts alongside a spread that includes both sweet and savory elements. The contrast makes each component shine.
Creative Variations and Substitutions for Pumpkin Hand Pies
One of the joys of mastering these pumpkin pop tarts is experimenting with variations:
Filling Variations:
- Add ½ cup of chocolate chips to the pumpkin filling for a decadent twist
- Mix in ¼ cup of chopped pecans or walnuts for crunch
- Replace half the pumpkin with sweet potato puree
- Add a layer of cream cheese filling beneath the pumpkin layer
- Stir in a tablespoon of maple syrup for deeper sweetness
Topping Variations:
- Drizzle cooled pumpkin breakfast pastries with a simple glaze made from powdered sugar and milk
- Top with a cream cheese frosting
- Sprinkle with pumpkin pie spice instead of cinnamon
- Add a handful of pepitas (pumpkin seeds) to the sugar topping
- Brush with maple syrup instead of egg wash before baking
Dietary Modifications:
- Use coconut oil or vegan butter for dairy-free pumpkin pastries
- Replace the egg in the dough with a flax egg (1 tablespoon ground flaxseed mixed with 3 tablespoons water)
- Use gluten-free flour blend for the pastry (though texture will differ)
- Reduce sugar in the filling by one-third for less sweet versions
- Use whole wheat pastry flour for half the all-purpose flour for added nutrition
Storage and Make-Ahead Tips for Pumpkin Pop Tarts
These pumpkin hand pies store beautifully, which makes them perfect for meal prep:
Short-Term Storage: Keep cooled pumpkin pop tarts in an airtight container at room temperature for up to 3 days. Layer them between sheets of parchment paper to prevent sticking.
Refrigeration: For longer storage, refrigerate in an airtight container for up to one week. Reheat in a toaster or 350°F oven for 5-7 minutes to restore crispness.
Freezing: These pumpkin breakfast pastries freeze exceptionally well. Place cooled pastries on a baking sheet and freeze until solid, then transfer to a freezer bag with parchment between layers. Freeze for up to 3 months. Reheat from frozen in a 350°F oven for 15-20 minutes.
Make-Ahead Assembly: You can assemble unbaked pumpkin pop tarts and freeze them before baking. When ready to bake, add 5-10 minutes to the baking time. This is my favorite method for having fresh pastries on busy mornings.
Troubleshooting Your Pumpkin Pastries
If your first batch doesn’t turn out perfectly, don’t worry! Here are solutions to common issues:
Soggy Bottoms: Ensure your filling is completely cool before assembling. You can also blind-bake the bottom rectangles for 5 minutes before adding filling.
Filling Leaks: Don’t overfill your pumpkin hand pies, and ensure edges are well-sealed with egg wash before pressing together.
Tough Pastry: Handle the dough minimally and don’t overmix. Keep ingredients cold throughout the process.
Uneven Browning: Rotate your baking sheet halfway through baking. Make sure your oven temperature is accurate by using an oven thermometer.
Pale Color: Increase oven temperature by 25°F or brush with a more generous amount of egg wash before baking.
The Joy of Homemade Pumpkin Pop Tarts
Creating these pumpkin pop tarts from scratch is more than just following a recipe – it’s about bringing warmth, comfort, and the essence of autumn into your kitchen. Every time I make these, I’m reminded why homemade always beats store-bought. The aroma, the flavor, the texture, and yes, even the slight imperfections that prove they were made with love – all of these elements combine to create something truly special.
The beauty of this recipe is that it’s forgiving enough for beginners yet satisfying for experienced bakers. Whether you’re making them for a special breakfast, packing them in lunchboxes, or sharing them with friends over coffee, these pumpkin breakfast pastries never fail to impress.
Looking at that beautiful cross-section in the photograph, where you can see the layers of flaky pastry embracing the smooth pumpkin filling, I’m reminded of why I fell in love with this recipe. It’s the perfect marriage of texture and flavor, of rustic charm and elegant taste.
My Final Tips for Perfect Pumpkin Hand Pies
After making countless batches of these pumpkin pop tarts, here’s my most valuable advice: don’t rush the process. Yes, they take time, but most of that is passive chilling and cooling time. The actual hands-on work is quite manageable and even enjoyable once you get into a rhythm.
I recommend making these on a lazy weekend morning when you can savor the process. Put on some music, pour yourself a cup of coffee, and embrace the therapeutic nature of working with pastry dough. The crimping motion becomes almost meditative, and there’s something deeply satisfying about creating neat rows of uniform pumpkin pastries ready for the oven.
Also, don’t be afraid to get your family involved, especially kids. They love crimping the edges with a fork and sprinkling on that sparkly sugar. It’s a wonderful way to create memories while teaching basic baking skills.
Remember, practice makes perfect. Your first batch might not look bakery-perfect, but they’ll still taste absolutely delicious. By your third or fourth batch, you’ll have the process down and will be turning out pumpkin pop tarts that look as professional as they taste.
The most important thing is to enjoy both the making and the eating. These pumpkin breakfast pastries represent the best of home baking – simple ingredients transformed through care and technique into something that brings joy with every bite. Happy baking!