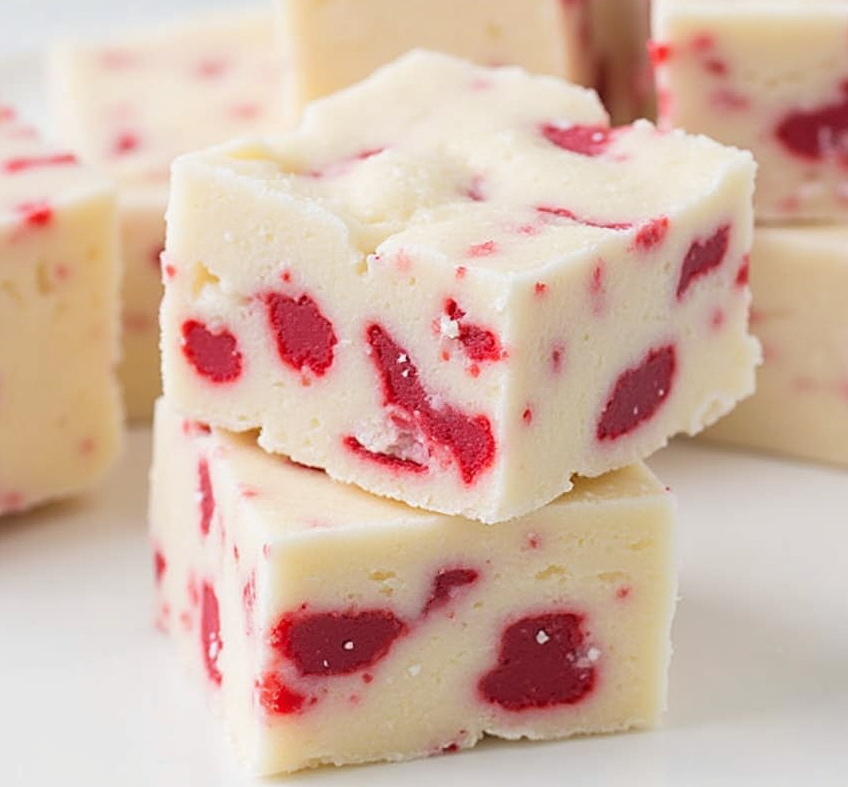
There’s something about the holiday season that brings out my experimental side in the kitchen. After more than a decade of creating and perfecting confectionery recipes, I’ve found that homemade fudge holds a special place in people’s hearts—especially when it looks as stunning as this Winter White Red Velvet Fudge. The striking contrast between creamy white chocolate and vibrant red velvet swirls not only creates a gorgeous presentation but delivers a flavor combination that keeps everyone coming back for “just one more piece.”
Why This Red Velvet Fudge Stands Out
Most red velvet desserts rely on a chocolate cake base with food coloring, but this fudge takes a different approach. By marbling semi-sweet chocolate with white chocolate, we create a complex flavor profile that’s reminiscent of traditional red velvet while maintaining the smooth, creamy texture that makes great fudge so irresistible.
What I love most about this recipe is its versatility. While I call it “Winter White Red Velvet Fudge” because it’s perfect for holiday gatherings with its festive colors, I’ve found it’s equally appreciated for Valentine’s Day, Fourth of July celebrations (paired with a blue-tinted white chocolate fudge), or really any occasion that calls for something sweet and impressive.
Ingredients You’ll Need
- 3 cups white granulated sugar
- ¾ cup butter (1½ sticks)
- ⅔ cup half and half cream
- 12 oz white chocolate chips (about 2 cups)
- 1 jar (7 oz) marshmallow fluff
- 1 teaspoon pure vanilla extract
- 1 cup semi-sweet chocolate chips (6 oz)
- 3 tablespoons red liquid food coloring (or enough gel food coloring to achieve a vibrant red)
Equipment Notes
Before diving into the process, let me share a few important equipment tips I’ve learned the hard way:
- Use a VERY large microwave-safe bowl for the main mixture. Trust me on this—the mixture expands dramatically during cooking, and cleaning marshmallow fluff from the inside of your microwave is not how you want to spend your afternoon (yes, I speak from experience).
- Have a medium bowl ready for the red portion of the fudge.
- Choose your pan size carefully. An 8×10 or 9×9-inch pan works perfectly for this recipe, creating pieces with the ideal thickness. If you use a larger pan, your fudge will be thinner; smaller, and it will be quite thick (which means longer setting time).
Step-by-Step Process
Preparation
- Line your 9×9-inch or 8×10-inch baking dish with aluminum foil, extending the foil over the edges (this makes removal incredibly easy later). Lightly grease the foil with butter or cooking spray.
- In a medium bowl, combine the semi-sweet chocolate chips and red food coloring. If using gel coloring, you’ll need less than the 3 tablespoons recommended for liquid coloring. Set this aside for now—we’ll come back to it.
Making the Fudge Base
- Place your butter in a large microwave-safe bowl. I can’t emphasize enough how important it is to use a bowl that’s at least twice the volume you think you’ll need—this mixture expands dramatically!
- Microwave the butter on high for about 1½ minutes until completely melted.
- Add the sugar and half-and-half cream to the melted butter, stirring until combined. The mixture will look somewhat grainy at this point, which is perfectly normal.
- Now comes the cooking process. This is where attention to detail makes all the difference in achieving that perfect fudge texture:
- Microwave on high for 3 minutes, then remove and stir thoroughly.
- Return to microwave for 2 minutes, remove and stir again, making sure to scrape down the sides of the bowl.
- Microwave for another 3 minutes, remove and stir.
- Finally, microwave for 2½ minutes more.
- Remove from the microwave and immediately stir in the marshmallow fluff and vanilla extract. This can take some muscle—the fluff is sticky and the mixture is hot, but keep at it until everything is well incorporated.
- Add the white chocolate chips and stir continuously until they’re completely melted and the mixture is smooth. The residual heat should melt the chips; if they’re not melting completely, you can return the bowl to the microwave for 15-second intervals, stirring between each.
Creating the Red Velvet Swirl
- Transfer about half of this white chocolate mixture into the bowl with the prepared semi-sweet chocolate chips and red food coloring.
- Stir this red mixture vigorously until the chocolate is completely melted and the color is evenly distributed. You’re looking for a deep, vibrant red that contrasts beautifully with the white portion.
Assembly and Marbling
- Working quickly before the fudge starts to set, drop alternate spoonfuls of the white and red mixtures into your prepared pan. No need to be precise—the beauty of this fudge comes from its organic marbling pattern.
- Once all the fudge is in the pan, gently tap the pan against your counter a few times to remove air bubbles and help level the surface.
- Using a butter knife or the back of a spoon, swirl the two colors together using a figure-eight or zigzag motion. The key here is restraint—you want distinct swirls of red and white, not a completely blended pink mixture.
- If needed, smooth the top with an offset spatula or the back of a spoon.
Setting and Cutting
- Refrigerate the fudge until completely firm, at least 4 hours but preferably overnight. Patience pays off here—cutting too soon can result in a messy experience.
- Once set, lift the fudge out of the pan using the foil overhang and transfer to a cutting board.
- With a sharp knife, cut into squares. I find it helpful to clean the knife between cuts for the neatest presentation. I typically aim for 1-inch squares since this fudge is quite rich.
- Store the cut fudge in an airtight container in the refrigerator, as it tends to soften at room temperature.
Troubleshooting Tips From Years of Fudge-Making
After making countless batches of fudge over the years, I’ve encountered nearly every possible issue. Here are some solutions to common problems:
If Your Fudge Doesn’t Set Properly:
The most common reason for soft fudge is not cooking the sugar mixture long enough. Microwave powers vary, so you might need to add an additional 30 seconds to 1 minute to your total cooking time. If you’ve already poured your fudge and it’s not setting, don’t despair! You can transform it into an amazing ice cream topping.
If Your Fudge Is Too Grainy:
Grainy fudge usually results from sugar crystals forming during the cooling process. To prevent this, avoid stirring the fudge once you’ve poured it into the pan, and make sure all your sugar dissolved during the cooking process.
If Your White Chocolate Won’t Melt Smoothly:
Quality matters when it comes to white chocolate. Look for chips or bars that contain cocoa butter rather than vegetable oils. If your white chocolate seems resistant to melting, add a teaspoon of neutral oil (like vegetable oil) to help it along.
Flavor Variations I’ve Perfected
While the classic Winter White Red Velvet Fudge is spectacular on its own, I’ve developed some variations over the years that have become equally popular:
Peppermint Red Velvet Fudge
Add ½ teaspoon peppermint extract to the white portion and sprinkle crushed candy canes on top before the fudge sets. This creates a refreshing twist that’s perfect for Christmas.
Raspberry White Chocolate Fudge
Replace the red food coloring with 3 tablespoons of strained raspberry puree (which will give a natural pink color) and add ¼ teaspoon of raspberry extract to the red portion for a fruit-forward variation.
Cream Cheese Red Velvet Fudge
For an authentic red velvet cake experience, add 2 tablespoons of softened cream cheese to the white portion before swirling. This adds a subtle tanginess that complements the sweetness beautifully.
Making It Ahead and Gifting
One of the reasons I keep coming back to this recipe year after year is how perfect it is for gifting. The fudge can be made up to two weeks in advance if kept refrigerated, which makes it ideal for holiday preparation.
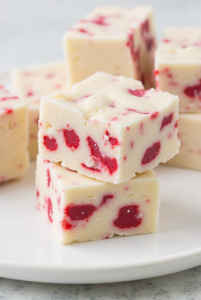
For gift-giving, I cut the fudge into squares and place them in small paper cups inside decorative tins or boxes. A ribbon and personalized tag complete the presentation. I’ve found that people are always impressed by homemade candy, especially when it looks this professional.
Why This Recipe Works Every Time
What makes this Winter White Red Velvet Fudge so reliable comes down to a few key factors:
- The marshmallow fluff acts as a stabilizer, helping to prevent sugar crystallization and ensuring a smooth, creamy texture.
- The precise cooking times allow the sugar to reach the perfect temperature without the need for a candy thermometer, making this accessible even for beginners.
- The combination of white and semi-sweet chocolate creates a balanced sweetness that prevents the fudge from becoming cloying, as can happen with white chocolate alone.
The beautiful marbling isn’t just for show—it provides varied flavor experiences in each bite, with some areas more creamy and vanilla-forward, while others deliver that hint of chocolate that makes red velvet so beloved.
Perfect Occasions for Winter White Red Velvet Fudge
While I originally created this recipe for winter holiday gatherings, I’ve found it’s versatile enough for year-round enjoyment:
- Valentine’s Day celebrations: The red and white color scheme is naturally romantic
- Christmas cookie exchanges: Stands out among the typical cookie offerings
- Bridal showers: Especially when the wedding colors include red
- Game day parties: Cut into smaller pieces for a sweet finger food
- Gift baskets: Pairs beautifully with coffee or tea gifts
Final Thoughts
What began as an experiment in my kitchen has become one of my signature recipes, requested by friends and family year after year. There’s something magical about the contrast between the smooth, creamy white chocolate and the vibrant red swirls that makes this fudge not just delicious, but memorable.
While it might look complicated, the recipe is surprisingly straightforward once you understand the steps. The key is allowing yourself the time to work methodically and having patience during the setting process. The reward—a professional-looking confection that tastes even better than it looks—is well worth the effort.
Whether you’re an experienced candy maker or trying homemade fudge for the first time, this Winter White Red Velvet Fudge is sure to become a staple in your recipe collection. Just be prepared for the requests for “your famous fudge” that will inevitably follow once people have had their first taste!