The Perfect Raspberry Cheesecake: Creamy, Dreamy, and Surprisingly Easy
There’s something magical about a perfectly executed cheesecake. That first forkf ul – where the creamy filling meets the buttery crust, and a burst of fruity sweetness ties everything together – it’s an experience that can turn an ordinary day into something special. And when that cheesecake features the bright, slightly tangy flavor of fresh raspberries? Well, that’s when dessert becomes downright unforgettable.
I’ve been perfecting this Raspberry Cheesecake recipe for years, ever since my grandmother shared her secret technique with me over a decade ago. What started as a special occasion dessert has become my go-to whenever I want to impress guests or simply treat my family to something extraordinary. The best part? While it looks and tastes like it came from a high-end bakery, it’s surprisingly achievable in your own kitchen.
Why This Raspberry Cheesecake Stands Above the Rest
Before we dive into the recipe, let me share why this particular cheesecake deserves a spot in your dessert rotation:
- The perfect balance: The slight tartness of raspberries perfectly balances the rich, creamy cheesecake filling
- Foolproof method: My step-by-step technique helps prevent common cheesecake issues like cracks and sinkholes
- Make-ahead friendly: Actually tastes better when made a day in advance, perfect for entertaining
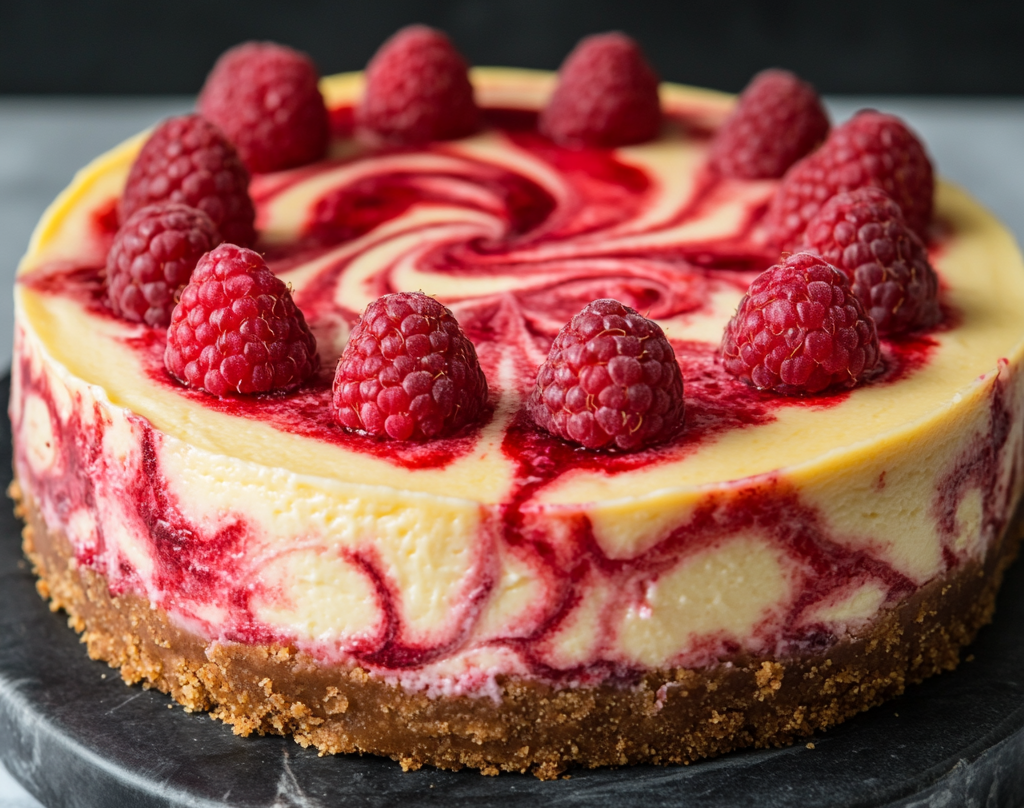
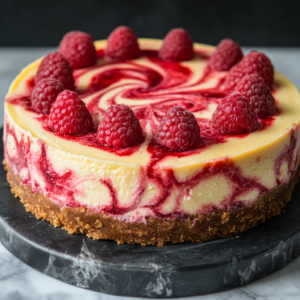
- Impressive presentation: The vibrant red raspberry topping creates a stunning dessert that’s Instagram-worthy
- Versatile recipe: Can be adapted for different occasions and seasons with simple modifications
Let me walk you through creating this showstopper dessert, with all the tips and tricks I’ve learned along the way.
Ingredients for the Perfect Raspberry Cheesecake
For the Graham Cracker Crust:
- 2 cups graham cracker crumbs (about 15-16 full sheets, finely crushed)
- 1/3 cup granulated sugar
- 1/2 cup (1 stick) unsalted butter, melted
- Pinch of salt
For the Cheesecake Filling:
- 4 packages (8 oz each) cream cheese, at room temperature (this is non-negotiable!)
- 1 1/4 cups granulated sugar
- 1/2 cup sour cream, at room temperature
- 2 teaspoons pure vanilla extract
- 1 tablespoon fresh lemon juice
- 5 large eggs, at room temperature
- 1 cup fresh raspberries, plus more for topping
Raspberry Swirl (optional but recommended):
- 1 cup fresh or frozen raspberries
- 3 tablespoons granulated sugar
- 1 tablespoon water
- 1 teaspoon lemon juice
Raspberry Topping:
- 2 cups fresh raspberries
- 1/2 cup granulated sugar
- 2 tablespoons cornstarch
- 1/4 cup water
- 1 tablespoon lemon juice
- Pinch of salt
Essential Equipment
To create cheesecake perfection, you’ll need:
- 9-inch springform pan
- Large roasting pan (for water bath)
- Heavy-duty aluminum foil
- Electric mixer (stand mixer is preferable, but hand mixer works too)
- Food processor (for crust and raspberry puree)
- Fine mesh sieve (for straining raspberry seeds)
- Instant-read thermometer (optional but helpful)
Detailed Instructions
Preparing Your Ingredients (Day Before or Morning Of)
Take note! The secret to a smooth, crack-free cheesecake starts before you even turn on the oven. Here’s what to do:
- Set ingredients out early: Place cream cheese, sour cream, and eggs on the counter at least 2 hours before baking (or overnight in the refrigerator if making the next day). Room temperature ingredients incorporate smoothly without overmixing, which is crucial for perfect texture.
- Prepare your pan: Grease the sides and bottom of your springform pan. Some bakers like to line the bottom with parchment paper for extra insurance against sticking.
Making the Graham Cracker Crust (15 minutes)
- Preheat your oven to 325°F (165°C).
- Crush graham crackers in a food processor until you have fine crumbs. If you don’t have a food processor, place them in a zip-top bag and crush with a rolling pin.
- Mix the crust ingredients: In a medium bowl, combine the graham cracker crumbs, sugar, melted butter, and salt. Stir until the mixture resembles wet sand and holds together when pressed.
- Press into the pan: Transfer the mixture to your prepared springform pan. Using the bottom of a measuring cup, press the crumbs firmly into the bottom and about 1-1.5 inches up the sides of the pan. The flat bottom of the measuring cup creates an even, well-packed crust.
- Pre-bake the crust: Bake for 10 minutes, then remove from the oven and let cool while you prepare the filling. This step ensures a crisp, never-soggy crust.
Creating the Raspberry Swirl (if using) (10 minutes)
- Make the puree: In a small saucepan, combine 1 cup raspberries, 3 tablespoons sugar, water, and lemon juice. Bring to a simmer over medium heat and cook for about 5 minutes, until berries break down.
- Strain the mixture: Press through a fine-mesh sieve to remove seeds. This step is worth the effort – no one wants seeds in their silky cheesecake! Set aside to cool while you make the filling.
Preparing the Cheesecake Filling (20 minutes)
- Beat the cream cheese: In the bowl of a stand mixer fitted with the paddle attachment (or in a large bowl using a hand mixer), beat the cream cheese on medium-low speed until completely smooth and free of lumps, about 2 minutes. Scrape down the sides and bottom of the bowl several times during this process.
- Add the sugar: Gradually add the sugar and continue beating until smooth and creamy, about 1-2 minutes. The mixture should look satiny without any graininess.
- Mix in the flavorings: Add the sour cream, vanilla extract, and lemon juice. Beat on low speed just until combined.
- Add eggs one at a time: This is crucial! Add the eggs one at a time, beating on low speed just until each is incorporated. After you add the last egg, stop mixing as soon as it’s blended in. Overmixing after adding eggs can incorporate too much air, leading to cracks.
- Fold in whole raspberries: Gently fold in 1 cup of fresh raspberries using a rubber spatula. Be careful not to crush them – you want gorgeous berry pieces throughout the cheesecake.
Assembly and Baking (1 hour 15 minutes, plus cooling)
- Prepare the water bath: Wrap the outside of your springform pan with a double layer of heavy-duty aluminum foil, bringing it all the way up the sides. This prevents water from seeping into your crust. Place the wrapped pan in a larger roasting pan.
- Fill the crust: Pour half of the cheesecake filling over the pre-baked crust. If using the raspberry swirl, dollop half of the cooled raspberry puree randomly over the surface and swirl with a knife or skewer. Add remaining filling and repeat with remaining puree if desired.
- Add hot water: Place the roasting pan with the cheesecake in the oven, then carefully pour hot water into the roasting pan until it reaches about halfway up the sides of the springform pan.
- Bake with care: Bake at 325°F for 1 hour and 15 minutes, or until the edges are set but the center still has a slight jiggle (about 3-4 inches in diameter). The internal temperature should reach about 150°F if you’re using a thermometer.
- Cool gradually: Turn off the oven, crack the door open, and let the cheesecake cool in the oven for 1 hour. This slow cooling prevents the dramatic temperature change that can cause cracks.
- Continue cooling: After an hour, remove the cheesecake from the water bath and place on a cooling rack. Run a thin knife around the edge of the pan to loosen the cheesecake (another crack-prevention technique). Let cool completely at room temperature, about 2-3 hours.
Making the Raspberry Topping (15 minutes, plus setting time)
- Prepare the topping: In a medium saucepan, combine 1 cup of the raspberries, sugar, cornstarch, water, lemon juice, and salt. Bring to a simmer over medium heat, stirring constantly until the mixture thickens, about 3-5 minutes.
- Add fresh berries: Remove from heat and gently stir in the remaining 1 cup of fresh raspberries. Let cool for about 15 minutes.
- Top the cheesecake: Spread the raspberry topping over the cooled cheesecake. Refrigerate for at least 4 hours, but preferably overnight.
Serving Your Masterpiece
After the cheesecake has thoroughly chilled (patience is a virtue!), it’s time to unveil your creation:
- Prepare for slicing: Run a large, sharp knife under hot water and dry it. The warm knife will glide through the cheesecake cleanly.
- Release from the pan: Carefully remove the sides of the springform pan. If the cake seems stuck, run a thin knife or offset spatula around the edges again.
- Slice and serve: Cut into slices, wiping the knife clean between cuts for picture-perfect slices. Serve as is, or with a dollop of whipped cream and additional fresh raspberries for garnish.
Storage and Make-Ahead Tips
One of the best things about cheesecake is that it actually improves with a little time:
- Refrigerator storage: Covered cheesecake will keep in the refrigerator for up to 5 days. The flavor often deepens and improves after the first day.
- Freezer friendly: Cheesecake freezes beautifully! Freeze the whole cake or individual slices, tightly wrapped, for up to 2 months. Thaw overnight in the refrigerator before serving.
- Make-ahead game plan: For entertaining, make this cheesecake 1-2 days in advance. The flavors will meld beautifully, and you’ll have one less thing to worry about on the day of your gathering.
Troubleshooting Common Cheesecake Issues
Even experienced bakers encounter challenges with cheesecake. Here’s how to solve the most common problems:
Problem: Cracks on the surface Solution: Don’t worry if your cheesecake cracks – the raspberry topping will cover it! For future cheesecakes, ensure you’re using room temperature ingredients, not overmixing after adding eggs, using a water bath, and cooling gradually.
Problem: Water leaked into the crust Solution: Make sure to use heavy-duty foil and wrap it carefully. For extra insurance, some bakers place the springform pan inside a slightly larger cake pan before putting it in the water bath.
Problem: Filling seems too runny Solution: Ensure your cream cheese is at room temperature before beginning. Cold cream cheese can lead to overmixing, which introduces too much air. Also, make sure you’re using full-fat cream cheese – low-fat versions contain more water.
Problem: Cheesecake sinks in the middle Solution: This usually indicates underbaking. Next time, give it a little longer in the oven. The center should still jiggle slightly but not look wet or unset.
Delicious Variations to Try
Once you’ve mastered this classic raspberry cheesecake, consider these creative twists:
White Chocolate Raspberry
Add 8 ounces of melted white chocolate to the cheesecake batter. The creamy sweetness pairs beautifully with the tart berries.
Chocolate Cookie Crust
Substitute chocolate graham crackers or chocolate sandwich cookies for the regular graham crackers in the crust for a chocolate-berry combination.
Lemon-Raspberry
Increase the lemon juice to 3 tablespoons and add 1 tablespoon of lemon zest to the filling for a bright, citrusy note.
Individual Mini Cheesecakes
Use a muffin tin lined with paper liners to create individual servings – perfect for parties! Adjust baking time to about 20-25 minutes.
Nutritional Information (Approximate per slice, based on 12 slices)
- Calories: 480-520 per slice
- Fat: 32-35g
- Carbohydrates: 45-48g
- Protein: 7-9g
- Fiber: 2-3g
The Science Behind Perfect Cheesecake
Understanding the “why” behind cheesecake techniques helps you become a better baker. Here’s what’s happening:
- Room temperature ingredients: Cold cream cheese contains lumps that never fully incorporate, no matter how long you beat it. Room temperature ingredients blend seamlessly.
- Minimal mixing after adding eggs: Eggs trap air when overmixed, which expands during baking and then contracts during cooling, causing cracks.
- Water bath baking: Creates a humid environment and regulates temperature, allowing for gentle, even heating that prevents the eggs in the filling from overcooking.
- Gradual cooling: Sudden temperature changes cause rapid contraction, leading to cracks. Cooling in the turned-off oven allows the cheesecake to gradually adjust.
Final Thoughts and Serving Ideas
This Raspberry Cheesecake isn’t just a dessert – it’s a celebration. I’ve served it for birthdays, anniversaries, holiday gatherings, and sometimes just because it’s Tuesday and we need something special.
For a truly memorable presentation, try these serving ideas:
- Create a dessert board with the cheesecake as the centerpiece, surrounded by fresh berries, chocolate-dipped strawberries, and small cookies
- Serve with a raspberry sauce drizzle and a sprig of fresh mint
- For adults, pair with a glass of Champagne or a ruby port
- Set up a topping bar with whipped cream, chocolate sauce, and different berries for guests to customize their slices
However you choose to serve it, this Raspberry Cheesecake is sure to become part of your family’s dessert legacy, just as it has become part of mine. The looks of pure delight as people take their first bite make every step of this recipe absolutely worth it.