I have a confession to make. I hate doing dishes after a dessert project. Pans, springform rings, water baths — after a long week, the last thing I want is an hour of washing up following my own dinner party. That’s exactly why these strawberry dessert cups have become my secret weapon.
No oven No bake time No complicated cleanup. Just individual, stunning little cups of layered cheesecake, fresh strawberries, and a buttery crunchy base that you can make in under 25 minutes — and they look like something out of a fancy patisserie.
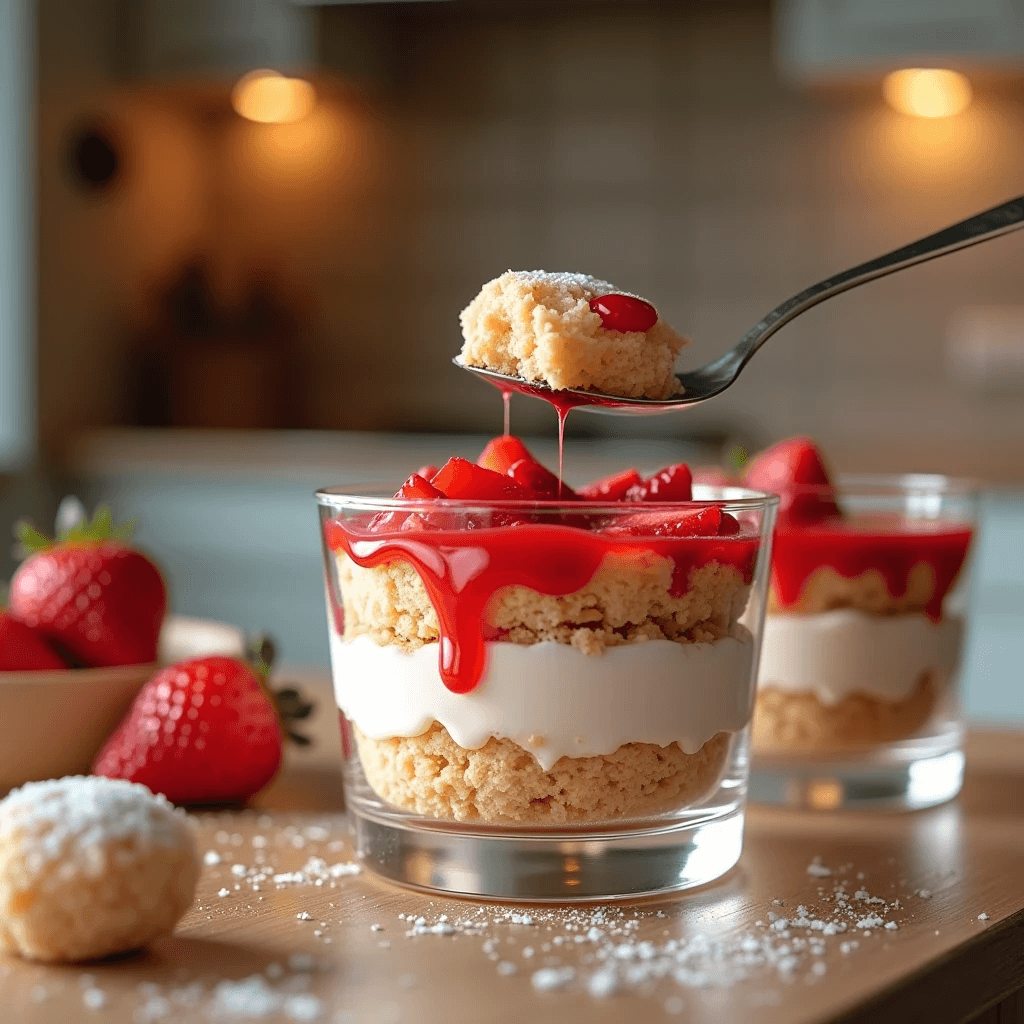
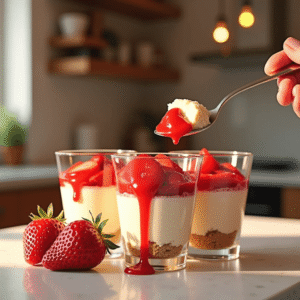
The inspiration for these cups is those gorgeous clear glasses you see in the photos: a golden cookie crust on the bottom, a thick layer of silky cream cheese filling in the middle, and a pile of glossy strawberries in a deep red sauce on top — plus a dramatic drizzle of strawberry glaze being poured from a spoon, capturing that perfect food-styling moment. They are absolutely beautiful on a dessert table, and even better to eat.
Let’s make them.
Why These Strawberry Dessert Cups Are a Game-Changer
Strawberry dessert cups (also called strawberry cheesecake parfaits or mini cheesecake cups) hit every mark. They’re individual, so there’s no messy slicing. They’re portable — perfect for outdoor parties, picnics, potlucks, and buffets. They can be made 24 hours in advance. And because you can see all the layers through the clear cups, they look absolutely stunning without any decorating skill required.
This is the dessert you make when you want to impress without the stress.
Ingredients for Strawberry Dessert Cups
(Makes 8–10 cups)
Cookie Crust Layer:
- 2 cups (200g) graham cracker crumbs (or crushed digestive biscuits)
- 1/4 cup (50g) granulated sugar (optional)
- 5 tablespoons (70g) unsalted butter, melted
Creamy Cheesecake Filling:
- 450g (16 oz) full-fat cream cheese, softened to room temperature
- 1 can (300ml) sweetened condensed milk
- 2 teaspoons pure vanilla extract
- 2 tablespoons fresh lemon juice
- 1/2 cup (120ml) heavy whipping cream, whipped to stiff peaks (optional, for a lighter filling)
Strawberry Topping:
- 400g (about 2 1/2 cups) fresh strawberries, hulled and halved
- 3 tablespoons granulated sugar
- 1 tablespoon lemon juice
- 1 teaspoon cornstarch dissolved in 1 tablespoon water
Garnish:
- Whipped cream (homemade or store-bought)
- Fresh whole strawberries
- Optional: a drizzle of extra strawberry sauce
Step-by-Step Instructions for Strawberry Dessert Cups
Prepare the Cookie Crust Layer
In a medium bowl, combine the graham cracker crumbs, optional sugar, and melted butter. Stir until all the crumbs are evenly coated and the mixture holds together when pressed. Divide evenly among your serving glasses, pressing down firmly with the back of a spoon or the base of a small glass to create a compact, level crust layer. Refrigerate while you prepare the filling.
Make the Cheesecake Filling
In a large mixing bowl, beat the softened cream cheese with an electric mixer until completely smooth and fluffy, about 2 minutes. There should be zero lumps — this is crucial for a beautiful filling.
Add the sweetened condensed milk and beat until fully incorporated and creamy. Stir in the vanilla extract and lemon juice. If you’re using whipped cream, fold it in gently at this stage for a lighter, mousse-like texture.
Taste the filling — it should be sweet, creamy, with a slight tang. Adjust with a little more lemon juice or vanilla to your preference.
Make the Strawberry Topping
Combine the halved strawberries, sugar, and lemon juice in a medium saucepan over medium heat. Cook, stirring gently, until the strawberries soften and release their juices, about 5–7 minutes. Stir in the cornstarch slurry and cook for another 1–2 minutes until the sauce becomes thick and glossy, coating the strawberries beautifully. Remove from heat and cool to room temperature before using.
Assemble the Strawberry Dessert Cups
This is the fun part — and it’s where the magic happens.
Remove your glasses from the refrigerator. Spoon a generous layer of the cream cheese filling over the crust — fill the glasses about halfway. Tap each glass gently on the counter to release any air bubbles and level the filling. Spoon the strawberry topping over the cream filling, letting it pool beautifully on top. Finish with a swirl of whipped cream and a fresh strawberry for garnish.
Refrigerate for at least 1 hour before serving (2+ hours for best results). The filling firms up beautifully and the flavors meld together into something magical.
Presentation Tips for Strawberry Dessert Cups
- Use clear glasses or cups to show off all the beautiful layers. Tumblers, wine glasses, mason jars, and even clear plastic party cups all work beautifully.
- Piped whipped cream: Use a piping bag with a star tip for a professional, polished top.
- Garnish last-minute: Add the fresh strawberry and whipped cream garnish just before serving for the freshest, most appealing look.
- Drizzle effect: Keep a small amount of extra strawberry sauce warm in a small pitcher for tableside drizzling — guests will love it.
Nutritional Values (Per Cup, Based on 10 Servings)
| Nutrient | Amount |
|---|---|
| Calories | ~380 kcal |
| Total Fat | 22g |
| Saturated Fat | 13g |
| Carbohydrates | 40g |
| Sugars | 30g |
| Protein | 6g |
| Fiber | 1g |
| Sodium | 220mg |
Food and Wine Pairings
- Strawberry lemonade: Refreshing and complementary — the citrus cuts through the richness of the cream cheese filling.
- Crémant d’Alsace: A French sparkling white wine with fine bubbles and apple-pear notes that play wonderfully with the strawberry.
- Chai tea: The warm spices in chai create a surprising and delightful contrast with the cold, creamy cups.
Recipe Variations and Substitutions
- Oreo base: Swap the graham crackers for crushed Golden Oreos for a more buttery, cookie-forward crust.
- Lighter version: Use reduced-fat cream cheese and Greek yogurt in place of half the cream cheese for a lighter filling.
- Tropical twist: Replace the strawberry topping with mango puree and diced mango for a tropical variation.
- Chocolate layer: Add a thin layer of chocolate ganache over the crust before adding the cream cheese filling.
- Kids’ version: Layer the cups with crumbled biscuits, vanilla pudding, and sliced strawberries for a child-friendly shortcut version.
- Vegan: Use dairy-free cream cheese and coconut condensed milk for a fully plant-based option.
Notes & FAQs
Can I make these cups the night before? Absolutely — in fact, they’re better the next day! The crust softens just slightly and the filling becomes even more set and creamy. Just hold off on the whipped cream garnish until serving time.
What glasses work best? Any clear vessel works — wine glasses, rocks glasses, mason jars, or clear plastic cups for casual events. For parties, 8–12 oz clear cups with lids (available on Amazon) are perfect for portability and presentation.
Can I freeze these cups? Yes, but without the fresh strawberry topping and whipped cream garnish. Freeze the filled cups (crust + cheesecake layer only) for up to 1 month. Thaw in the refrigerator overnight and add the strawberry topping before serving.
My filling is lumpy — what do I do? Lumpy filling means the cream cheese wasn’t at full room temperature before mixing. For next time, leave it out for at least 2 hours. If you already have lumps, pass the filling through a fine-mesh sieve before spooning into cups.
Conclusion
Strawberry dessert cups are the answer to every occasion where you want something beautiful, delicious, and genuinely easy. They require no oven, no special skills, and no complicated technique — just fresh ingredients, a little patience while things chill, and the pleasure of watching people’s faces light up when you set one of these gorgeous cups in front of them.
My personal tip: always make two more than you think you need. These go fast, and the saddest thing in the world is watching someone look longingly at the last cup that someone else is already eating.
Make them the night before, keep them in the fridge, and enjoy the stress-free hosting win.