Red Velvet Cake Recipe
My grandmother’s red velvet cake was legendary in our family. Every birthday, every celebration, that distinctive crimson layer cake would appear, covered in cream cheese frosting so good people would scrape the plate clean. When she passed, she left me her handwritten recipe card, splattered with batter stains and smudged from years of use. Making her red velvet cake connects me to her memory, and now I’m sharing this treasured recipe with you, along with everything I’ve learned about creating the perfect version.
The Fascinating History of Red Velvet Cake
Before diving into the recipe, let’s talk about what makes red velvet cake special. Originally, the “red” in red velvet came from a chemical reaction between cocoa powder and acidic ingredients like buttermilk and vinegar. This reaction produced a subtle reddish-brown color.
During the Great Depression, Adams Extract Company began marketing red food coloring specifically for this cake, and the bright red version we know today was born. The Waldorf-Astoria Hotel in New York popularized it further, and it became a Southern classic.
However, what truly defines red velvet cake isn’t just the color—it’s the unique texture and subtle chocolate flavor combined with tangy cream cheese frosting. The cake should be tender, moist, and fine-crumbed, with a flavor that’s hard to categorize but impossible to forget.
Essential Ingredients for Red Velvet Cake
For the Cake:
- 2½ cups all-purpose flour
- 1½ cups granulated sugar
- 1 teaspoon baking soda
- 1 teaspoon salt
- 2 tablespoons unsweetened cocoa powder
- 1½ cups vegetable oil
- 1 cup buttermilk, room temperature
- 2 large eggs, room temperature
- 2 tablespoons red food coloring (liquid, not gel)
- 1 teaspoon white vinegar
- 1 teaspoon vanilla extract
For the Cream Cheese Frosting:
- 16 oz cream cheese, softened
- 1 cup unsalted butter, softened
- 4 cups powdered sugar, sifted
- 2 teaspoons vanilla extract
- Pinch of salt
Optional Garnish:
- Red velvet cake crumbs
- Freeze-dried strawberries, crushed
Step-by-Step Instructions for Perfect Red Velvet Cake
Preparing Your Pans and Ingredients
First, preheat your oven to 350°F (175°C). Grease two 9-inch round cake pans thoroughly with butter or non-stick spray, then line the bottoms with parchment paper circles. This double protection ensures your cakes release perfectly.
Next, bring all refrigerated ingredients to room temperature. This step is critical—cold ingredients don’t emulsify properly, resulting in a dense, uneven cake. I set everything out about an hour before baking.
Mixing the Red Velvet Cake Batter
In a large bowl, sift together flour, sugar, baking soda, salt, and cocoa powder. Sifting isn’t just about removing lumps—it aerates the dry ingredients, contributing to that signature tender crumb.
In a separate bowl, whisk together oil, buttermilk, eggs, food coloring, vinegar, and vanilla. The mixture will look alarmingly red, and that’s exactly right. Don’t reduce the food coloring thinking it’s too much—you need that amount for the classic appearance.
Create a well in the center of your dry ingredients. Pour the wet mixture into this well, then use a whisk to gradually incorporate the flour from the sides. Stir just until combined—overmixing develops gluten, making your red velvet cake tough instead of tender.
The batter should be thin and pourable, almost liquid. This is normal and contributes to the cake’s moisture.
Baking Your Red Velvet Cake Layers
Divide the batter evenly between your prepared pans. I use a kitchen scale for precision, but you can also eyeball it. Tap each pan firmly on the counter a few times to release air bubbles.
Bake for 28-32 minutes, or until a toothpick inserted in the center comes out with just a few moist crumbs. The cakes should spring back when lightly pressed. Watch them carefully toward the end—overbaking is the enemy of moist cake.
Let the cakes cool in their pans for 10 minutes, then turn them out onto wire racks. Remove the parchment paper and let them cool completely. This takes at least an hour. I know it’s tempting to frost warm cake, but resist—warm cake + buttercream = disaster.
Making Perfect Cream Cheese Frosting
While your cakes cool, prepare the frosting. Ensure your cream cheese and butter are genuinely soft—not melted, not cold, but yielding to gentle pressure. In my experience, this is the single most important factor in smooth frosting.
Beat the cream cheese and butter together on medium speed for about 3 minutes until fluffy and well combined. Scrape down the bowl frequently. Add the vanilla and salt, mixing briefly.
Reduce your mixer to low speed and gradually add the sifted powdered sugar, about one cup at a time. Once all the sugar is incorporated, increase speed to medium-high and beat for 2-3 minutes until the frosting is light and fluffy.
The consistency should be spreadable but not runny. If it’s too soft, refrigerate for 15-20 minutes. If too stiff, add a tablespoon of heavy cream.
Assembling Your Red Velvet Cake
Place one cake layer on your serving plate or cake stand. If the top is domed, use a serrated knife to level it—this creates stable, professional-looking layers.
Spread about 1½ cups of frosting over this first layer, creating an even coating all the way to the edges. Place the second layer on top, flat side up. Gently press down to secure.
Apply a thin layer of frosting over the entire cake—this is called a crumb coat. It seals in loose crumbs so your final frosting layer looks pristine. Refrigerate for 30 minutes to set this crumb coat.
Finally, apply your remaining frosting generously over the entire cake. I use an offset spatula for smooth sides and top, but a butter knife works too. Create swirls or keep it smooth—both look beautiful.
Decorating Your Red Velvet Cake
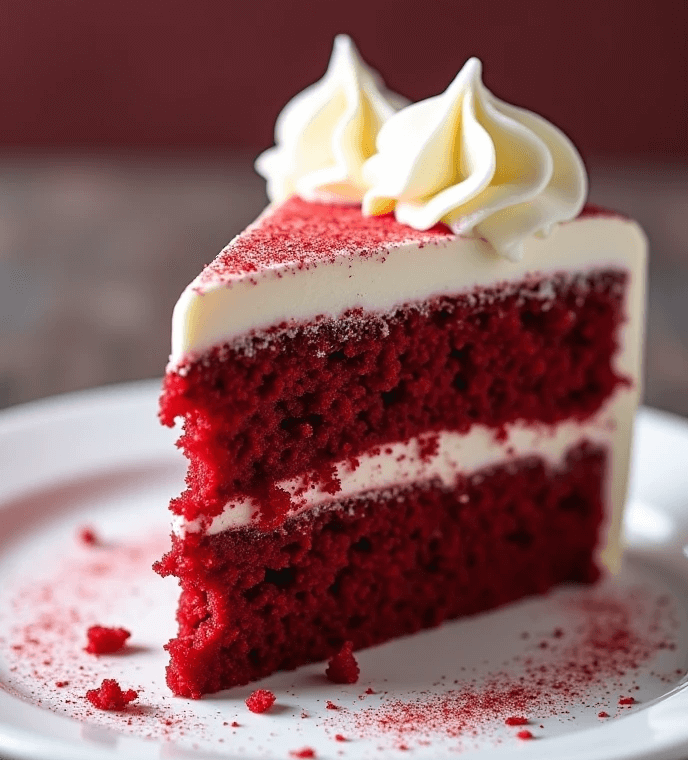
The image shows an elegant presentation with cream cheese frosting piped in graceful swirls on top and crushed red velvet cake crumbs scattered across the surface. This technique is simpler than it looks.
Save some cake scraps from leveling your layers (or deliberately trim a bit off). Let them dry out for an hour, then crumble them with your fingers. These ruby-red crumbs add visual interest and announce the cake’s flavor before anyone takes a bite.
For the frosting swirls, transfer some frosting to a piping bag fitted with a large star tip. Pipe decorative rosettes or shells around the top edge. The contrast between smooth frosted sides and textured piped details looks professional.
Alternatively, keep the decoration simple. A smooth frosted exterior with a gentle dusting of cake crumbs is classic and beautiful.
Pro Tips for Red Velvet Cake Success
Through years of making this recipe, I’ve discovered several tricks that elevate results from good to spectacular. First, use liquid food coloring, not gel. Gel colorings are too concentrated and can affect the batter’s texture. You need the old-fashioned liquid variety.
Second, don’t skip the vinegar. It reacts with the baking soda, creating tiny air bubbles that contribute to the tender crumb. It also enhances the subtle chocolate flavor.
Third, use actual buttermilk, not milk with vinegar added. Real buttermilk has thickness and tanginess that homemade substitutes can’t replicate.
Fourth, soften your cream cheese and butter properly. Microwaving them creates uneven softening and can cause the frosting to separate. Leave them at room temperature for 2-3 hours instead.
Storage and Make-Ahead Instructions
Red velvet cake actually improves after a day in the refrigerator. The flavors meld, and the texture becomes even more tender. Store covered in the refrigerator for up to five days. Bring to room temperature before serving—cold cake doesn’t showcase the texture properly.
You can also freeze unfrosted cake layers for up to three months. Wrap each layer tightly in plastic wrap, then aluminum foil. Thaw in the refrigerator overnight before assembling and frosting.
The frosting also freezes well. Store in an airtight container for up to two months. Thaw in the refrigerator, then re-whip briefly before using.
Nutritional Information per Slice (12 servings)
- Calories: 685
- Total Fat: 42g
- Saturated Fat: 18g
- Cholesterol: 115mg
- Sodium: 420mg
- Total Carbohydrates: 74g
- Dietary Fiber: 1g
- Sugars: 58g
- Protein: 6g
Serving Suggestions and Occasions
Red velvet cake is inherently celebratory. The dramatic red interior revealed when you slice through the white frosting never fails to impress. I’ve served this at weddings, birthdays, Valentine’s Day dinners, and Christmas celebrations.
For an extra-special presentation, serve slices on white plates with a small pool of raspberry sauce beside them. The color combination is stunning. Fresh berries alongside each slice add freshness that cuts through the richness.
This cake pairs beautifully with coffee—the slight bitterness complements the sweet frosting. For beverages, consider champagne or sparkling wine for celebrations, or a glass of cold milk for nostalgic comfort.
Wine Pairing for Red Velvet Cake
While coffee is classic, wine pairing opens interesting possibilities. A late-harvest Riesling offers sweetness that matches the frosting while its acidity balances the richness. The wine’s stone fruit notes complement the subtle chocolate.
Port wine, particularly ruby port, creates an elegant pairing. The wine’s richness stands up to the cream cheese frosting, and the color coordination is visually appealing.
For something unexpected, try a sweet sparkling Brachetto d’Acqui. This lightly fizzy Italian red wine has notes of strawberries and roses that work beautifully with red velvet cake.
Common Red Velvet Cake Mistakes
Through my baking journey, I’ve made every possible mistake with this recipe. Let me help you avoid them. First, don’t open the oven door during the first 25 minutes of baking. The temperature drop can cause the cakes to sink in the middle.
Second, avoid using gel food coloring. I tried it once thinking it would create deeper color, and the batter became gummy and weird. Stick with liquid.
Third, don’t frost warm cake. I know I’ve mentioned this already, but it’s worth repeating. Warm cake makes frosting melt and slide off, creating a messy disaster instead of a beautiful dessert.
Fourth, don’t skip sifting the powdered sugar for the frosting. Unsifted sugar creates lumpy frosting that looks unprofessional.
Variations on Classic Red Velvet Cake
Once you’ve mastered the classic version, experimenting with variations keeps things interesting. Try these ideas:
Red Velvet Cupcakes: Divide the batter among 24 cupcake liners. Bake at 350°F for 18-20 minutes. These are perfect for parties and easier to serve than cake slices.
Red Velvet Cheesecake: Add a layer of cheesecake filling between the cake layers for extraordinary decadence.
Red Velvet Brownies: Pour the batter into a 9×13 pan for fudgy, cake-like brownies. Top with cream cheese frosting.
Chocolate Ganache Version: Replace half the cream cheese frosting with chocolate ganache for chocolate lovers.
The Perfect Red Velvet Cake Texture
When you cut into a properly made red velvet cake, you should see a tender, fine-grained crumb that’s moist but not gummy. The red color should be vibrant throughout, not faded or streaky.
Looking at the image, notice how the interior reveals that gorgeous red crumb structure. The layers are even and level, showing careful baking and assembly. The cream cheese frosting between layers is thick enough to stay put but not so thick it squeezes out the sides.
The slice in the image shows perfect cake-to-frosting ratio—plenty of that tangy frosting coating the tender red layers, with decorative piped swirls on top. The crushed red velvet crumbs scattered across the surface add texture and visual interest.
This is what you’re aiming for: a show-stopping dessert that tastes as incredible as it looks.
Red Velvet Cake Recipe | Classic Southern Dessert with Cream
Description
The Fascinating History of Red Velvet Cake
Before diving into the recipe, let’s talk about what makes red velvet cake special. Originally, the “red” in red velvet came from a chemical reaction between cocoa powder and acidic ingredients like buttermilk and vinegar. This reaction produced a subtle reddish-brown color.
During the Great Depression, Adams Extract Company began marketing red food coloring specifically for this cake, and the bright red version we know today was born. The Waldorf-Astoria Hotel in New York popularized it further, and it became a Southern classic.
However, what truly defines red velvet cake isn’t just the color—it’s the unique texture and subtle chocolate flavor combined with tangy cream cheese frosting. The cake should be tender, moist, and fine-crumbed, with a flavor that’s hard to categorize but impossible to forget.
Ingredients
Essential Ingredients for Red Velvet Cake
For the Cake:
- 2½ cups all-purpose flour
- 1½ cups granulated sugar
- 1 teaspoon baking soda
- 1 teaspoon salt
- 2 tablespoons unsweetened cocoa powder
- 1½ cups vegetable oil
- 1 cup buttermilk, room temperature
- 2 large eggs, room temperature
- 2 tablespoons red food coloring (liquid, not gel)
- 1 teaspoon white vinegar
- 1 teaspoon vanilla extract
For the Cream Cheese Frosting:
- 16 oz cream cheese, softened
- 1 cup unsalted butter, softened
- 4 cups powdered sugar, sifted
- 2 teaspoons vanilla extract
- Pinch of salt
Optional Garnish:
- Red velvet cake crumbs
- Freeze-dried strawberries, crushed
Instructions
First, preheat your oven to 350°F (175°C). Grease two 9-inch round cake pans thoroughly with butter or non-stick spray, then line the bottoms with parchment paper circles. This double protection ensures your cakes release perfectly.
Next, bring all refrigerated ingredients to room temperature. This step is critical—cold ingredients don’t emulsify properly, resulting in a dense, uneven cake. I set everything out about an hour before baking.
In a large bowl, sift together flour, sugar, baking soda, salt, and cocoa powder. Sifting isn’t just about removing lumps—it aerates the dry ingredients, contributing to that signature tender crumb.
In a separate bowl, whisk together oil, buttermilk, eggs, food coloring, vinegar, and vanilla. The mixture will look alarmingly red, and that’s exactly right. Don’t reduce the food coloring thinking it’s too much—you need that amount for the classic appearance.
Create a well in the center of your dry ingredients. Pour the wet mixture into this well, then use a whisk to gradually incorporate the flour from the sides. Stir just until combined—overmixing develops gluten, making your red velvet cake tough instead of tender.
The batter should be thin and pourable, almost liquid. This is normal and contributes to the cake’s moisture.
Divide the batter evenly between your prepared pans. I use a kitchen scale for precision, but you can also eyeball it. Tap each pan firmly on the counter a few times to release air bubbles.
Bake for 28-32 minutes, or until a toothpick inserted in the center comes out with just a few moist crumbs. The cakes should spring back when lightly pressed. Watch them carefully toward the end—overbaking is the enemy of moist cake.
Let the cakes cool in their pans for 10 minutes, then turn them out onto wire racks. Remove the parchment paper and let them cool completely. This takes at least an hour. I know it’s tempting to frost warm cake, but resist—warm cake + buttercream = disaster.
While your cakes cool, prepare the frosting. Ensure your cream cheese and butter are genuinely soft—not melted, not cold, but yielding to gentle pressure. In my experience, this is the single most important factor in smooth frosting.
Beat the cream cheese and butter together on medium speed for about 3 minutes until fluffy and well combined. Scrape down the bowl frequently. Add the vanilla and salt, mixing briefly.
Reduce your mixer to low speed and gradually add the sifted powdered sugar, about one cup at a time. Once all the sugar is incorporated, increase speed to medium-high and beat for 2-3 minutes until the frosting is light and fluffy.
The consistency should be spreadable but not runny. If it’s too soft, refrigerate for 15-20 minutes. If too stiff, add a tablespoon of heavy cream.
Place one cake layer on your serving plate or cake stand. If the top is domed, use a serrated knife to level it—this creates stable, professional-looking layers.
Spread about 1½ cups of frosting over this first layer, creating an even coating all the way to the edges. Place the second layer on top, flat side up. Gently press down to secure.
Apply a thin layer of frosting over the entire cake—this is called a crumb coat. It seals in loose crumbs so your final frosting layer looks pristine. Refrigerate for 30 minutes to set this crumb coat.
Finally, apply your remaining frosting generously over the entire cake. I use an offset spatula for smooth sides and top, but a butter knife works too. Create swirls or keep it smooth—both look beautiful.
The image shows an elegant presentation with cream cheese frosting piped in graceful swirls on top and crushed red velvet cake crumbs scattered across the surface. This technique is simpler than it looks.
Save some cake scraps from leveling your layers (or deliberately trim a bit off). Let them dry out for an hour, then crumble them with your fingers. These ruby-red crumbs add visual interest and announce the cake’s flavor before anyone takes a bite.
For the frosting swirls, transfer some frosting to a piping bag fitted with a large star tip. Pipe decorative rosettes or shells around the top edge. The contrast between smooth frosted sides and textured piped details looks professional.
Alternatively, keep the decoration simple. A smooth frosted exterior with a gentle dusting of cake crumbs is classic and beautiful.
Through years of making this recipe, I’ve discovered several tricks that elevate results from good to spectacular. First, use liquid food coloring, not gel. Gel colorings are too concentrated and can affect the batter’s texture. You need the old-fashioned liquid variety.
Second, don’t skip the vinegar. It reacts with the baking soda, creating tiny air bubbles that contribute to the tender crumb. It also enhances the subtle chocolate flavor.
Third, use actual buttermilk, not milk with vinegar added. Real buttermilk has thickness and tanginess that homemade substitutes can’t replicate.
Fourth, soften your cream cheese and butter properly. Microwaving them creates uneven softening and can cause the frosting to separate. Leave them at room temperature for 2-3 hours instead.
Red velvet cake actually improves after a day in the refrigerator. The flavors meld, and the texture becomes even more tender. Store covered in the refrigerator for up to five days. Bring to room temperature before serving—cold cake doesn’t showcase the texture properly.
You can also freeze unfrosted cake layers for up to three months. Wrap each layer tightly in plastic wrap, then aluminum foil. Thaw in the refrigerator overnight before assembling and frosting.
The frosting also freezes well. Store in an airtight container for up to two months. Thaw in the refrigerator, then re-whip briefly before using.