There’s something about the first bite of a properly made lamington that instantly transports me back to my grandmother’s kitchen. The soft sponge, the rich coating, the delicate balance of textures – it’s a dessert that has stood the test of time for good reason. But after years of making traditional chocolate lamingtons, I stumbled upon a game-changing variation that I simply can’t stop sharing: Raspberry Lamingtons.
These vibrant, ruby-red treats have all the nostalgic charm of the original but with a fresh, fruity twist that makes them perfect for everything from afternoon tea to special celebrations. After perfecting this recipe through countless iterations (and happily subjecting friends and family to taste-testing duty), I’m thrilled to share my definitive guide to creating these show-stopping raspberry lamingtons at home.
The Fascinating History of Lamingtons
Before diving into our raspberry variation, let’s appreciate the rich heritage behind this beloved treat. Lamingtons originated in Australia in the late 19th century and were named after Lord Lamington, who served as Governor of Queensland from 1896 to 1901. The classic version consists of squares of sponge cake coated in chocolate and rolled in desiccated coconut.
According to popular lore, the creation was somewhat accidental – a kitchen maid accidentally dropped the governor’s favorite sponge cake into melted chocolate, and to avoid waste, it was rolled in coconut to make it easier to handle. Whether this story is apocryphal or accurate, lamingtons have become an iconic part of Australian culinary heritage and have spread to dessert plates worldwide.
Why Raspberry Lamingtons Deserve Your Attention
Traditional chocolate lamingtons will always have their place, but raspberry lamingtons offer several compelling advantages:
- Visual Impact: The vibrant red color creates an immediate wow factor that chocolate versions simply can’t match. They’re particularly stunning on holiday tables or at Valentine’s Day celebrations.
- Balanced Flavor Profile: The natural tartness of raspberries cuts through the sweetness of the cake and icing, creating a more complex and satisfying flavor experience.
- Seasonal Versatility: While they shine during raspberry season, these lamingtons can be made year-round using frozen berries or quality raspberry preserves.
- Conversation Starter: Even those familiar with traditional lamingtons are often delighted to discover this fruity variation, making them perfect for gatherings where you want to spark conversation.
After experimenting with various berry flavors over the years, raspberries consistently deliver the most vibrant color and the perfect balance of sweetness and acidity. The slight tang of raspberries also pairs beautifully with the rich coconut coating in a way that other berries simply don’t.
Mastering the Perfect Sponge Cake Base
The foundation of any great lamington is an excellent sponge cake. After numerous tests, I’ve found that a slightly more substantial sponge works better for raspberry lamingtons than the ultra-light traditional version. This is because the raspberry coating can be more liquid than chocolate, requiring a cake that won’t dissolve upon contact.
The Ideal Sponge Recipe
Ingredients:
- 1 cup (250g) unsalted butter, softened
- 1 cup (220g) caster sugar
- 1 teaspoon vanilla extract
- 4 large eggs, at room temperature
- 2 cups (300g) self-raising flour
- 1/2 cup (120ml) milk
- 1/4 teaspoon salt
Method:
- Preparation: Preheat your oven to 350°F (180°C). Line a 9-inch square baking pan with parchment paper, leaving overhang on the sides for easy removal.
- Creaming: Beat butter and sugar until pale and fluffy – this takes about 5 minutes with an electric mixer. Don’t rush this step, as it incorporates air for a lighter texture.
- Adding Eggs: Add eggs one at a time, beating well after each addition. If the mixture looks like it’s curdling, add a tablespoon of your measured flour.
- Incorporating Dry Ingredients: Sift the flour and salt together, then fold into the butter mixture alternately with the milk, starting and ending with flour. This method prevents overmixing while ensuring all ingredients are well incorporated.
- Baking: Pour the batter into your prepared pan and smooth the top. Bake for 25-30 minutes until golden and a skewer inserted in the center comes out clean.
- Cooling: Allow the cake to cool in the pan for 10 minutes, then use the parchment paper to lift it out onto a wire rack to cool completely.
The Critical Aging Step
Here’s a professional secret that makes a massive difference: after your cake has cooled completely, wrap it in plastic wrap and let it sit at room temperature overnight. This “aging” process allows the crumb structure to settle and firm up slightly, making the cake much easier to cut into neat squares and dip without crumbling.
If you’re short on time, you can place the wrapped cake in the refrigerator for 2 hours, but the overnight rest at room temperature yields superior results.
Creating the Perfect Raspberry Coating
The magical raspberry coating is what transforms this from an ordinary sponge cake into something special. There are two approaches to creating this coating, and I’ll share both so you can choose based on your preferences and available ingredients.
Method 1: Fresh Raspberry Coating (Preferred)
Ingredients:
- 3 cups (375g) fresh or frozen raspberries
- 2 1/2 cups (300g) confectioners’ sugar
- 2 tablespoons cornstarch
- 2 tablespoons lemon juice
- 1/4 teaspoon salt
- 3 cups (225g) desiccated coconut for coating
Method:
- Place raspberries in a medium saucepan over medium heat. Cook, stirring occasionally, until the berries break down and release their juices (about 5-7 minutes).
- Press the cooked raspberries through a fine-mesh sieve into a bowl, using a spoon to extract as much liquid as possible while leaving the seeds behind. You should have approximately 1 cup of raspberry puree.
- Return the strained puree to the saucepan over low heat. Whisk in the confectioners’ sugar, cornstarch, lemon juice, and salt until completely smooth.
- Continue cooking, stirring constantly, until the mixture thickens slightly – about 2-3 minutes. It should coat the back of a spoon but still be fluid enough for dipping.
- Transfer to a bowl and allow to cool to room temperature before using. The mixture will continue to thicken as it cools.
Method 2: Quick Raspberry Coating
Ingredients:
- 1/2 cup (160g) good quality raspberry jam
- 2 cups (240g) confectioners’ sugar
- 2-3 tablespoons hot water
- Few drops of red food coloring (optional, for more vibrant color)
- 3 cups (225g) desiccated coconut for coating
Method:
- In a medium bowl, whisk together the raspberry jam and confectioners’ sugar.
- Gradually add hot water, one tablespoon at a time, until you reach a smooth, pourable consistency that will coat the back of a spoon.
- If using, add a few drops of red food coloring to achieve a vibrant raspberry color.
While the fresh raspberry method takes more time, it delivers a significantly more authentic flavor and naturally beautiful color. The jam-based method works in a pinch but lacks some of the brightness and depth of the fresh version.
The Assembly Process: Tips for Perfect Execution
Assembling lamingtons can be messy, but with these professional tips, you’ll achieve bakery-worthy results:
- Cutting the Cake: Use a serrated knife to cut your cooled (and preferably aged) cake into 16 equal squares. Clean the knife between cuts for the neatest edges.
- Freezing Step: Place the cut squares on a baking sheet lined with parchment paper and freeze for 30 minutes. This firming-up makes them much easier to handle during dipping.
- Dipping Station Setup: Create an efficient assembly line with your raspberry coating in one bowl, desiccated coconut in another (a wide, shallow bowl works best), and a wire rack set over parchment paper for the finished lamingtons.
- The Dipping Technique: Using two forks, gently lower a cake square into the raspberry coating. Quickly roll it to coat all sides, then lift it out, allowing excess coating to drip off.
- Coconut Coating: Transfer the coated square to the coconut bowl and use your hands to gently press coconut onto all sides. Place on the wire rack to set.
- Setting Time: Allow the completed lamingtons to set for at least 2 hours at room temperature (or 1 hour in the refrigerator) before serving.
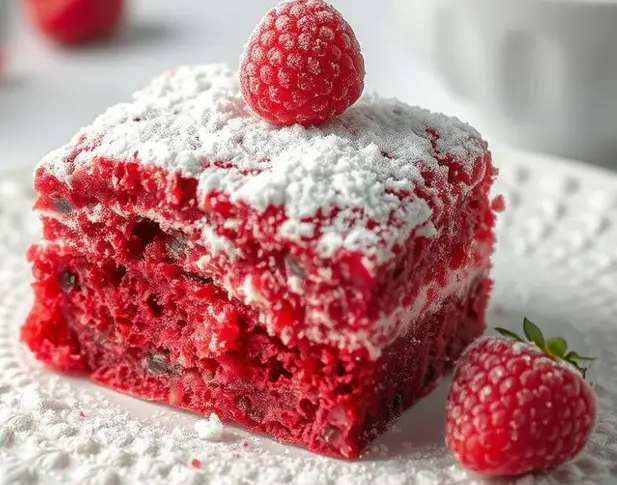
- Finishing Touch: For the presentation seen in the image, dust with a light coating of confectioners’ sugar and top each lamington with a fresh raspberry just before serving.
Troubleshooting Common Challenges
Even experienced bakers encounter occasional issues with lamingtons. Here are solutions to the most common problems:
Problem: Coating is Too Thick
If your raspberry coating becomes too thick for smooth dipping, gently warm it over low heat, stirring constantly, or add warm water a teaspoon at a time until you reach the proper consistency.
Problem: Cake Crumbles During Dipping
This typically happens when the cake hasn’t been properly chilled or aged. Return squares to the freezer for 15-20 minutes and try again. Also, make sure your coating isn’t too hot, as this can cause the cake to break apart.
Problem: Coconut Won’t Stick Evenly
If coconut isn’t adhering properly, your coating may be too runny. Allow it to set slightly before continuing, or add a bit more confectioners’ sugar to thicken.
Problem: Uneven Color
For the most consistent color, make sure to fully immerse each cake square and rotate it quickly in the coating. Don’t let the squares sit too long in the liquid or they’ll become soggy.
Creative Variations to Explore
Once you’ve mastered the basic raspberry lamington, consider these exciting variations:
White Chocolate Drizzle
After your lamingtons have set, drizzle with melted white chocolate for a beautiful contrast and complementary flavor.
Cream-Filled Luxury
Cut each cake square horizontally and fill with sweetened whipped cream before reassembling and coating. These should be consumed within 24 hours.
Mixed Berry Version
Substitute a mixture of raspberries, strawberries, and blackberries for a more complex berry flavor profile.
Coconut Alternatives
While traditional desiccated coconut is classic, you can experiment with toasted coconut or even finely chopped pistachios for the outer coating.
Make-Ahead and Storage Recommendations
Raspberry lamingtons actually improve after resting for a day, as the flavors meld and the moisture from the coating softens the cake slightly. Here’s how to store them properly:
- Room Temperature: Store in an airtight container for up to 3 days.
- Refrigerator: If filled with cream or during hot weather, store refrigerated for up to 5 days.
- Freezer: Unfilled lamingtons freeze beautifully for up to 3 months. Thaw overnight in the refrigerator.
For gifting or transport, place each lamington in a paper cupcake liner inside a sturdy container to prevent them from sticking together.
Perfect Pairings for Serving
These vibrant raspberry lamingtons deserve thoughtful accompaniments. Consider serving with:
- A pot of Earl Grey or English Breakfast tea
- Vanilla bean ice cream for dessert
- Fresh berries and mint
- A glass of sparkling rosé for special occasions
The Emotional Connection: Why Lamingtons Matter
Food is rarely just about sustenance – it’s about connection, memory, and shared experience. Lamingtons hold a special place in many hearts because they represent care and craftsmanship. They’re not quick to make, suggesting they were prepared with thought and love.
My own journey with raspberry lamingtons began when I was looking to brighten a friend’s difficult day. The traditional chocolate version seemed too ordinary for the occasion, so I experimented with this raspberry variation. The joy on her face when presented with these vibrant treats was worth every minute spent in the kitchen.
Since then, raspberry lamingtons have become my signature offering for special occasions, requested at baby showers, holiday gatherings, and anytime a little color and sweetness is needed. They’ve become more than just a recipe – they’re a way to show care through baking.
Final Thoughts
Creating perfect raspberry lamingtons takes time and patience, but the results are truly worth the effort. There’s something deeply satisfying about transforming simple ingredients into such a visually stunning and delicious treat.
Whether you’re an experienced baker looking to expand your repertoire or a novice seeking a project that will impress, these raspberry lamingtons deliver on all fronts. The vibrant color, balanced flavor, and nostalgic form combine to create a dessert that honors tradition while embracing innovation.
I hope this recipe brings as much joy to your kitchen as it has to mine. Happy baking!