How a Burnt Garlic Disaster and a Forgotten Date NightLed Me to My All-Time Favorite Chicken Recipe
Let me take you back to a Tuesday three years ago. I was trying to impress a new-ish boyfriend (now husband, thank goodness) with what I claimed was my “signature chicken dish.” Picture this: me, a wine glass in one hand, a phone propped up on the stove following a “30-minute gourmet chicken” video, and smoke alarm screaming its head off. The garlic was black charcoal, the chicken was rubbery, and we ended up ordering pizza on the floor, surrounded by the ghost of ruined dinner plans. He was a good sport, but I was mortified. That was the moment I realized my “talents” were limited to scrambled eggs and toast.
That failure sparked a little kitchen revolution for me. I decided I needed ONE reliable, impressive, actually delicious chicken recipe that I could make without panic. Something vibrant, healthy, and foolproof enough for a weeknight but fancy enough for guests. After dozens of trials (and yes, a few more burnt offerings), I found it. This lemon garlic chicken recipe didn’t just save my dinner nights; it became my culinary confidence booster. And the best part? It pairs beautifully with a fantastic homemade pickled vegetables guide I discovered along the way, which adds the most incredible tangy crunch. This dish is the reason my husband now volunteers to do the dishes. No joke.
So, grab a glass of something (water, wine, I’m not judging), and let me walk you through the meal that transformed my kitchen from a disaster zone into my happy place.
Materials & Supplies
Alright, friend, let’s get our mise en place on. Having everything ready is 90% of the battle with this dish. Here’s your team:
For the Lemon Garlic Chicken:
Boneless, Skinless Chicken Thighs: 4 (about 1.5 lbs). Trust me on thighs. They’re juicier, more forgiving, and have way more flavor than breasts. If you must use breasts, reduce the cooking time by 2 minutes per side.*
Fresh Lemons: 2. You’ll need juice from both and zest from one. Zest first, then juice! It’s a game-changer you’ll thank me for.*
Garlic: 1 entire head. Yes, a whole head. We’re not shy here. About 8-10 cloves, minced. Pro tip: smash the clove with your knife blade first—it peels like a dream and releases more oils.*
- Olive Oil: Good quality, about ¼ cup.
Chicken Broth: ½ cup, low-sodium. Or use veggie broth, or even white wine if you’re feeling fancy.*
Dried Oregano & Thyme: 1 tsp each. Dried is fine here; the long simmer lets it bloom.*
- Salt & Freshly Cracked Black Pepper: The usual suspects, but don’t skimp on the pepper.
Butter or a Butter-Olive Oil Blend: 2 tbsp, for finishing. This makes the sauce silky and luxurious.*
The Secret Weapon – Quick Pickles (Inspired by a Great Homemade Pickled Vegetables Guide):
Veggies: 1 cup total of your favorites. I use sliced radishes, cucumber sticks, and red onion. Watermelon rind is amazing if you can find it!*
- Vinegar: ½ cup white wine or rice vinegar.
- Water: ½ cup.
- Sugar: 1 tbsp.
- Salt: 1 tsp.
- Optional Crunch Add-ins: A few peppercorns, a sliced garlic clove, a sprig of dill.
Tools You’ll Need:
- A large, heavy-bottomed skillet or fry pan (oven-safe if you want to finish it in the oven for extra goldenness).
- A small bowl for your pickling brine.
- A jar or container for the pickles.
- A zester/microplane (for the lemon zest!).
- A meat thermometer (optional but helpful for perfect chicken).
Timing / Cooking Schedule

Let’s be real about clock time:
- Prep Time: 15 minutes (mostly chopping garlic, juicing lemons, slicing veggies for pickles).
- Cook Time: 20-25 minutes.
- Total Time: 35-40 minutes from start to finish.
Honestly, the first time I made this, it took me double this time! I was fumbling with the zester, over-checking the chicken, and almost forgot the pickles. Now, I can have the pickles in their jar and the chicken in the pan in under 10 minutes flat. The active cooking is super hands-on for the first 8 minutes, then it’s mostly simmering and stirring. Perfect for getting a side of rice or a simple salad ready while it finishes.
Step-by-Step Instructions
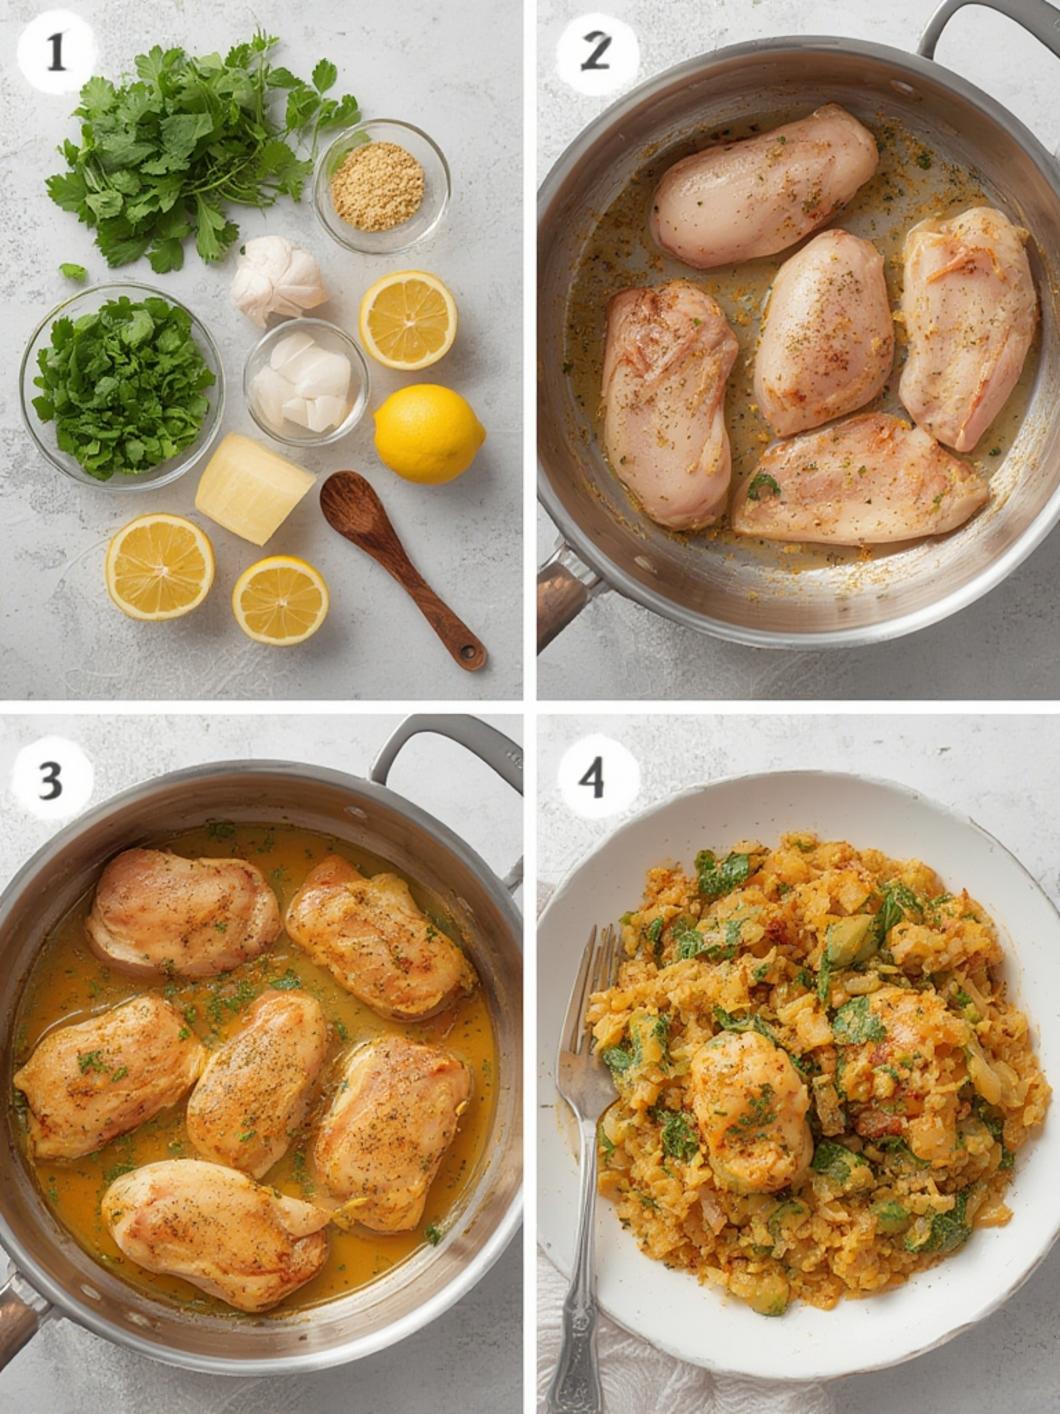
Step 1: The Pickle Prelude (Do This First!)
Combine the vinegar, water, sugar, and salt in your jar or small bowl. Stir until dissolved. Toss in your sliced veggies and any optional spices. Set aside. I made the mistake of skipping this step once and regretted it—the raw onion bite on the finished dish was harsh! The quick pickles cut through the richness beautifully. Let them sit while you cook; 20 minutes is enough to start working their magic.
Step 2: Pat & Season the Chicken
Pat your chicken thighs VERY dry with paper towels. This is non-negotiable for good browning. Season generously on both sides with salt and pepper.
Step 3: Sear for Gold
Heat your olive oil in that big skillet over medium-high heat. Once it shimmers, add the chicken in a single layer (don’t crowd the pan!). Cook, undisturbed, for 5-6 minutes, until the underside is a deep, gorgeous golden brown. Flip and cook the other side for 4 minutes. You’re not cooking it through yet, just building that flavor foundation. Transfer the chicken to a plate.
Step 4: The Garlic & Lemon Bloom
Reduce heat to medium. Add all that minced garlic to the drippings in the pan. Stir constantly for about 60 seconds—NO LONGER—until it’s fragrant and just starting to color. Burned garlic is bitter, and we’ve all been there. Once, I walked away for 30 seconds and had to start over. Lesson learned!
Step 5: Build the Sauce
Pour in the chicken broth, scraping the bottom of the pan with a wooden spoon to lift any browned bits (this is fond, liquid gold!). Stir in the oregano, thyme, and the zest from one lemon. Let this bubble gently for 2 minutes.
Step 6: Finish in the Sauce
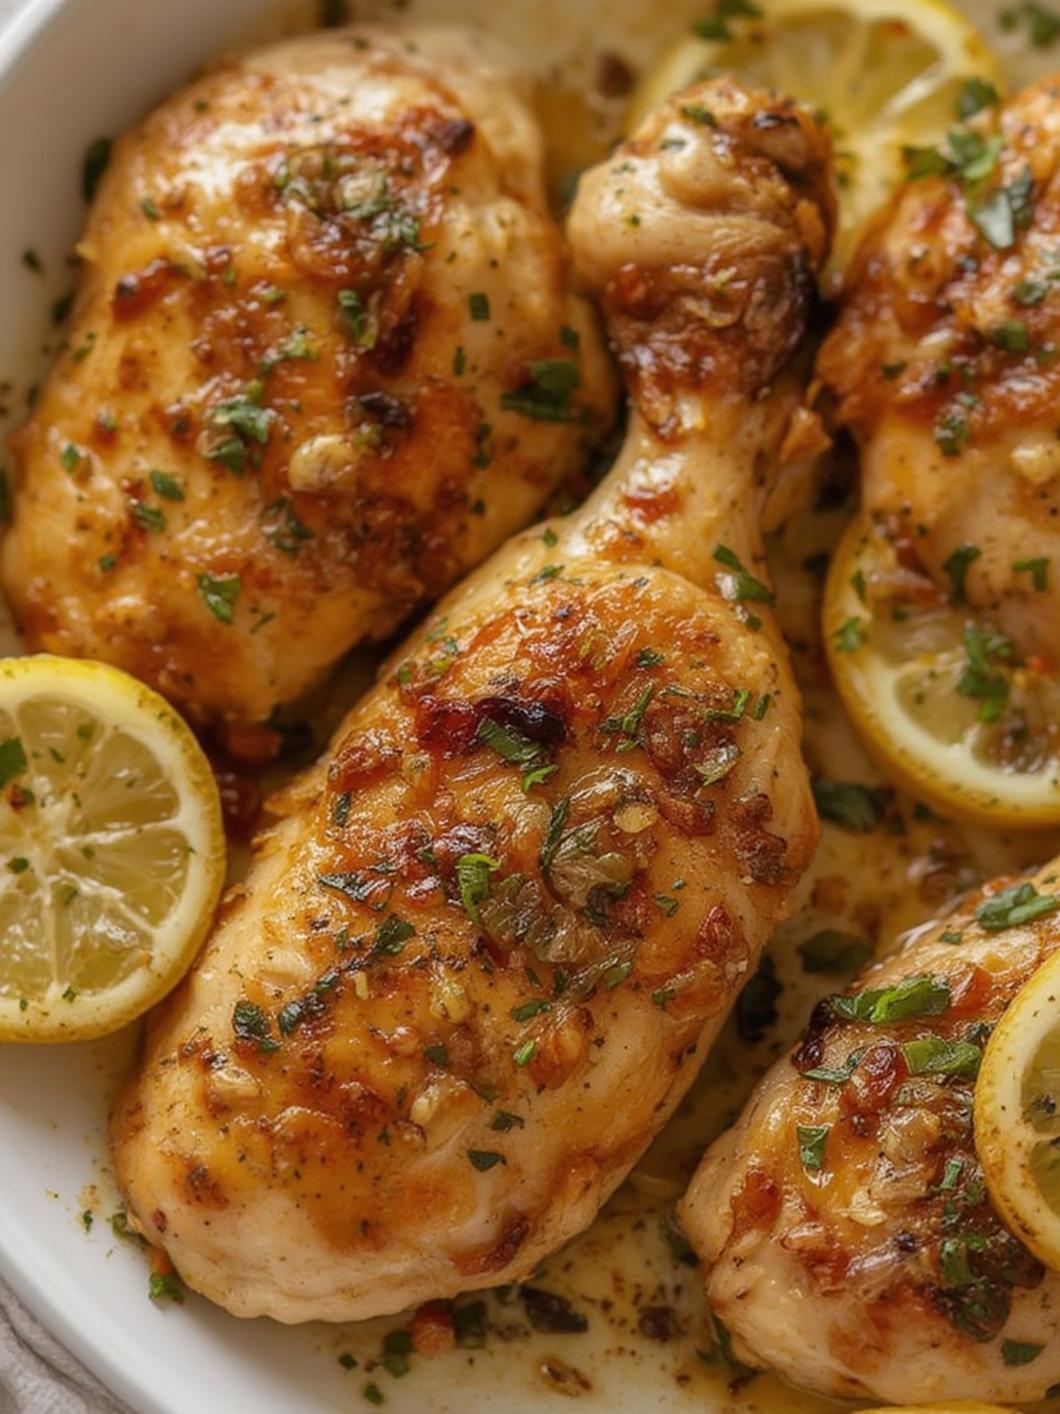
Return the chicken and any accumulated juices to the pan. Reduce heat to low, cover, and simmer for 10-12 minutes, until the chicken is cooked through (internal temp should hit 165°F/74°C).
Step 7: The Grand Finale
Uncover, turn the heat up to medium, and add the juice from both lemons and the butter. Swirl the pan until the butter melts and the sauce thickens slightly—about 2-3 minutes. Taste and adjust seasoning. That’s it! You’re done.
Nutritional Benefits / Advantages
I’m not here to tell you this is a “diet food,” but it’s a nutrient powerhouse. Chicken thighs provide solid protein and iron. The garlic? Immune-boosting, anti-inflammatory. Lemons are packed with Vitamin C. The olive oil is heart-healthy monounsaturated fat. And when you add those quick-pickled veggies from a solid homemade pickled vegetables guide, you’re getting fermented goodness for your gut, plus extra fiber and vitamins from the raw veggies. My doctor was surprised when I told him I make this at home every week—he assumed it was a “cheat meal.” Nope! Just smart, flavorful, real food.
Tips, Alternative Methods or Cooking Advice
- The One-Pan Wonder: Don’t want to do pickles? Skip ‘em! Throw some halved cherry tomatoes and a handful of spinach into the sauce in Step 6. They’ll wilt in the last 2 minutes.
- Oven Finish: After Step 3, you can transfer the seared chicken to a 400°F oven for 8-10 minutes while you make the sauce, then return it to the pan for the final lemon-butter step. Gives an incredibly even cook.
- Spice It Up: Add a pinch of red pepper flakes with the garlic. Or stir in a spoonful of grainy mustard with the butter.
- Citrus Swap: Half of the lemon juice can be replaced with a splash of white wine or even a bit of orange juice for a sweeter note.
- Herb Freshness: If you have fresh thyme or oregano, use 1 tbsp chopped in place of the dried and add it with the lemon juice at the end.
Common Mistakes to Avoid
The Burnt Garlic Blunder: I touched on this, but it bears repeating. Garlic goes from perfect to pathetic in 15 seconds over medium-high heat. Keep it on medium, stir constantly, and as soon as it’s fragrant and lightly golden, add the broth to cool the pan down. My horror story: I once got distracted by a text, came back to blackened garlic bits. The whole batch had to be trashed. Now, I set my spoon down by the garlic as a physical reminder to stir, stir, stir.
Skipping the Dry Pat: Wet chicken steams instead of sears. You’ll get a sad, grey color and no texture. Paper towels are your friend.
Overcooking the Chicken: Thighs are forgiving, but you can still dry them out. Use a thermometer! Pull them at 160°F, and carryover cooking will bring them to a perfect 165°F while they rest in the sauce.
Storage / Maintenance Tips
This is a fantastic meal prep hero!
- Refrigerator: Store chicken and sauce separately in airtight containers for up to 4 days. The pickles get better as they sit! Keep them in their jar in the fridge for up to 2 weeks.
- Reheating: Gently reheat the chicken and sauce in a saucepan over low heat with a splash of broth or water to loosen it. Don’t microwave it on high—it’ll get tough.
- Freezing: The chicken freezes okay, but the sauce can sometimes separate a bit. Freeze in portions, and reheat slowly, whisking to bring it back together. The pickles do not freeze well.
Conclusion
That burnt dinner was the best thing that ever happened to my cooking confidence. It forced me to find a recipe—this lemon garlic chicken recipe—that I could truly call my own. It’s become our Sunday supper, my go-to for bringing a new mom a meal, and the dish I make when I need to feel like a kitchen rockstar in 40 minutes flat. Paired with a quick batch of pickles from a tried-and-true homemade pickled vegetables guide, it’s a complete, vibrant, and soul-satisfying meal that never fails.
Give it a try. I dare you to make it without burning the garlic (just kidding, but seriously, stir!). I have a feeling it will find a permanent, proud spot in your recipe box, too. And when you do, come back and tell me about it. Did you add the spinach? Did your family devour it? I live for these stories.
FAQs
Q: Can I use chicken breasts instead of thighs?
A: You absolutely can! Pound them to an even thickness first. Sear for 4-5 minutes per side, then simmer in the sauce for just 5-7 minutes, or until cooked through. Keep a close eye on them—breasts dry out faster.
Q: My sauce isn’t thickening. Help!
A: It’s likely just a bit loose. Turn the heat up to medium and let it bubble for another minute or two. The reduction will happen quickly. Whisking in that final butter also helps emulsify and thicken it.
Q: I don’t have fresh lemons. Can I use bottled juice?
A: Technically, yes, but it’s a different beast. Bottled lemon juice lacks the bright, floral zest and can have a slightly metallic or flat taste. If you must, use ¼ cup bottled juice and skip the zest. But for the full magic, fresh is best—it’s the star of the show!
Q: The dish seems too salty. What went wrong?
A: This usually happens from two things: 1) Using salty chicken broth, or 2) Not accounting for the salt from the pickles if you’re eating them together. Always use low-sodium broth and taste your sauce before adding extra salt at the table.
Q: Can I make this ahead for a party?
A: Yes! Make the chicken and sauce, let it cool, and store it in the fridge for up to 2 days. Gently reheat on the stove. I’d actually recommend making the pickles 2-3 days ahead so their flavors fully develop. Reheat the chicken gently—don’t boil it.

Quick way to grow 3-Ingredient Lemon Garlic Chicken
Description
That failure sparked a little kitchen revolution for me. I decided I needed ONE reliable, impressive, actually delicious chicken recipe that I could make without panic. Something vibrant, healthy, and foolproof enough for a weeknight but fancy enough for guests. After dozens of trials (and yes, a few more burnt offerings), I found it. This lemon garlic chicken recipe didn’t just save my dinner nights; it became my culinary confidence booster. And the best part? It pairs beautifully with a fantastic homemade pickled vegetables guide I discovered along the way, which adds the most incredible tangy crunch. This dish is the reason my husband now volunteers to do the dishes. No joke.
Ingredients
Materials & Supplies
Alright, friend, let’s get our mise en place on. Having everything ready is 90% of the battle with this dish. Here’s your team:
For the Lemon Garlic Chicken:
Boneless, Skinless Chicken Thighs: 4 (about 1.5 lbs). Trust me on thighs. They’re juicier, more forgiving, and have way more flavor than breasts. If you must use breasts, reduce the cooking time by 2 minutes per side.*
Fresh Lemons: 2. You’ll need juice from both and zest from one. Zest first, then juice! It’s a game-changer you’ll thank me for.*
Garlic: 1 entire head. Yes, a whole head. We’re not shy here. About 8-10 cloves, minced. Pro tip: smash the clove with your knife blade first—it peels like a dream and releases more oils.*
- Olive Oil: Good quality, about ¼ cup.
Chicken Broth: ½ cup, low-sodium. Or use veggie broth, or even white wine if you’re feeling fancy.*
Dried Oregano & Thyme: 1 tsp each. Dried is fine here; the long simmer lets it bloom.*
- Salt & Freshly Cracked Black Pepper: The usual suspects, but don’t skimp on the pepper.
Butter or a Butter-Olive Oil Blend: 2 tbsp, for finishing. This makes the sauce silky and luxurious.*
The Secret Weapon – Quick Pickles (Inspired by a Great Homemade Pickled Vegetables Guide):
Veggies: 1 cup total of your favorites. I use sliced radishes, cucumber sticks, and red onion. Watermelon rind is amazing if you can find it!*
- Vinegar: ½ cup white wine or rice vinegar.
- Water: ½ cup.
- Sugar: 1 tbsp.
- Salt: 1 tsp.
- Optional Crunch Add-ins: A few peppercorns, a sliced garlic clove, a sprig of dill.
Tools You’ll Need:
- A large, heavy-bottomed skillet or fry pan (oven-safe if you want to finish it in the oven for extra goldenness).
- A small bowl for your pickling brine.
- A jar or container for the pickles.
- A zester/microplane (for the lemon zest!).
- A meat thermometer (optional but helpful for perfect chicken).
Timing / Cooking Schedule
Let’s be real about clock time:
- Prep Time: 15 minutes (mostly chopping garlic, juicing lemons, slicing veggies for pickles).
- Cook Time: 20-25 minutes.
- Total Time: 35-40 minutes from start to finish.
Honestly, the first time I made this, it took me double this time! I was fumbling with the zester, over-checking the chicken, and almost forgot the pickles. Now, I can have the pickles in their jar and the chicken in the pan in under 10 minutes flat. The active cooking is super hands-on for the first 8 minutes, then it’s mostly simmering and stirring. Perfect for getting a side of rice or a simple salad ready while it finishes.
Instructions
Step 1: The Pickle Prelude (Do This First!)
Combine the vinegar, water, sugar, and salt in your jar or small bowl. Stir until dissolved. Toss in your sliced veggies and any optional spices. Set aside. I made the mistake of skipping this step once and regretted it—the raw onion bite on the finished dish was harsh! The quick pickles cut through the richness beautifully. Let them sit while you cook; 20 minutes is enough to start working their magic.
Step 2: Pat & Season the Chicken
Pat your chicken thighs VERY dry with paper towels. This is non-negotiable for good browning. Season generously on both sides with salt and pepper.
Step 3: Sear for Gold
Heat your olive oil in that big skillet over medium-high heat. Once it shimmers, add the chicken in a single layer (don’t crowd the pan!). Cook, undisturbed, for 5-6 minutes, until the underside is a deep, gorgeous golden brown. Flip and cook the other side for 4 minutes. You’re not cooking it through yet, just building that flavor foundation. Transfer the chicken to a plate.
Step 4: The Garlic & Lemon Bloom
Reduce heat to medium. Add all that minced garlic to the drippings in the pan. Stir constantly for about 60 seconds—NO LONGER—until it’s fragrant and just starting to color. Burned garlic is bitter, and we’ve all been there. Once, I walked away for 30 seconds and had to start over. Lesson learned!
Step 5: Build the Sauce
Pour in the chicken broth, scraping the bottom of the pan with a wooden spoon to lift any browned bits (this is fond, liquid gold!). Stir in the oregano, thyme, and the zest from one lemon. Let this bubble gently for 2 minutes.
Step 6: Finish in the Sauce
Return the chicken and any accumulated juices to the pan. Reduce heat to low, cover, and simmer for 10-12 minutes, until the chicken is cooked through (internal temp should hit 165°F/74°C).
Step 7: The Grand Finale
Uncover, turn the heat up to medium, and add the juice from both lemons and the butter. Swirl the pan until the butter melts and the sauce thickens slightly—about 2-3 minutes. Taste and adjust seasoning. That’s it! You’re done.
Nutritional Benefits / Advantages
I’m not here to tell you this is a “diet food,” but it’s a nutrient powerhouse. Chicken thighs provide solid protein and iron. The garlic? Immune-boosting, anti-inflammatory. Lemons are packed with Vitamin C. The olive oil is heart-healthy monounsaturated fat. And when you add those quick-pickled veggies from a solid homemade pickled vegetables guide, you’re getting fermented goodness for your gut, plus extra fiber and vitamins from the raw veggies. My doctor was surprised when I told him I make this at home every week—he assumed it was a “cheat meal.” Nope! Just smart, flavorful, real food.
Tips, Alternative Methods or Cooking Advice
- The One-Pan Wonder: Don’t want to do pickles? Skip ‘em! Throw some halved cherry tomatoes and a handful of spinach into the sauce in Step 6. They’ll wilt in the last 2 minutes.
- Oven Finish: After Step 3, you can transfer the seared chicken to a 400°F oven for 8-10 minutes while you make the sauce, then return it to the pan for the final lemon-butter step. Gives an incredibly even cook.
- Spice It Up: Add a pinch of red pepper flakes with the garlic. Or stir in a spoonful of grainy mustard with the butter.
- Citrus Swap: Half of the lemon juice can be replaced with a splash of white wine or even a bit of orange juice for a sweeter note.
- Herb Freshness: If you have fresh thyme or oregano, use 1 tbsp chopped in place of the dried and add it with the lemon juice at the end.
Common Mistakes to Avoid
The Burnt Garlic Blunder: I touched on this, but it bears repeating. Garlic goes from perfect to pathetic in 15 seconds over medium-high heat. Keep it on medium, stir constantly, and as soon as it’s fragrant and lightly golden, add the broth to cool the pan down. My horror story: I once got distracted by a text, came back to blackened garlic bits. The whole batch had to be trashed. Now, I set my spoon down by the garlic as a physical reminder to stir, stir, stir.
Skipping the Dry Pat: Wet chicken steams instead of sears. You’ll get a sad, grey color and no texture. Paper towels are your friend.
Overcooking the Chicken: Thighs are forgiving, but you can still dry them out. Use a thermometer! Pull them at 160°F, and carryover cooking will bring them to a perfect 165°F while they rest in the sauce.
Storage / Maintenance Tips
This is a fantastic meal prep hero!
- Refrigerator: Store chicken and sauce separately in airtight containers for up to 4 days. The pickles get better as they sit! Keep them in their jar in the fridge for up to 2 weeks.
- Reheating: Gently reheat the chicken and sauce in a saucepan over low heat with a splash of broth or water to loosen it. Don’t microwave it on high—it’ll get tough.
- Freezing: The chicken freezes okay, but the sauce can sometimes separate a bit. Freeze in portions, and reheat slowly, whisking to bring it back together. The pickles do not freeze well.