I’ll never forget the first time I made an Oreo no-bake cheesecake for a summer barbecue. It was scorching, and the last thing I wanted was turning on my oven. As I watched my guests’ faces light up with that first creamy, cookie-filled bite, I realized I’d discovered dessert gold. No oven, no stress, just pure cookies-and-cream bliss.
There’s something wonderfully liberating about making a show-stopping dessert without preheating your oven. An Oreo no-bake cheesecake combines everything we love about traditional cheesecake—that smooth, creamy filling and satisfying richness—with the convenience of a refrigerator dessert and the beloved flavor of Oreo cookies.
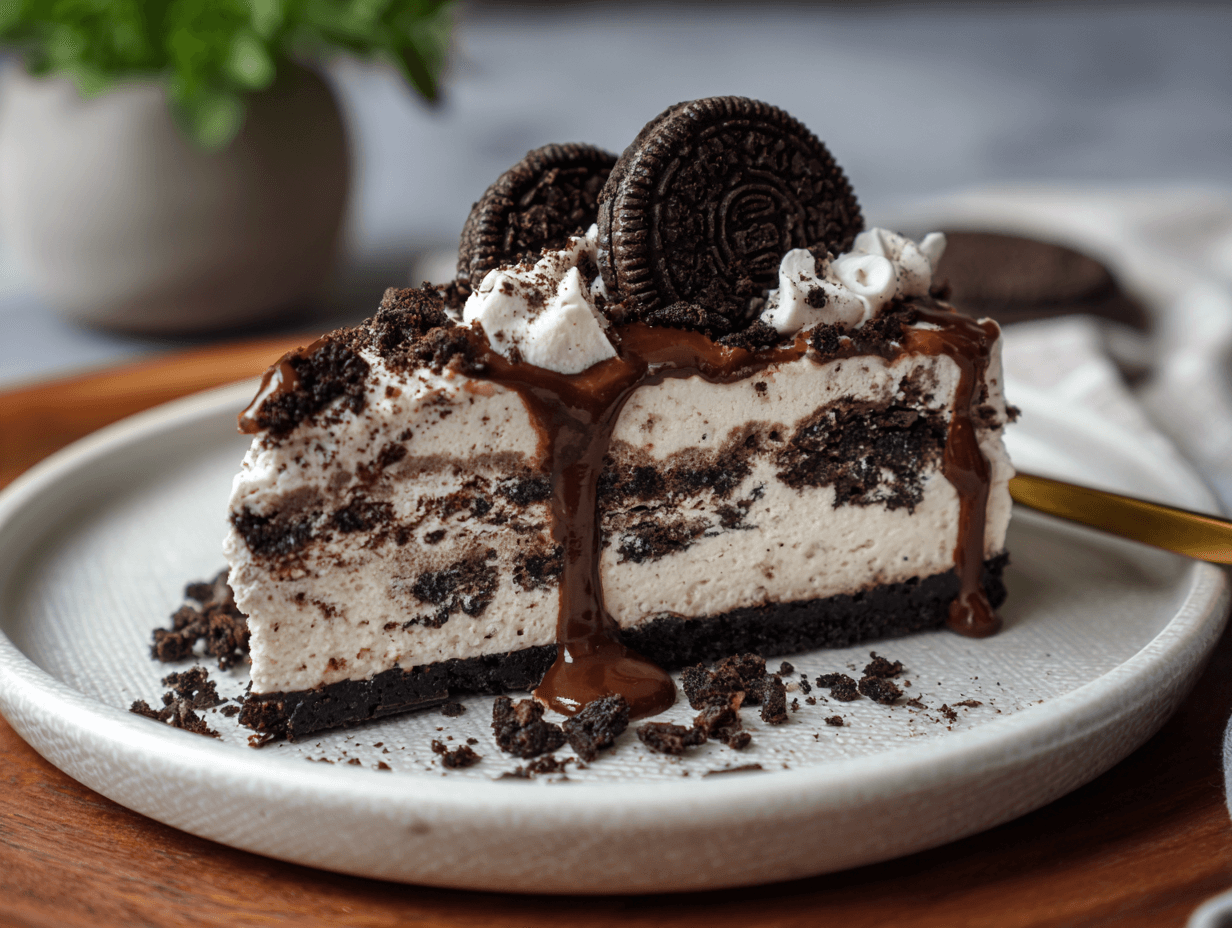
The picture tells the delicious story: a generous slice of Oreo no-bake cheesecake sitting proudly on a white plate. Look at those distinct layers—a dark, crushed Oreo cookie crust on the bottom, a rich chocolate pudding middle layer, and a fluffy cookies-and-cream topping studded with Oreo pieces. A whole Oreo cookie and fresh whipped cream crown this masterpiece.
Why Oreo No-Bake Cheesecake Is a Game-Changer
What makes Oreo no-bake cheesecake such a winner? It starts with accessibility. Traditional cheesecakes require precise oven temperatures, water baths, and nerve-wracking worry about cracks. This version eliminates all those concerns. You simply mix, layer, and chill.
The flavor profile is another major advantage. Oreo cookies bring instant nostalgia and universal appeal. The slightly bitter chocolate cookie complements the sweet, tangy cream cheese filling perfectly.
Oreo No-Bake Cheesecake Recipe: Complete Ingredients
Creating a spectacular Oreo no-bake cheesecake requires just a handful of ingredients.
Oreo Crust:
- 24 Oreo cookies (whole, with cream filling)
- 5 tablespoons (70g) unsalted butter, melted
Chocolate Pudding Layer (Optional but Recommended):
- 1 package (3.9 oz) instant chocolate pudding mix
- 1 1/2 cups (360ml) cold milk
Cheesecake Filling:
- 16 oz (450g) cream cheese, softened to room temperature
- 1 cup (120g) powdered sugar
- 1 teaspoon vanilla extract
- 1 1/2 cups (360ml) heavy whipping cream, cold
- 12 Oreo cookies, roughly chopped
Topping:
- Whipped cream
- Whole or halved Oreo cookies
- Chocolate shavings or cocoa powder (optional)
Step-by-Step Instructions for Oreo No-Bake Cheesecake Success
Making an Oreo no-bake cheesecake is remarkably straightforward. Follow these detailed steps for perfect results every time.
Step 1: Prepare Your Pan
Line a 9-inch springform pan with parchment paper on the bottom, or lightly grease it. The springform pan is essential for easy removal and clean slicing.
Step 2: Make the Oreo Crust
Place 24 Oreo cookies (cream and all) in a food processor and pulse until fine crumbs form. If you don’t have a food processor, place the cookies in a zip-top bag and crush them with a rolling pin.
Transfer the crumbs to a bowl and mix in 5 tablespoons of melted butter until the mixture resembles wet sand. Press firmly into the bottom of your prepared pan using the bottom of a measuring cup. Refrigerate while preparing the filling.
Step 3: Make the Chocolate Pudding Layer (Optional)
If adding the chocolate layer shown in the image, prepare instant chocolate pudding according to package directions (usually 1 package pudding mix with 1½ cups cold milk, whisked for 2 minutes). Spread the pudding evenly over the Oreo crust and refrigerate while preparing the cheesecake filling.
Step 4: Beat the Cream Cheese
In a large bowl, using a hand mixer or stand mixer, beat the room-temperature cream cheese until completely smooth and fluffy, about 3 minutes. Scrape down the sides of the bowl several times to eliminate lumps.
Step 5: Add Sugar and Vanilla
Add powdered sugar and vanilla extract to the cream cheese. Beat until fully incorporated and smooth, about 2 minutes. The mixture should be pale and fluffy.
Step 6: Whip the Cream
In a separate bowl with clean beaters, whip the heavy cream to medium-soft peaks, about 2–3 minutes on medium-high speed. The cream should hold its shape but remain soft and billowy.
Step 7: Combine and Fold
Gently fold about one-third of the whipped cream into the cream cheese mixture to lighten it. Then fold in the remaining whipped cream along with 12 roughly chopped Oreo cookies. Use a rubber spatula and fold gently to maintain airiness.
Step 8: Assemble and Chill
Spread the cream cheese and Oreo mixture over the crust (or chocolate layer), smoothing the top with an offset spatula. Press additional Oreo halves around the edge and place a whole cookie in the center for decoration if desired. Cover tightly with plastic wrap and refrigerate for at least 4 hours, preferably overnight.
Step 9: Serve
When ready to serve, run a thin knife around the edge before releasing the springform pan. Top with whipped cream and extra Oreo pieces just before serving.
Pro Tips for the Best Oreo No-Bake Cheesecake
After making countless versions, I’ve discovered techniques that guarantee stunning results.
Room Temperature Cream Cheese Is Essential: Cold cream cheese creates lumps. Set it out at least 1 hour before starting, or soften in the microwave in 10-second bursts.
Don’t Over-Whip the Cream: Stop at soft to medium peaks. Over-whipped cream becomes grainy and buttery.
Fold Gently: Use a folding motion rather than stirring when combining whipped cream with cream cheese. This preserves air and keeps the filling light.
Chill Time Matters: Four hours is minimum, but overnight is better for proper setting and flavor development.
Use a Hot Knife for Clean Slices: Dip your knife in hot water and wipe dry between cuts for professional-looking slices.
Delicious Variations to Try
Once you’ve mastered the basic recipe, these variations add exciting dimensions.
Peanut Butter Oreo Cheesecake: Add 1/2 cup creamy peanut butter to the cream cheese before folding in whipped cream.
Mint Oreo Cheesecake: Use mint Oreos and add 1/2 teaspoon peppermint extract to the filling.
Pumpkin Oreo Cheesecake: Add 3/4 cup pumpkin puree and 1 teaspoon pumpkin pie spice to the cream cheese mixture.
Strawberry Oreo Cheesecake: Layer fresh sliced strawberries between filling layers and use Golden Oreos.
S’mores Oreo Cheesecake: Use chocolate graham crackers for the crust, add mini marshmallows to the filling, and torch the top.
Storage and Make-Ahead Tips
One of the best features of Oreo no-bake cheesecake is how well it keeps.
Store covered in the refrigerator for up to 5 days. Add whipped cream topping just before serving.
The cheesecake itself can be made up to 2 days ahead, covered tightly with plastic wrap.
To freeze, wrap the entire pan tightly in plastic wrap, then foil. Freeze for up to 1 month. Thaw overnight in the refrigerator. Texture might be slightly less fluffy but still delicious.
Serving Suggestions and Presentation Ideas
An Oreo no-bake cheesecake is beautiful on its own, but these ideas elevate presentation.
Create a chocolate drizzle by melting chocolate chips with 1 tablespoon cream, then drizzle decoratively over the top.
Add fresh berries around the edge for color and tart contrast.
Pipe whipped cream rosettes around the perimeter and place an Oreo half on each.
Dust the entire top with cocoa powder through a fine-mesh sieve for drama.
Perfect Pairings for Your Cheesecake
The right accompaniments enhance the Oreo no-bake cheesecake experience.
Coffee is the classic pairing—slight bitterness cuts through richness perfectly. Cold milk remains timeless. For adult gatherings, pair with dessert wine like Moscato or Port.
Hot chocolate creates an indulgent double-chocolate experience. Fresh berries on the side add refreshing tartness that balances the rich, sweet cheesecake.
Nutritional Information
One slice (12 servings) contains approximately 420 calories, 48g carbohydrates, 26g fat, and 5g protein.
As with any dessert, Oreo no-bake cheesecake is meant to be savored occasionally. The joy it brings makes every calorie worthwhile!
Frequently Asked Questions About No-Bake Cheesecake
Can I make this without a springform pan? Yes, use a regular pie dish or 9×9-inch square pan. You won’t be able to remove it, so serve directly from the dish.
Do I have to remove the cream from the Oreos? No! Leaving the cream adds flavor and helps the crust stick together.
Can I use lite cream cheese? Regular, full-fat cream cheese provides the best flavor and texture.
What if I don’t have heavy cream? Heavy whipping cream is essential—half-and-half or milk won’t whip properly.
Can I make mini cheesecakes? Absolutely! Use a muffin tin lined with paper liners. Makes about 12-16 mini cheesecakes.
How do I know when it’s set? The surface should look firm and not jiggle when you gently shake the pan.
Conclusion: Your New Favorite No-Bake Dessert
Oreo no-bake cheesecake represents everything we love about modern dessert making. It’s easy, impressive, endlessly customizable, and absolutely delicious. The combination of crunchy Oreo crust, creamy filling studded with cookie pieces, and optional chocolate layers creates an experience that rivals any traditional cheesecake—without the stress.
What makes this recipe truly special is its reliability. Even complete beginners achieve professional-looking, bakery-quality results. No worry about cracks, no precise temperature control, no water baths—just simple mixing and chilling that produces spectacular results every time.
This Oreo no-bake cheesecake has become my go-to for everything from casual family dinners to elegant dinner parties. It’s the dessert I make when I want to impress without spending hours in the kitchen.
My Personal Tip: For the creamiest, most luxurious texture, let your Oreo no-bake cheesecake sit at room temperature for about 15 minutes before serving. Straight from the refrigerator, it’s firm and sliceable. But allowing it to warm slightly transforms the texture into something almost cloud-like—incredibly creamy and smooth. This small step elevates the entire eating experience from delicious to absolutely transcendent!