There’s something undeniably comforting about the aroma of freshly baked bread wafting through your home. When that bread happens to be infused with garlic and butter? Well, that’s when everyday baking becomes a culinary experience worth savoring. These No-Knead Garlic Butter Bread Rolls offer all the satisfaction of homemade bread without the arm-tiring work traditionally associated with bread making.
Why You’ll Love These No-Knead Garlic Butter Rolls
The beauty of these rolls lies in their simplicity combined with their impressive results. Traditional bread making often intimidates home cooks due to the physical labor involved in kneading dough until it reaches that perfect elasticity. This recipe eliminates that step entirely while still producing soft, fluffy, and flavorful rolls that would make any bakery proud.
The addition of garlic butter takes these rolls from good to extraordinary. The garlic infuses the dough with its aromatic flavor while the butter creates a rich, tender crumb that practically melts in your mouth. Whether served alongside pasta, used to sop up soup, or simply enjoyed on their own, these rolls elevate any meal to special occasion status.
Understanding the No-Knead Method
The no-knead method revolutionized home bread baking by making it accessible to everyone, regardless of physical ability or baking experience. Instead of developing gluten through physical kneading, this technique allows time to do the work. The science is fascinating – during the longer rising period, natural enzymes in the flour break down complex proteins while yeast slowly ferments, creating both structure and flavor without any kneading required.
This method produces bread with a more complex flavor profile and excellent texture. For these garlic butter rolls, it means you get all the benefits of homemade bread with minimal hands-on effort – perfect for busy households or anyone who wants to enjoy fresh bread without the traditional workload.
Ingredients Breakdown
For the Dough:
- 1 cup lukewarm fresh milk (240 ml): The liquid base that activates the yeast; using lukewarm milk (around 105-110°F) creates the ideal environment for yeast activity while adding richness to the dough
- 1 whole large egg: Provides structure, richness, and helps with rising
- 3 tbsp sugar (38 grams): Feeds the yeast while adding a subtle sweetness that balances the savory garlic
- 2 tsp instant yeast (6 grams): The leavening agent that creates those beautiful air pockets
- 3 cups all-purpose flour (384 grams): The foundation of our rolls; all-purpose flour provides just the right amount of protein for soft yet structurally sound rolls
- 1/3 cup softened butter (75 grams): Creates tenderness in the crumb and enhances flavor
- 1/2 tsp salt (3 grams): Enhances all flavors while controlling yeast activity
- 1 tbsp minced garlic (9 grams): The star flavor component that infuses throughout the dough
- 1 tbsp chopped parsley (4 grams): Adds fresh flavor and visual appeal
For Topping:
- 1 egg wash (beaten egg) or milk: Creates that beautiful golden-brown shine on the crust
- 1 tsp minced garlic: For an extra punch of garlic flavor on top
- 1 tsp parsley: Adds fresh color and flavor
- 1 tsp sugar: Helps with browning and adds a touch of sweetness
- 2 tbsp melted butter: Creates that irresistible buttery finish and aroma
Step-by-Step Instructions
Preparing the Dough
- In a large mixing bowl, combine the lukewarm milk, egg, and sugar. Stir gently until the sugar begins to dissolve.
- Sprinkle the instant yeast over the milk mixture and let it sit for about 5 minutes until it becomes foamy. This step confirms your yeast is active and ready to work.
- Add the flour to the bowl, then add the softened butter, salt, minced garlic, and chopped parsley.
- Using a wooden spoon or spatula, mix everything together until no dry flour remains. The dough will look somewhat shaggy and sticky – this is exactly what you want! Resist the urge to add more flour.
- Cover the bowl with plastic wrap or a damp kitchen towel and place it in a warm, draft-free area of your kitchen. Let the dough rise for 1-2 hours until it has doubled in size.
Shaping the Rolls
- Once risen, gently deflate the dough by folding it over itself a few times in the bowl.
- Prepare your baking dish by lightly greasing it with butter or non-stick spray.
- Divide the dough into 12-16 equal portions, depending on your preferred roll size. For perfectly even rolls, use a kitchen scale to weigh each portion.
- With lightly floured hands, shape each portion into a smooth ball by tucking the edges underneath and rolling it between your palms.
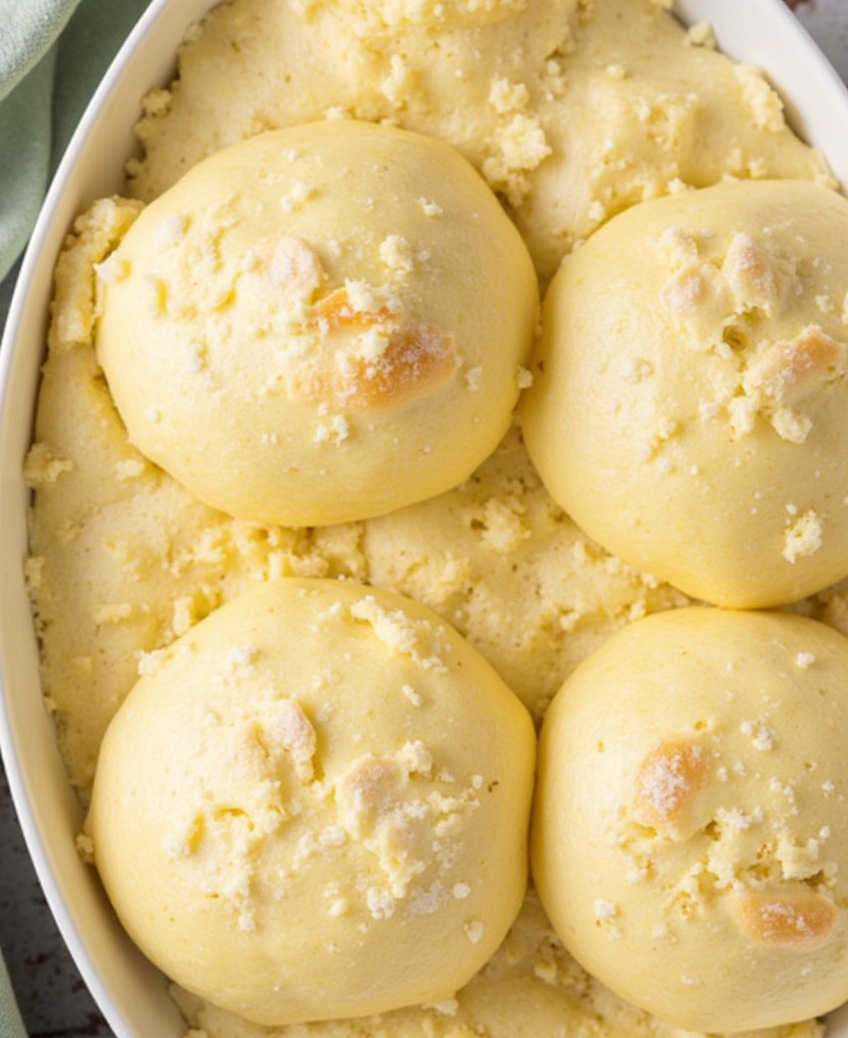
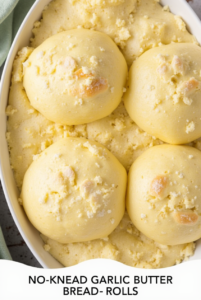
- Arrange the dough balls in your prepared baking dish, leaving a small gap between each roll to allow for expansion.
- Cover again and let rise for another 30-45 minutes until puffy and nearly doubled in size.
Baking to Perfection
- While the rolls are completing their second rise, preheat your oven to 375°F (190°C).
- In a small bowl, prepare your topping by mixing together the minced garlic, parsley, and sugar.
- Just before baking, gently brush the tops of the rolls with egg wash or milk.
- Sprinkle the garlic-parsley-sugar mixture evenly over the rolls.
- Bake in the preheated oven for 18-22 minutes, or until the rolls are golden brown and sound hollow when tapped on the bottom.
- Remove from the oven and immediately brush with melted butter, allowing it to soak into the hot rolls.
- Let cool for 5-10 minutes before serving warm.
Tips for Perfect Garlic Butter Rolls Every Time
- Measure accurately: Bread baking is more science than art, so measuring ingredients by weight rather than volume will give you the most consistent results.
- Don’t rush the rise: The magic of no-knead bread happens during the rising time. Allow the full rising time for the best texture and flavor development.
- Check your yeast: If you’re not sure about the freshness of your yeast, proof it before adding to your recipe by mixing it with a little warm water and sugar. If it doesn’t foam within 10 minutes, you need fresh yeast.
- Create a warm environment: For optimal rising, place your covered dough in a warm area around 75-85°F. Some good options include an oven with just the light turned on or on top of a refrigerator.
- Don’t overbake: These rolls are at their best when they’re soft and tender. Watch them carefully toward the end of baking and remove them when they’re golden brown.
Storage and Make-Ahead Options
These garlic butter rolls are best enjoyed fresh from the oven, but they can be stored in an airtight container at room temperature for up to 2 days. To refresh them, wrap in foil and warm in a 300°F oven for about 10 minutes.
For make-ahead convenience, you can prepare the dough through the first rise, shape the rolls, and then refrigerate overnight. The next day, allow them to come to room temperature and complete their second rise (about 1-2 hours) before baking as directed.
The rolls can also be frozen after baking. Cool completely, wrap individually in plastic wrap, then foil, and freeze for up to 3 months. Thaw at room temperature and reheat wrapped in foil in a 300°F oven until warmed through.
Perfect Pairings
These aromatic garlic butter rolls complement a wide variety of meals. Here are some perfect pairings:
- Pasta dishes: Especially those with rich tomato or cream sauces that can be sopped up with the rolls
- Soups and stews: The rolls make excellent dippers for everything from minestrone to beef stew
- Roasted meats: Serve alongside roast chicken, beef, or pork for a complete comfort meal
- Salads: Transform a simple salad into a satisfying meal with these flavorful rolls on the side
- On their own: Split and toasted with a spread of additional garlic butter or as the base for mini sandwiches
Variations to Try
While these rolls are perfect as-is, here are some variations to customize them to your taste:
- Cheesy Garlic Rolls: Add 1/2 cup of shredded parmesan or cheddar cheese to the dough and sprinkle more on top before baking
- Herb Garden Rolls: Expand beyond parsley with a mixture of fresh herbs like rosemary, thyme, and chives
- Spicy Garlic Rolls: Add 1/4 teaspoon of red pepper flakes to the dough for a gentle heat
- Whole Wheat Option: Replace up to one-third of the all-purpose flour with whole wheat flour for a nuttier flavor and added nutrition
- Sweet Garlic Rolls: Increase the sugar to 1/4 cup for a sweeter roll that highlights the contrast with the savory garlic
Why No-Knead Works So Well
The no-knead method relies on time rather than physical effort to develop gluten, the protein structure that gives bread its characteristic chew and texture. During the long rising period, several important processes occur:
- The flour’s proteins naturally align and form gluten bonds
- Enzymes in the flour break down complex starches into simpler sugars
- Yeast consumes these sugars, producing carbon dioxide and flavor compounds
- The dough structure develops slowly, creating a more complex flavor profile
The result is bread with excellent texture and flavor development without the physical labor traditionally required. For these garlic butter rolls, this method creates a particularly tender crumb that perfectly absorbs the butter and garlic flavors.
Troubleshooting Common Issues
Even with a simplified method like no-knead, bread baking can sometimes present challenges. Here are solutions to common issues:
- Dough too sticky: Resist adding more flour. Instead, use lightly oiled or floured hands when handling the dough. The wetter dough produces lighter rolls.
- Dough not rising: Check that your yeast is fresh and active. Also ensure your rising environment is warm enough – yeast becomes dormant in cold temperatures.
- Dense rolls: This usually indicates either too much flour or insufficient rising time. Measure ingredients carefully and be patient with the rising process.
- Pale crust: For a deeper golden color, brush with egg wash rather than milk, and make sure your oven is fully preheated.
- Garlic burns on top: If you notice the garlic on top browning too quickly, cover the rolls loosely with foil for the remainder of the baking time.
The Joy of Homemade Bread
There’s something deeply satisfying about pulling a tray of golden, aromatic rolls from your oven. It connects us to centuries of baking tradition while filling our homes with that unmistakable scent that says “comfort” in any language. These No-Knead Garlic Butter Rolls bring that experience within easy reach, even for novice bakers.
By eliminating the physical demands of traditional bread making, this recipe opens the door to fresh, homemade bread for everyone. The minimal hands-on time makes it practical for busy weeknights, while the impressive results make these rolls worthy of your holiday table.
Whether you’re an experienced baker looking to simplify your routine or a novice taking your first steps into bread making, these garlic butter rolls offer a foolproof entry point to the rewarding world of homemade bread. The combination of buttery richness, aromatic garlic, and tender, fluffy texture creates an irresistible package that will have everyone at your table reaching for seconds – and asking for your secret recipe.