I’ll never forget the first time I bit into a King Hawaiian Cheesecake Danish. It was at a charming little bakery in Honolulu, and I was instantly captivated by the flaky, buttery layers of golden pastry giving way to the most luscious, creamy cheesecake filling I’d ever experienced. The combination was so extraordinary that I spent the next two weeks experimenting in my kitchen, determined to recreate that magical moment. After countless attempts and some helpful hints from a local baker friend, I finally perfected this recipe that combines the beloved sweetness of King’s Hawaiian bread with the indulgence of cheesecake, all wrapped in delicate Danish pastry.
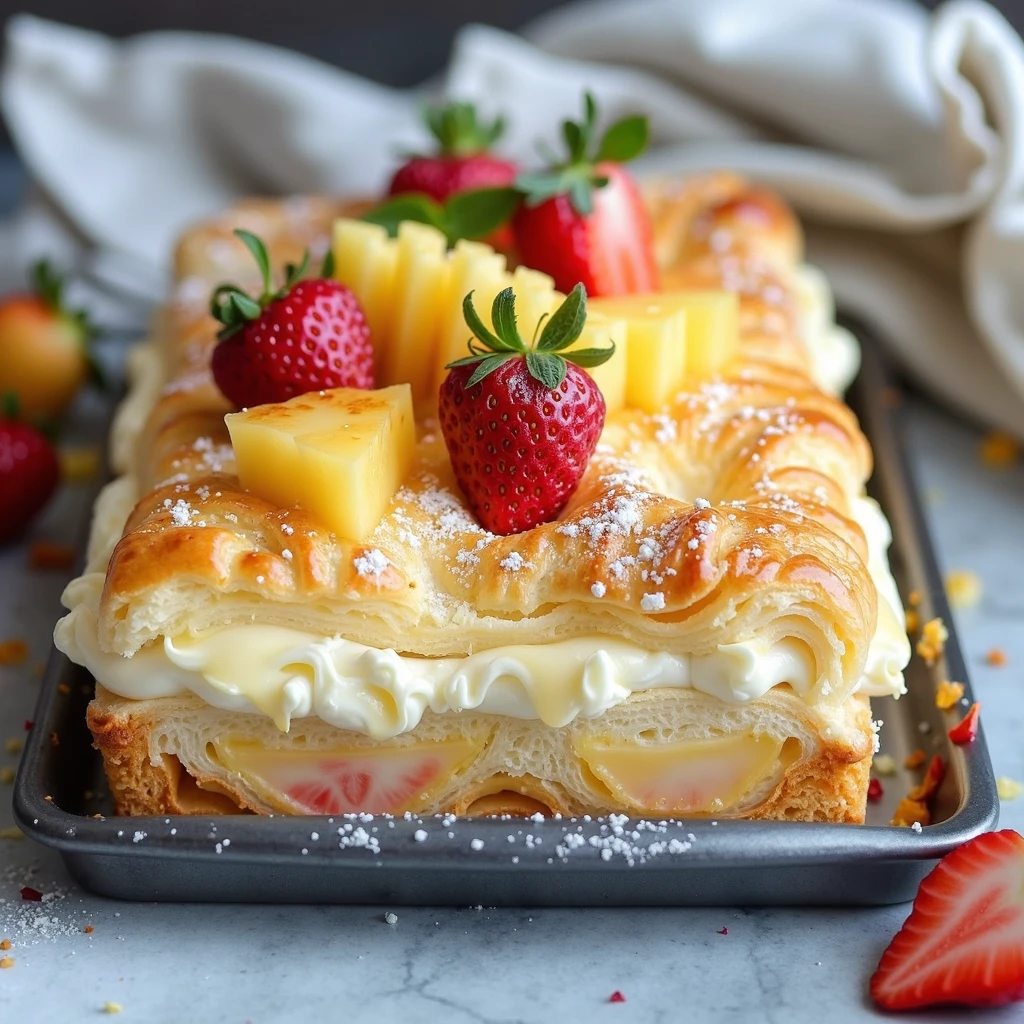
This King Hawaiian Cheesecake Danish represents the perfect fusion of textures and flavors—crispy, flaky pastry on the outside, sweet and soft Hawaiian bread-inspired dough in the middle, and a rich, tangy cheesecake filling at its heart. Furthermore, it’s topped with fresh tropical fruits and a glossy glaze that makes every bite absolutely irresistible. Whether you’re serving these for a special brunch, holiday breakfast, or simply treating yourself on a lazy weekend morning, this recipe will quickly become a household favorite.
What Makes This King Hawaiian Cheesecake Danish So Special
Traditional Danish pastries are wonderful on their own, but this King Hawaiian Cheesecake Danish takes the concept to an entirely new level. By incorporating the signature sweet, pillowy texture reminiscent of King’s Hawaiian rolls into the pastry dough, we create a base that’s both tender and flaky simultaneously. Additionally, the generous cheesecake filling provides a luxurious richness that perfectly balances the sweetness of the dough.
Unlike standard cheese Danishes that can sometimes taste one-dimensional, this King Hawaiian Cheesecake Danish delivers complex layers of flavor. The slight tanginess from the cream cheese filling contrasts beautifully with the sweet, buttery pastry. Moreover, the tropical fruit topping—featuring fresh pineapple and strawberries—adds bright, fresh notes that prevent the pastry from feeling too heavy or overly sweet.
What truly sets this recipe apart is its impressive appearance combined with surprising ease of preparation. While it looks like something from a high-end bakery, the technique is actually quite manageable for home bakers. Consequently, you can achieve professional-looking results without needing years of pastry experience or specialized equipment.
Essential Ingredients for Your King Hawaiian Cheesecake Danish
Creating these spectacular pastries requires quality ingredients, but nothing too difficult to source. Each component plays a crucial role in achieving that perfect King Hawaiian Cheesecake Danish texture and flavor.
Sweet Hawaiian-Style Danish Dough:
- 3 cups all-purpose flour, plus extra for dusting – provides structure while remaining tender
- ¼ cup granulated sugar – adds the signature sweetness
- 2¼ teaspoons instant yeast (1 packet) – creates lift and airiness
- 1 teaspoon salt – balances the sweetness and enhances flavors
- ¾ cup warm whole milk (110°F) – activates yeast and adds richness
- ¼ cup pineapple juice, warmed – infuses tropical flavor throughout
- 2 large eggs – binds ingredients and adds richness
- ⅓ cup unsalted butter, melted – creates tender, flaky layers
- 1 teaspoon vanilla extract – adds warmth and depth
- 1 cup cold unsalted butter, for laminating – creates those gorgeous flaky layers
Creamy Cheesecake Filling:
- 16 ounces cream cheese, softened to room temperature – the star of the filling
- ½ cup granulated sugar – sweetens perfectly without overpowering
- 1 large egg – helps the filling set during baking
- 2 tablespoons sour cream – adds tanginess and smooth texture
- 1 tablespoon all-purpose flour – prevents the filling from being too runny
- 1 teaspoon vanilla extract – complements the cream cheese beautifully
- Zest of 1 lemon – brightens the filling with subtle citrus notes
Tropical Topping and Glaze:
- 1 cup fresh pineapple chunks – adds juicy, tropical sweetness
- 1 cup fresh strawberries, sliced – provides color and fresh berry flavor
- 1 cup powdered sugar – creates the glossy glaze
- 2-3 tablespoons pineapple juice – thins the glaze and adds flavor
- ½ teaspoon vanilla extract – rounds out the glaze
- Shredded coconut for garnish (optional) – adds texture and tropical flair
Step-by-Step Instructions for Perfect King Hawaiian Cheesecake Danish
Creating these beautiful pastries involves several steps, but breaking the process down makes it entirely manageable. I’ll guide you through each stage with detailed instructions to ensure your success.
Preparing Your Hawaiian-Style Danish Dough
Begin by creating the sweet, enriched dough that gives this King Hawaiian Cheesecake Danish its distinctive character. In a large mixing bowl, combine the flour, sugar, instant yeast, and salt, whisking them together thoroughly. This initial mixing ensures even distribution of the yeast throughout the flour.
In a separate bowl, whisk together the warm milk, warm pineapple juice, eggs, melted butter, and vanilla extract. The liquids should feel pleasantly warm to the touch but not hot—if they’re too hot, they’ll kill the yeast. Pour this mixture into the dry ingredients and stir with a wooden spoon until a shaggy dough forms.
Turn the dough out onto a lightly floured surface and knead for about 8-10 minutes until it becomes smooth, elastic, and slightly sticky. Alternatively, use a stand mixer fitted with a dough hook and knead on medium speed for 6-7 minutes. The dough should pass the “windowpane test”—when you stretch a small piece thin enough to see light through it without tearing.
Place the dough in a lightly greased bowl, cover with plastic wrap, and let it rise in a warm, draft-free location for about 1-1.5 hours, or until doubled in size. Meanwhile, prepare your laminating butter by placing the cold butter between two sheets of parchment paper and pounding it with a rolling pin into a flat rectangle about ½ inch thick. Refrigerate this butter layer until needed.
Laminating Your King Hawaiian Cheesecake Danish Dough
Once your dough has risen, punch it down gently to release the air and turn it out onto a lightly floured surface. Roll it into a large rectangle approximately 12×18 inches. This laminating process creates those beautiful, flaky layers that make Danish pastries so irresistible.
Place your prepared butter rectangle in the center of the dough. Fold the sides of the dough over the butter like a letter, encasing it completely. Turn the dough 90 degrees, then roll it out again into a long rectangle. Fold it into thirds again (this is called a “turn”), wrap it in plastic wrap, and refrigerate for 30 minutes.
Repeat this rolling and folding process two more times, refrigerating for 30 minutes between each turn. This creates multiple layers of butter and dough that will puff up beautifully during baking. While this process requires patience, it’s absolutely essential for achieving the characteristic flaky texture of your King Hawaiian Cheesecake Danish.
After the final turn and rest period, your laminated dough is ready to shape. Roll it out on a lightly floured surface into a large rectangle about ¼ inch thick. Using a sharp knife or pizza cutter, cut the dough into rectangles approximately 4×5 inches each. You should get about 12 pieces.
Creating the Luscious Cheesecake Filling
While your dough is chilling during one of the rest periods, prepare the spectacular cheesecake filling that makes this King Hawaiian Cheesecake Danish truly unforgettable. In a large mixing bowl, beat the softened cream cheese with an electric mixer on medium speed until completely smooth and fluffy, about 2-3 minutes. Scrape down the sides of the bowl frequently to ensure even mixing.
Add the sugar and continue beating until light and fluffy, another 2 minutes. Then, add the egg, sour cream, flour, vanilla extract, and lemon zest. Beat on low speed initially to prevent splattering, then increase to medium and beat until the mixture is perfectly smooth and creamy with no lumps remaining. The flour helps stabilize the filling so it doesn’t run out of the pastries during baking.
Transfer this filling to a piping bag or a large zip-top bag with one corner snipped off. This makes portioning the filling onto your pastries much easier and neater. If you’re not ready to assemble immediately, refrigerate the filling until needed—it can be prepared up to 24 hours in advance.
Assembling Your King Hawaiian Cheesecake Danish
Now comes the exciting part—assembling your beautiful King Hawaiian Cheesecake Danish pastries! Line two large baking sheets with parchment paper or silicone baking mats. Place your cut dough rectangles on the prepared sheets, spacing them about 2 inches apart to allow for expansion during baking.
For each pastry, fold the corners inward slightly to create a shallow well in the center, or make diagonal cuts about 1 inch long at each corner and fold those strips back. These techniques create a border that helps contain the filling. Pipe or spoon about 2-3 tablespoons of the cheesecake filling into the center of each pastry, spreading it slightly but leaving the borders clear.
Arrange several pieces of fresh pineapple and strawberry slices on top of the cheesecake filling, pressing them in gently. The fruit not only looks beautiful but also adds fresh, bright flavor to each bite. At this point, cover the assembled pastries loosely with plastic wrap and let them rise in a warm place for 30-45 minutes until slightly puffy.
Preheat your oven to 375°F (190°C) during the final 15 minutes of rising time. Just before baking, you can brush the exposed dough edges with a beaten egg wash (one egg beaten with 1 tablespoon of water) for extra golden color, though this step is optional.
Bake the King Hawaiian Cheesecake Danish for 18-22 minutes, until the pastry is golden brown and the cheesecake filling is set but still slightly jiggly in the center. The pastries will continue cooking slightly from residual heat after you remove them from the oven, so don’t overbake or the filling will become dry.
Adding the Finishing Touches to Your King Hawaiian Cheesecake Danish
Allow your baked pastries to cool on the baking sheets for 10 minutes, then carefully transfer them to a wire rack. While they’re cooling, prepare the simple but stunning glaze that adds the final touch of sweetness and shine to your King Hawaiian Cheesecake Danish.
In a small bowl, whisk together the powdered sugar, pineapple juice, and vanilla extract until smooth. The consistency should be thick but pourable—similar to honey. If it’s too thick, add more pineapple juice a teaspoon at a time. If it’s too thin, add more powdered sugar.
Drizzle this glaze generously over the still-warm pastries, allowing it to cascade down the sides and pool slightly around the fruit. The warmth of the pastries helps the glaze set into a beautiful, glossy finish. If desired, sprinkle some shredded coconut over the glaze while it’s still wet for added tropical flair and textural contrast.
These King Hawaiian Cheesecake Danish pastries are best enjoyed slightly warm or at room temperature within the first day of baking. However, they’re still absolutely delicious the next day as well, especially when reheated briefly in a 300°F oven for 5-7 minutes.
Nutritional Information for King Hawaiian Cheesecake Danish
Understanding the nutritional content helps you enjoy these treats mindfully. Per pastry (recipe makes 12):
- Calories: 425
- Total Fat: 24g
- Saturated Fat: 15g
- Cholesterol: 95mg
- Sodium: 285mg
- Total Carbohydrates: 47g
- Dietary Fiber: 1g
- Sugars: 22g
- Protein: 7g
While these King Hawaiian Cheesecake Danish pastries are certainly indulgent, they’re perfect for special occasions and weekend treats. The combination of protein from the eggs and cream cheese along with the carbohydrates from the dough provides sustained energy to start your day.
Serving Suggestions and Presentation Ideas
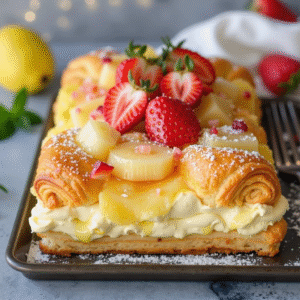
These gorgeous King Hawaiian Cheesecake Danish pastries deserve to be presented beautifully. I love arranging them on a large serving platter or cake stand, allowing the golden pastry and colorful fruit toppings to create a stunning visual display. The contrast between the flaky golden layers and the white cheesecake filling dotted with bright red strawberries and yellow pineapple is absolutely eye-catching.
For brunch service, arrange your King Hawaiian Cheesecake Danish alongside fresh tropical fruit salad, crispy bacon or sausage links, and freshly brewed Kona coffee or tropical fruit smoothies. The combination creates a complete Hawaiian-inspired breakfast spread that transports your guests to paradise.
These pastries also shine as a centerpiece for afternoon tea service. Cut them into smaller portions and serve with additional fresh berries, whipped cream, and hot tea or iced passion fruit tea. Additionally, they make wonderful contributions to potluck brunches, bake sales, or holiday breakfast gatherings—they travel well and always receive rave reviews.
For an extra-special presentation, dust the finished pastries with a light sprinkle of powdered sugar just before serving, which adds an elegant touch. Fresh mint leaves also make beautiful, aromatic garnishes that complement the tropical fruit flavors perfectly.
Perfect Pairings: What to Serve with King Hawaiian Cheesecake Danish
These sweet, rich pastries pair wonderfully with beverages that can either complement or contrast their flavors. My favorite pairing is a bold, dark-roasted coffee—preferably Hawaiian Kona or a similar variety. The coffee’s slight bitterness and deep, roasted notes provide perfect balance against the sweet pastry and creamy filling.
For those who prefer tea, try serving these King Hawaiian Cheesecake Danish with passion fruit green tea or coconut oolong. These tropical-flavored teas echo the pineapple in the pastry while adding their own unique aromatic qualities. Alternatively, a classic English Breakfast tea provides a robust, malty flavor that stands up well to the richness of the cream cheese filling.
For brunch gatherings, consider offering mimosas made with fresh pineapple juice and champagne, or virgin piña coladas for non-alcoholic options. These tropical beverages complement the Hawaiian theme beautifully and create a cohesive flavor experience throughout the meal.
If you’re serving these pastries as dessert, a sweet dessert wine such as late-harvest Riesling or Moscato provides lovely pairing. Their fruity, slightly sweet profiles harmonize with the tropical fruits and don’t overwhelm the delicate flavors of the King Hawaiian Cheesecake Danish.
Creative Variations on the Classic King Hawaiian Cheesecake Danish
Once you’ve mastered the basic King Hawaiian Cheesecake Danish recipe, there are numerous delicious variations to explore that keep this pastry exciting and versatile.
Tropical Paradise Danish: Enhance the tropical theme by adding diced mango and kiwi to the fruit topping alongside the pineapple and strawberries. Mix a tablespoon of coconut cream into the cheesecake filling and sprinkle toasted coconut flakes over the finished pastries. This version tastes like a tropical vacation in pastry form.
Berry Bliss Hawaiian Danish: Replace the pineapple with a mix of fresh blueberries, raspberries, and blackberries for a berry-forward version. Add a teaspoon of lemon juice to the cheesecake filling to complement the berries’ natural tartness. This variation is perfect for summer when berries are at their peak.
Chocolate Lover’s Hawaiian Danish: Drizzle melted dark chocolate over the finished pastries instead of the pineapple glaze. You can also add mini chocolate chips to the cheesecake filling for extra indulgence. The combination of chocolate, cream cheese, and tropical fruit creates a sophisticated flavor profile.
Caramel Macadamia Hawaiian Danish: Toast chopped macadamia nuts and sprinkle them over the cheesecake filling before baking. After cooling, drizzle with caramel sauce instead of the pineapple glaze. This version pays homage to Hawaii’s famous macadamia nut industry and adds wonderful crunch.
Lemon Blueberry Hawaiian Danish: Increase the lemon zest in the filling to two lemons and add fresh blueberries on top. Replace the pineapple juice in the glaze with fresh lemon juice. This bright, citrusy variation is refreshing and perfect for spring brunches.
Storage and Make-Ahead Tips for King Hawaiian Cheesecake Danish
Proper storage ensures your King Hawaiian Cheesecake Danish remains fresh and delicious for as long as possible. Store any leftover pastries in an airtight container in the refrigerator for up to 3 days. The cheesecake filling requires refrigeration, so never leave these pastries at room temperature for more than 2 hours.
To refresh refrigerated pastries, reheat them in a 300°F oven for 5-7 minutes until warmed through. This brief reheating restores some of the pastry’s crispness and makes the filling creamy again. Avoid using the microwave, as it makes the pastry soggy rather than crisp.
For make-ahead convenience, you can prepare several components in advance. The laminated dough can be made up to 2 days ahead and kept refrigerated, tightly wrapped in plastic wrap. The cheesecake filling also keeps well for 24 hours in the refrigerator in a covered container.
You can assemble the pastries completely (without the glaze), cover them tightly with plastic wrap, and refrigerate overnight. In the morning, let them sit at room temperature for 30 minutes while your oven preheats, then bake as directed. This method is perfect for holiday mornings when you want fresh pastries without early morning stress.
The baked and cooled pastries (without glaze) can also be frozen for up to 2 months. Wrap them individually in plastic wrap, then place in a freezer-safe container or bag. Thaw overnight in the refrigerator, then warm in a 300°F oven for 8-10 minutes. Add the glaze and fresh fruit just before serving for the best presentation.
Troubleshooting Common King Hawaiian Cheesecake Danish Issues
Even experienced bakers occasionally face challenges when making laminated pastries. Here are solutions to common problems you might encounter:
Butter Breaking Through Dough During Laminating: This happens when the butter and dough have different temperatures. The butter should be cold but pliable—if it’s too hard, it breaks through the dough; if too soft, it squishes out. If butter breaks through, patch it with a bit of dough and refrigerate for 20 minutes before continuing.
Pastry Not Rising Properly: This usually indicates dead yeast or dough that’s too cold. Always check your yeast’s expiration date and ensure your liquids are at the correct temperature (110°F). If your kitchen is very cold, let the pastries rise in an oven with just the light on, which provides gentle warmth.
Filling Running Out During Baking: Make sure you’re not overfilling the pastries—2-3 tablespoons is the right amount. Additionally, ensure the cheesecake filling includes the tablespoon of flour, which helps it set properly. Creating proper borders by folding the dough edges also helps contain the filling.
Pastry Browning Too Quickly: If the tops are browning too fast while the insides remain undercooked, your oven temperature is too high. Use an oven thermometer to verify accuracy, and tent the pastries loosely with foil during the last 5-10 minutes of baking if needed.
Soggy Bottom Pastry: This occurs when the bottom doesn’t bake through properly. Ensure your oven is fully preheated before baking, and consider baking the pastries on the lower rack position for the first 10 minutes before moving to the center rack. This promotes better bottom crust development.
My Personal Tips for King Hawaiian Cheesecake Danish Success
After perfecting this recipe through many batches, I’ve discovered several insider tricks that consistently produce bakery-quality King Hawaiian Cheesecake Danish every single time.
First, don’t rush the laminating process. Those rest periods in the refrigerator between turns are absolutely essential. They allow the gluten to relax, making the dough easier to roll, and they keep the butter at the right temperature. Rushing this step compromises the flaky layers you’re working so hard to create.
Second, use a bench scraper when working with the dough. This inexpensive tool makes rolling and folding laminated dough infinitely easier. It helps you lift the dough without tearing it and keeps your work surface clean. Once I started using one, my laminated pastries improved dramatically.
Third, embrace imperfection in your first few attempts. Laminated doughs have a learning curve, and even less-than-perfect pastries will still taste absolutely delicious. Each time you make this King Hawaiian Cheesecake Danish, you’ll develop better feel for the dough and improve your technique.
Fourth, invest in quality cream cheese for the filling. Store brands can sometimes have stabilizers that affect texture. Full-fat, name-brand cream cheese creates the smoothest, most luxurious filling. Additionally, ensure it’s completely softened to room temperature before mixing to avoid lumps.
Finally, use fresh, high-quality fruit for the topping. Since the fruit is such a prominent visual and flavor element, it’s worth seeking out the sweetest, ripest specimens. Fresh pineapple tastes significantly better than canned in this application, and ripe, red strawberries make all the difference.
This King Hawaiian Cheesecake Danish has become my signature recipe for special breakfasts and brunches. The combination of flaky, buttery pastry, rich cheesecake filling, and bright tropical fruit creates something truly memorable. While the recipe requires some time and patience, the stunning results make every step worthwhile. Whether you’re celebrating a special occasion or simply want to treat yourself to something extraordinary, these pastries deliver pure joy in every bite.
Print
King Hawaiian Cheesecake Danish: The Ultimate Sweet Pastry Paradise
Description
Creating these spectacular pastries requires quality ingredients, but nothing too difficult to source. Each component plays a crucial role in achieving that perfect King Hawaiian Cheesecake Danish texture and flavor.
Ingredients
Sweet Hawaiian-Style Danish Dough:
- 3 cups all-purpose flour, plus extra for dusting – provides structure while remaining tender
- ¼ cup granulated sugar – adds the signature sweetness
- 2¼ teaspoons instant yeast (1 packet) – creates lift and airiness
- 1 teaspoon salt – balances the sweetness and enhances flavors
- ¾ cup warm whole milk (110°F) – activates yeast and adds richness
- ¼ cup pineapple juice, warmed – infuses tropical flavor throughout
- 2 large eggs – binds ingredients and adds richness
- ⅓ cup unsalted butter, melted – creates tender, flaky layers
- 1 teaspoon vanilla extract – adds warmth and depth
- 1 cup cold unsalted butter, for laminating – creates those gorgeous flaky layers
Creamy Cheesecake Filling:
- 16 ounces cream cheese, softened to room temperature – the star of the filling
- ½ cup granulated sugar – sweetens perfectly without overpowering
- 1 large egg – helps the filling set during baking
- 2 tablespoons sour cream – adds tanginess and smooth texture
- 1 tablespoon all-purpose flour – prevents the filling from being too runny
- 1 teaspoon vanilla extract – complements the cream cheese beautifully
- Zest of 1 lemon – brightens the filling with subtle citrus notes
Tropical Topping and Glaze:
- 1 cup fresh pineapple chunks – adds juicy, tropical sweetness
- 1 cup fresh strawberries, sliced – provides color and fresh berry flavor
- 1 cup powdered sugar – creates the glossy glaze
- 2–3 tablespoons pineapple juice – thins the glaze and adds flavor
- ½ teaspoon vanilla extract – rounds out the glaze
- Shredded coconut for garnish (optional) – adds texture and tropical flair
Instructions
Step-by-Step Instructions for Perfect King Hawaiian Cheesecake Danish
Creating these beautiful pastries involves several steps, but breaking the process down makes it entirely manageable. I’ll guide you through each stage with detailed instructions to ensure your success.
Preparing Your Hawaiian-Style Danish Dough
Begin by creating the sweet, enriched dough that gives this King Hawaiian Cheesecake Danish its distinctive character. In a large mixing bowl, combine the flour, sugar, instant yeast, and salt, whisking them together thoroughly. This initial mixing ensures even distribution of the yeast throughout the flour.
In a separate bowl, whisk together the warm milk, warm pineapple juice, eggs, melted butter, and vanilla extract. The liquids should feel pleasantly warm to the touch but not hot—if they’re too hot, they’ll kill the yeast. Pour this mixture into the dry ingredients and stir with a wooden spoon until a shaggy dough forms.
Turn the dough out onto a lightly floured surface and knead for about 8-10 minutes until it becomes smooth, elastic, and slightly sticky. Alternatively, use a stand mixer fitted with a dough hook and knead on medium speed for 6-7 minutes. The dough should pass the “windowpane test”—when you stretch a small piece thin enough to see light through it without tearing.
Place the dough in a lightly greased bowl, cover with plastic wrap, and let it rise in a warm, draft-free location for about 1-1.5 hours, or until doubled in size. Meanwhile, prepare your laminating butter by placing the cold butter between two sheets of parchment paper and pounding it with a rolling pin into a flat rectangle about ½ inch thick. Refrigerate this butter layer until needed.
Laminating Your King Hawaiian Cheesecake Danish Dough
Once your dough has risen, punch it down gently to release the air and turn it out onto a lightly floured surface. Roll it into a large rectangle approximately 12×18 inches. This laminating process creates those beautiful, flaky layers that make Danish pastries so irresistible.
Place your prepared butter rectangle in the center of the dough. Fold the sides of the dough over the butter like a letter, encasing it completely. Turn the dough 90 degrees, then roll it out again into a long rectangle. Fold it into thirds again (this is called a “turn”), wrap it in plastic wrap, and refrigerate for 30 minutes.
Repeat this rolling and folding process two more times, refrigerating for 30 minutes between each turn. This creates multiple layers of butter and dough that will puff up beautifully during baking. While this process requires patience, it’s absolutely essential for achieving the characteristic flaky texture of your King Hawaiian Cheesecake Danish.
After the final turn and rest period, your laminated dough is ready to shape. Roll it out on a lightly floured surface into a large rectangle about ¼ inch thick. Using a sharp knife or pizza cutter, cut the dough into rectangles approximately 4×5 inches each. You should get about 12 pieces.
Creating the Luscious Cheesecake Filling
While your dough is chilling during one of the rest periods, prepare the spectacular cheesecake filling that makes this King Hawaiian Cheesecake Danish truly unforgettable. In a large mixing bowl, beat the softened cream cheese with an electric mixer on medium speed until completely smooth and fluffy, about 2-3 minutes. Scrape down the sides of the bowl frequently to ensure even mixing.
Add the sugar and continue beating until light and fluffy, another 2 minutes. Then, add the egg, sour cream, flour, vanilla extract, and lemon zest. Beat on low speed initially to prevent splattering, then increase to medium and beat until the mixture is perfectly smooth and creamy with no lumps remaining. The flour helps stabilize the filling so it doesn’t run out of the pastries during baking.
Transfer this filling to a piping bag or a large zip-top bag with one corner snipped off. This makes portioning the filling onto your pastries much easier and neater. If you’re not ready to assemble immediately, refrigerate the filling until needed—it can be prepared up to 24 hours in advance.
Assembling Your King Hawaiian Cheesecake Danish
Now comes the exciting part—assembling your beautiful King Hawaiian Cheesecake Danish pastries! Line two large baking sheets with parchment paper or silicone baking mats. Place your cut dough rectangles on the prepared sheets, spacing them about 2 inches apart to allow for expansion during baking.
For each pastry, fold the corners inward slightly to create a shallow well in the center, or make diagonal cuts about 1 inch long at each corner and fold those strips back. These techniques create a border that helps contain the filling. Pipe or spoon about 2-3 tablespoons of the cheesecake filling into the center of each pastry, spreading it slightly but leaving the borders clear.
Arrange several pieces of fresh pineapple and strawberry slices on top of the cheesecake filling, pressing them in gently. The fruit not only looks beautiful but also adds fresh, bright flavor to each bite. At this point, cover the assembled pastries loosely with plastic wrap and let them rise in a warm place for 30-45 minutes until slightly puffy.
Preheat your oven to 375°F (190°C) during the final 15 minutes of rising time. Just before baking, you can brush the exposed dough edges with a beaten egg wash (one egg beaten with 1 tablespoon of water) for extra golden color, though this step is optional.
Bake the King Hawaiian Cheesecake Danish for 18-22 minutes, until the pastry is golden brown and the cheesecake filling is set but still slightly jiggly in the center. The pastries will continue cooking slightly from residual heat after you remove them from the oven, so don’t overbake or the filling will become dry.
Adding the Finishing Touches to Your King Hawaiian Cheesecake Danish
Allow your baked pastries to cool on the baking sheets for 10 minutes, then carefully transfer them to a wire rack. While they’re cooling, prepare the simple but stunning glaze that adds the final touch of sweetness and shine to your King Hawaiian Cheesecake Danish.
In a small bowl, whisk together the powdered sugar, pineapple juice, and vanilla extract until smooth. The consistency should be thick but pourable—similar to honey. If it’s too thick, add more pineapple juice a teaspoon at a time. If it’s too thin, add more powdered sugar.
Drizzle this glaze generously over the still-warm pastries, allowing it to cascade down the sides and pool slightly around the fruit. The warmth of the pastries helps the glaze set into a beautiful, glossy finish. If desired, sprinkle some shredded coconut over the glaze while it’s still wet for added tropical flair and textural contrast.
These King Hawaiian Cheesecake Danish pastries are best enjoyed slightly warm or at room temperature within the first day of baking. However, they’re still absolutely delicious the next day as well, especially when reheated briefly in a 300°F oven for 5-7 minutes.
Nutritional Information for King Hawaiian Cheesecake Danish
Understanding the nutritional content helps you enjoy these treats mindfully. Per pastry (recipe makes 12):
- Calories: 425
- Total Fat: 24g
- Saturated Fat: 15g
- Cholesterol: 95mg
- Sodium: 285mg
- Total Carbohydrates: 47g
- Dietary Fiber: 1g
- Sugars: 22g
- Protein: 7g
While these King Hawaiian Cheesecake Danish pastries are certainly indulgent, they’re perfect for special occasions and weekend treats. The combination of protein from the eggs and cream cheese along with the carbohydrates from the dough provides sustained energy to start your day.