The first time I attempted chocolate truffles, I was convinced they’d be impossibly difficult. After all, they look so elegant in fancy chocolate shops, perfectly round and dusted with cocoa powder. But here’s what I discovered: homemade easy chocolate truffles are surprisingly simple to make, and they taste infinitely better than store-bought versions. I still remember the moment I took my first bite—the silky ganache melting on my tongue, the rich chocolate flavor exploding in my mouth. Since that day, I’ve made these truffles for birthdays, holidays, and honestly, just random Tuesdays when I needed something special.
Why You’ll Love These Homemade Easy Chocolate Truffles
Making chocolate truffles at home transforms your kitchen into a chocolatier’s workshop. Moreover, you control every ingredient, which means you can adjust sweetness levels and choose high-quality chocolate. These homemade easy chocolate truffles require only a handful of ingredients, yet they deliver restaurant-quality results every single time.
The beauty of this recipe lies in its versatility. Furthermore, you can customize the fillings with caramel, peanut butter, or flavored liqueurs. I’ve experimented with dozens of variations, and each one has been a delicious adventure. The basic technique remains the same, which makes mastering homemade easy chocolate truffles an incredibly rewarding experience.
Understanding the Magic Behind Chocolate Truffles
Before diving into the recipe, let’s talk about what makes truffles so special. Essentially, they consist of a ganache center—a mixture of chocolate and cream—coated in additional chocolate or cocoa powder. The name “truffle” comes from their resemblance to the prized fungi, though thankfully, these chocolate versions are much easier to find.
Additionally, the texture is what sets exceptional truffles apart from mediocre ones. When you bite into a perfectly made homemade easy chocolate truffle, you should experience a moment of resistance from the outer shell, followed by the luxurious, creamy ganache inside. Achieving this balance requires attention to temperature and timing, but don’t worry—I’ll guide you through every step.
Essential Ingredients for Homemade Easy Chocolate Truffles
For the Ganache Center:
- 12 oz high-quality dark chocolate (60-70% cocoa), finely chopped
- 1 cup heavy cream
- 2 tablespoons unsalted butter, softened
- 1 teaspoon vanilla extract
- Pinch of salt
For the Coating:
- 8 oz dark chocolate, melted
- ½ cup unsweetened cocoa powder
- Optional: finely ground nuts, chocolate shavings, or gold dust
Step-by-Step Instructions for Perfect Chocolate Truffles
Making the Ganache Base
First, place your finely chopped chocolate in a heatproof bowl. Meanwhile, heat the heavy cream in a small saucepan over medium heat until it just begins to simmer. You’ll see tiny bubbles forming around the edges—that’s your signal to remove it from heat.
Next, pour the hot cream over the chopped chocolate. Let it sit undisturbed for about two minutes. This waiting period allows the heat to gently melt the chocolate without shocking it. Afterward, stir slowly from the center outward using a spatula. The mixture will gradually transform into a smooth, glossy ganache. If you notice any unmelted chocolate pieces, place the bowl over a pot of barely simmering water and stir until completely smooth.
Subsequently, add the softened butter, vanilla extract, and salt. Stir these ingredients in gently but thoroughly. The butter adds extra richness and helps create that melt-in-your-mouth texture that makes homemade easy chocolate truffles so irresistible.
Chilling the Ganache
Cover the bowl with plastic wrap, pressing it directly onto the surface of the ganache to prevent a skin from forming. Then, refrigerate for at least three hours, or until the ganache is firm enough to scoop. I usually make mine in the evening and let it chill overnight, which also breaks up the work into manageable sessions.
Shaping Your Homemade Easy Chocolate Truffles
Once your ganache has firmed up, it’s time for the fun part—shaping. Use a small cookie scoop or melon baller to portion out even amounts of ganache. Roll each portion between your palms to create smooth spheres. Here’s a crucial tip I learned after many batches: keep your hands cool. If your palms are too warm, the ganache will melt and become sticky. I keep a bowl of cold water nearby and dip my hands in it between rolling truffles.
Place the rolled truffles on a parchment-lined baking sheet. At this point, they won’t look perfect, and that’s absolutely fine. Return them to the refrigerator for another 30 minutes to firm up before coating.
Coating Your Chocolate Truffles
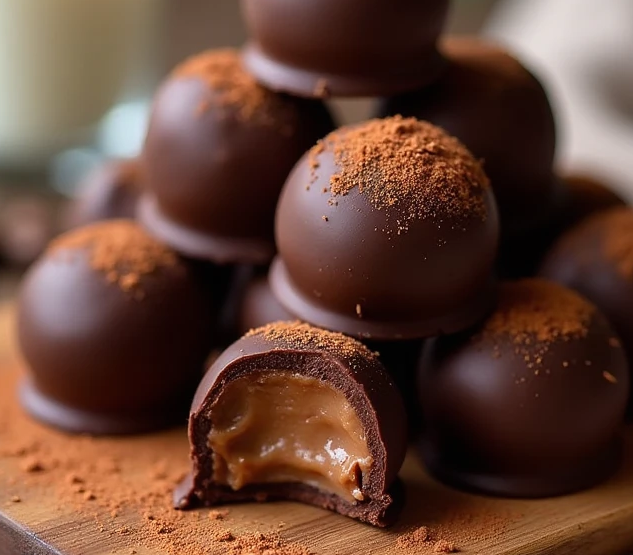
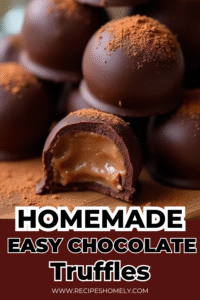
Now comes the moment when your homemade easy chocolate truffles truly shine. You have two main coating options: melted chocolate or cocoa powder. For a classic look, I recommend the cocoa powder method, which gives them that sophisticated, rustic appearance you see in the image—perfectly round spheres dusted generously with rich, dark cocoa.
For cocoa-dusted truffles, simply roll each chilled ganache ball in unsweetened cocoa powder until completely covered. The contrast between the smooth ganache and the slightly bitter cocoa creates an incredible flavor experience.
Alternatively, if you prefer a chocolate shell, melt your coating chocolate using a double boiler or microwave in 30-second intervals. Let the chocolate cool slightly—it should be liquid but not hot. Drop one truffle at a time into the melted chocolate, use a fork to roll it around, then lift it out, tapping the fork gently against the bowl’s edge to remove excess chocolate. Place on parchment paper to set.
Pro Tips for Homemade Easy Chocolate Truffles
Throughout my truffle-making journey, I’ve discovered several tricks that elevate results from good to spectacular. First, invest in quality chocolate. Since chocolate is the star ingredient, using premium bars makes a noticeable difference. I prefer brands with minimal ingredients—just cocoa, cocoa butter, and sugar.
Second, work in a cool environment. If your kitchen is warm, the ganache becomes difficult to handle. On hot days, I sometimes work near an open window or even briefly in front of the refrigerator.
Third, embrace imperfection. Handmade truffles should look handmade. Those slightly irregular shapes prove they’re crafted with care, not mass-produced in a factory.
Flavor Variations for Your Chocolate Truffles
Once you’ve mastered the basic homemade easy chocolate truffles recipe, experimentation becomes incredibly exciting. Here are my favorite variations:
Salted Caramel Truffles: Add 3 tablespoons of caramel sauce to the ganache and sprinkle sea salt on top after coating.
Espresso Truffles: Mix 2 tablespoons of finely ground espresso powder into the ganache for a sophisticated coffee kick.
Orange Chocolate Truffles: Add 2 teaspoons of orange zest and 1 tablespoon of Grand Marnier to the ganache.
Peanut Butter Truffles: Swirl 3 tablespoons of creamy peanut butter into the ganache before chilling.
Storing Your Homemade Easy Chocolate Truffles
Proper storage ensures your truffles maintain their perfect texture. Keep them in an airtight container in the refrigerator for up to two weeks. Layer them between sheets of parchment paper to prevent sticking. Before serving, let them sit at room temperature for about 10 minutes—this allows the ganache to soften slightly, enhancing the creamy texture.
Interestingly, you can also freeze chocolate truffles for up to three months. Wrap them individually in plastic wrap, then place them in a freezer-safe container. Thaw in the refrigerator overnight before enjoying.
Presenting Your Chocolate Truffles
Presentation elevates homemade easy chocolate truffles from a simple treat to a stunning gift. I arrange mine in small paper cups inside decorative boxes lined with tissue paper. The cocoa-dusted ones look particularly beautiful against white or cream-colored packaging.
For special occasions, consider adding a light sprinkle of edible gold dust over the cocoa powder. This tiny touch transforms them into truly luxurious confections. Additionally, tying the box with a satin ribbon and including a handwritten note adds a personal touch that recipients always appreciate.
Nutritional Information per Truffle
- Calories: 95
- Total Fat: 7g
- Saturated Fat: 4g
- Cholesterol: 12mg
- Sodium: 8mg
- Total Carbohydrates: 8g
- Dietary Fiber: 1g
- Sugars: 6g
- Protein: 1g
Wine and Beverage Pairing
Pairing homemade easy chocolate truffles with the right beverage enhances the entire experience. Port wine, particularly ruby or tawny varieties, complements the rich chocolate beautifully. The wine’s sweetness and complexity mirror the truffle’s depth.
For non-alcoholic options, try serving these truffles with espresso or French press coffee. The slight bitterness of good coffee balances the chocolate’s sweetness perfectly. Alternatively, a rich hot chocolate creates an indulgent chocolate-on-chocolate experience that’s especially wonderful on cold winter evenings.
Common Mistakes to Avoid
Through trial and error, I’ve learned what not to do when making chocolate truffles. Never add cold cream to chocolate—the temperature difference can cause the chocolate to seize. Always heat the cream until steaming before pouring.
Similarly, don’t rush the chilling process. If you try to roll the ganache before it’s properly set, you’ll end up with a sticky mess. Patience truly is a virtue in truffle-making.
Finally, avoid using chocolate chips for the ganache. They contain stabilizers that prevent them from melting as smoothly as bar chocolate. Stick with good-quality chocolate bars for the best results.
My Personal Truffle-Making Ritual
Every time I make homemade easy chocolate truffles, I follow a little ritual. I put on my favorite music, clear my workspace completely, and line up all my ingredients. There’s something meditative about the process—the careful melting, the gentle stirring, the rhythmic rolling. It’s become my form of kitchen therapy.
I also always taste-test the ganache before chilling it. This isn’t just about quality control (though that’s important); it’s about that moment of pure chocolate bliss that reminds me why I love baking.
Final Thoughts on Homemade Easy Chocolate Truffles
Making chocolate truffles at home is genuinely one of the most rewarding kitchen projects you can undertake. The process is straightforward, the ingredients are simple, and the results are absolutely spectacular. Whether you’re making them for a special celebration or just because you deserve something wonderful, these homemade easy chocolate truffles will exceed your expectations.
The image of those perfectly formed spheres—some whole, one cut in half to reveal the luscious caramel center, all dusted with that beautiful cocoa powder—captures exactly what you’ll create. That glossy exterior, the smooth ganache inside, the professional appearance that belies how simple they are to make.
So grab your best chocolate, roll up your sleeves, and prepare to impress everyone (including yourself) with your truffle-making skills. Once you realize how easy homemade chocolate truffles truly are, you’ll never look at expensive boxed chocolates the same way again.
Print
Article 1: Homemade Easy Chocolate Truffles
Description
Understanding the Magic Behind Chocolate Truffles
Before diving into the recipe, let’s talk about what makes truffles so special. Essentially, they consist of a ganache center—a mixture of chocolate and cream—coated in additional chocolate or cocoa powder. The name “truffle” comes from their resemblance to the prized fungi, though thankfully, these chocolate versions are much easier to find.
Additionally, the texture is what sets exceptional truffles apart from mediocre ones. When you bite into a perfectly made homemade easy chocolate truffle, you should experience a moment of resistance from the outer shell, followed by the luxurious, creamy ganache inside. Achieving this balance requires attention to temperature and timing, but don’t worry—I’ll guide you through every step.
Ingredients
Essential Ingredients for Homemade Easy Chocolate Truffles
For the Ganache Center:
- 12 oz high-quality dark chocolate (60-70% cocoa), finely chopped
- 1 cup heavy cream
- 2 tablespoons unsalted butter, softened
- 1 teaspoon vanilla extract
- Pinch of salt
For the Coating:
- 8 oz dark chocolate, melted
- ½ cup unsweetened cocoa powder
- Optional: finely ground nuts, chocolate shavings, or gold dust
Instructions
Step-by-Step Instructions for Perfect Chocolate Truffles
Making the Ganache Base
First, place your finely chopped chocolate in a heatproof bowl. Meanwhile, heat the heavy cream in a small saucepan over medium heat until it just begins to simmer. You’ll see tiny bubbles forming around the edges—that’s your signal to remove it from heat.
Next, pour the hot cream over the chopped chocolate. Let it sit undisturbed for about two minutes. This waiting period allows the heat to gently melt the chocolate without shocking it. Afterward, stir slowly from the center outward using a spatula. The mixture will gradually transform into a smooth, glossy ganache. If you notice any unmelted chocolate pieces, place the bowl over a pot of barely simmering water and stir until completely smooth.
Subsequently, add the softened butter, vanilla extract, and salt. Stir these ingredients in gently but thoroughly. The butter adds extra richness and helps create that melt-in-your-mouth texture that makes homemade easy chocolate truffles so irresistible.
Chilling the Ganache
Cover the bowl with plastic wrap, pressing it directly onto the surface of the ganache to prevent a skin from forming. Then, refrigerate for at least three hours, or until the ganache is firm enough to scoop. I usually make mine in the evening and let it chill overnight, which also breaks up the work into manageable sessions.
Shaping Your Homemade Easy Chocolate Truffles
Once your ganache has firmed up, it’s time for the fun part—shaping. Use a small cookie scoop or melon baller to portion out even amounts of ganache. Roll each portion between your palms to create smooth spheres. Here’s a crucial tip I learned after many batches: keep your hands cool. If your palms are too warm, the ganache will melt and become sticky. I keep a bowl of cold water nearby and dip my hands in it between rolling truffles.
Place the rolled truffles on a parchment-lined baking sheet. At this point, they won’t look perfect, and that’s absolutely fine. Return them to the refrigerator for another 30 minutes to firm up before coating.
Coating Your Chocolate Truffles
Now comes the moment when your homemade easy chocolate truffles truly shine. You have two main coating options: melted chocolate or cocoa powder. For a classic look, I recommend the cocoa powder method, which gives them that sophisticated, rustic appearance you see in the image—perfectly round spheres dusted generously with rich, dark cocoa.
For cocoa-dusted truffles, simply roll each chilled ganache ball in unsweetened cocoa powder until completely covered. The contrast between the smooth ganache and the slightly bitter cocoa creates an incredible flavor experience.
Alternatively, if you prefer a chocolate shell, melt your coating chocolate using a double boiler or microwave in 30-second intervals. Let the chocolate cool slightly—it should be liquid but not hot. Drop one truffle at a time into the melted chocolate, use a fork to roll it around, then lift it out, tapping the fork gently against the bowl’s edge to remove excess chocolate. Place on parchment paper to set.
Pro Tips for Homemade Easy Chocolate Truffles
Throughout my truffle-making journey, I’ve discovered several tricks that elevate results from good to spectacular. First, invest in quality chocolate. Since chocolate is the star ingredient, using premium bars makes a noticeable difference. I prefer brands with minimal ingredients—just cocoa, cocoa butter, and sugar.
Second, work in a cool environment. If your kitchen is warm, the ganache becomes difficult to handle. On hot days, I sometimes work near an open window or even briefly in front of the refrigerator.
Third, embrace imperfection. Handmade truffles should look handmade. Those slightly irregular shapes prove they’re crafted with care, not mass-produced in a factory.
Flavor Variations for Your Chocolate Truffles
Once you’ve mastered the basic homemade easy chocolate truffles recipe, experimentation becomes incredibly exciting. Here are my favorite variations:
Salted Caramel Truffles: Add 3 tablespoons of caramel sauce to the ganache and sprinkle sea salt on top after coating.
Espresso Truffles: Mix 2 tablespoons of finely ground espresso powder into the ganache for a sophisticated coffee kick.
Orange Chocolate Truffles: Add 2 teaspoons of orange zest and 1 tablespoon of Grand Marnier to the ganache.
Peanut Butter Truffles: Swirl 3 tablespoons of creamy peanut butter into the ganache before chilling.
Storing Your Homemade Easy Chocolate Truffles
Proper storage ensures your truffles maintain their perfect texture. Keep them in an airtight container in the refrigerator for up to two weeks. Layer them between sheets of parchment paper to prevent sticking. Before serving, let them sit at room temperature for about 10 minutes—this allows the ganache to soften slightly, enhancing the creamy texture.
Interestingly, you can also freeze chocolate truffles for up to three months. Wrap them individually in plastic wrap, then place them in a freezer-safe container. Thaw in the refrigerator overnight before enjoying.
Presenting Your Chocolate Truffles
Presentation elevates homemade easy chocolate truffles from a simple treat to a stunning gift. I arrange mine in small paper cups inside decorative boxes lined with tissue paper. The cocoa-dusted ones look particularly beautiful against white or cream-colored packaging.
For special occasions, consider adding a light sprinkle of edible gold dust over the cocoa powder. This tiny touch transforms them into truly luxurious confections. Additionally, tying the box with a satin ribbon and including a handwritten note adds a personal touch that recipients always appreciate.