
There’s something magical about biting into a warm, golden ball of dough only to discover a river of melted cheese flowing out. That’s exactly what you get with these incredible garlic butter cheese bombs—the kind of appetizer that disappears from the table before you can even finish arranging them on the platter. Trust me, I’ve watched it happen at every gathering I’ve brought these to.
The first time I made garlic butter cheese bombs was during a cold winter evening when my family craved something warm, comforting, and undeniably indulgent. I remember pulling them out of the oven, the kitchen filled with the irresistible aroma of garlic and butter, and watching my kids’ eyes light up as the cheese stretched endlessly with each bite. That moment sealed it—this recipe became a permanent fixture in our home.
Whether you call them cheese bombs, cheesy garlic bread balls, or stuffed cheese biscuits, these little treasures are the perfect blend of crispy exterior, soft dough, and gooey melted cheese. They’re ideal for game day gatherings, holiday appetizer spreads, or simply when you need a quick comfort food fix. In this comprehensive guide, I’ll walk you through everything you need to know to create the perfect garlic butter cheese bombs in your own kitchen.
What Makes These Garlic Butter Cheese Bombs Irresistible
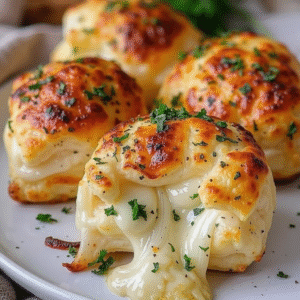
The beauty of this cheesy garlic appetizer lies in its simplicity and the perfect harmony of flavors. Picture this: soft, pillowy biscuit dough wrapped around a generous cube of mozzarella cheese, brushed with a fragrant garlic butter mixture infused with Italian herbs, then baked until the exterior turns golden brown while the inside transforms into a molten cheese center.
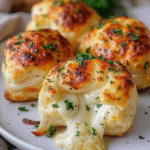
Looking at these garlic butter cheese bombs fresh from the oven, you’ll notice how the tops are perfectly golden and glistening with herb-flecked butter. The biscuits puff up beautifully, and as you break one open, the mozzarella creates those gorgeous, Instagram-worthy cheese pulls that stretch on and on. Little flecks of fresh parsley dot the tops, adding both color and a subtle freshness that balances the richness of the butter and cheese.
What sets these cheese stuffed biscuits apart from other appetizers is their versatility. They’re sophisticated enough to serve at a dinner party, yet casual enough for a Sunday football game. They work as an appetizer, a side dish for pasta or soup, or even a midnight snack when you’re craving something warm and cheesy.
Essential Ingredients for Perfect Garlic Cheese Bombs
One of the best things about this cheese bomb recipe is how few ingredients you need. Most of these items are probably already in your kitchen, making this the perfect last-minute appetizer when unexpected guests arrive.
For the Stuffed Cheese Biscuits
- 1 can (16.3 oz) refrigerated biscuit dough (8 biscuits) – Pillsbury Grands or similar buttermilk biscuits work perfectly
- 8 oz mozzarella cheese – cut into 8 cubes (about 1-inch each), or use string cheese cut in half
the Aromatic Garlic Herb Butter
- 4 tablespoons unsalted butter, melted
- 2 cloves garlic, minced (or 1 teaspoon garlic powder)
- 1 teaspoon Italian seasoning
- 2 tablespoons fresh parsley, finely chopped
- ¼ teaspoon salt
- 2 tablespoons grated Parmesan cheese (optional but recommended)
For Serving Your Cheesy Garlic Appetizer
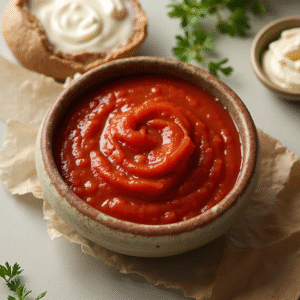
- Marinara sauce for dipping
- Ranch dressing (optional alternative)
- Additional fresh parsley for garnish
Step-by-Step Instructions for Making Garlic Butter Cheese Bombs
Follow these detailed instructions to achieve cheese bomb perfection every single time. The key is in the technique—especially when sealing the dough around the cheese to prevent any delicious leakage during baking.
Preparing Your Cheese Bombs for Baking
- Preheat and prepare: Set your oven to 375°F (190°C). Line a baking sheet with parchment paper or a silicone baking mat. This prevents sticking and makes cleanup a breeze.
- Prepare the cheese: Cut your mozzarella block into 8 equal cubes, approximately 1-inch each. If using string cheese, simply cut each stick in half. The cheese should be cold—this helps it hold its shape while you wrap the dough.
- Open and separate biscuits: Open your can of refrigerated biscuits and separate them into 8 individual pieces. Don’t worry about the pop—we all jump a little!
- Flatten the dough: Using your hands or a rolling pin, gently flatten each biscuit into a circle about 4 inches in diameter and ¼-inch thick. The dough should be thin enough to wrap around the cheese but thick enough to contain it.
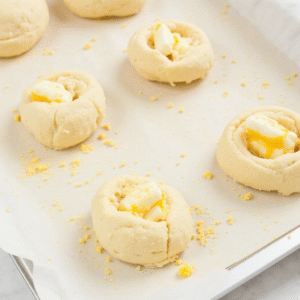
- Add the cheese: Place one cube of mozzarella in the center of each flattened biscuit.
- Seal carefully: This is the crucial step! Bring the edges of the dough up around the cheese and pinch them together firmly to create a sealed ball. Make sure there are no gaps or thin spots where cheese might escape. Roll gently between your palms to smooth the surface.
- Arrange on baking sheet: Place each sealed dough ball seam-side down on your prepared baking sheet, spacing them about 2 inches apart to allow for expansion.
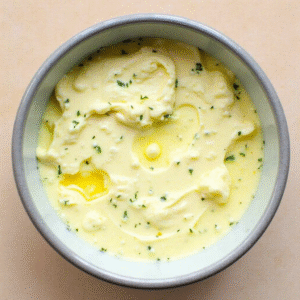
Creating the Flavorful Garlic Herb Butter
- Melt the butter: In a small microwave-safe bowl, melt the butter for about 30 seconds.
- Add aromatics: Stir in the minced garlic, Italian seasoning, parsley, and salt. If using fresh garlic, you can briefly heat the mixture to mellow the raw garlic flavor.
- First brush: Brush about half of the garlic butter mixture generously over each dough ball before baking.
Baking Your Cheese Stuffed Biscuits to Perfection
- Bake: Place the baking sheet in the preheated oven and bake for 12-15 minutes, or until the tops are golden brown and the biscuits are cooked through.
- Second brush: As soon as the cheese bombs come out of the oven, brush them with the remaining garlic butter while they’re still hot. This ensures the butter soaks into the warm dough.
- Finish and serve: Sprinkle with Parmesan cheese and additional fresh parsley if desired. Serve immediately while the cheese is still gloriously melted and stretchy.
Expert Tips for the Best Garlic Butter Cheese Bombs
After making hundreds of these cheesy delights, I’ve gathered some invaluable tips that will elevate your cheese bombs from good to absolutely incredible.
- Use cold cheese: Cold mozzarella is much easier to wrap and less likely to ooze out before baking. Consider putting your cheese cubes in the freezer for 10 minutes before wrapping.
- Seal thoroughly: The most common mistake is not sealing the dough properly. Take your time pinching those seams closed—it’s worth the extra effort.
- Don’t skip the double butter: Brushing before AND after baking creates that irresistible golden, garlicky exterior.
- Fresh garlic vs. powder: Fresh minced garlic provides a more robust flavor, while garlic powder gives a mellower taste. Both work wonderfully—choose based on your preference.
- Serve immediately: These are best enjoyed fresh from the oven when the cheese is at peak stretchiness. If you must reheat, a quick stint in the oven at 350°F for 5 minutes works better than the microwave.
Creative Variations for Your Cheese Bomb Recipe
Once you’ve mastered the basic garlic butter cheese bombs recipe, it’s time to get creative! Here are some delicious variations to keep things exciting.
Different Cheese Options for Stuffed Biscuits
- Cheddar cheese bombs: Use sharp cheddar for a tangier, more robust flavor.
- Pepper jack: Add a spicy kick with pepper jack cheese.
- Four-cheese blend: Mix mozzarella, provolone, fontina, and Parmesan for a complex cheese flavor.
- Gouda or Brie: For a more sophisticated twist, try smoked gouda or creamy brie.
Tasty Add-Ins for Extra Flavor
- Bacon lovers: Add crispy bacon bits inside with the cheese or wrap the bombs in bacon before baking.
- Pepperoni pizza style: Include mini pepperoni slices with the mozzarella and serve with pizza sauce.
- Buffalo chicken: Add shredded chicken tossed in buffalo sauce along with the cheese.
- Jalapeño popper: Mix cream cheese with diced jalapeños and wrap in the biscuit dough.
- Herb variations: Try rosemary and thyme, or add a touch of lemon zest to the garlic butter for brightness.
Making Cheese Bombs from Scratch
For those who prefer homemade everything, you can make the dough from scratch. Combine 2 cups all-purpose flour, 1 tablespoon sugar, 2½ teaspoons baking powder, 1½ teaspoons garlic powder, and ¼ teaspoon salt. Cut in 5 tablespoons cold butter until the mixture resembles pea-sized crumbs, then add ¾ cup cold buttermilk. Knead gently, refrigerate for 10 minutes, then roll out and cut into squares for wrapping the cheese.
Nutritional Values for Garlic Cheese Bombs
While these cheesy garlic appetizers are definitely an indulgence, here’s what you’re looking at nutritionally per cheese bomb (makes 8 servings):
- Calories: 160-200 kcal
- Carbohydrates: 14-18g
- Protein: 5-7g
- Fat: 10-13g
- Saturated Fat: 5-7g
- Cholesterol: 20-35mg
- Sodium: 350-420mg
- Calcium: 90-120mg
Healthier modifications: Use reduced-fat cheese and less butter, opt for whole wheat biscuit dough when available, or try part-skim mozzarella for a lighter version.
Stunning Presentation Tips for Your Cheesy Appetizer
Presentation matters, especially when you’ve put effort into making these gorgeous cheese stuffed biscuits. Here’s how to make them look as good as they taste:
- Serve on a rustic board: Arrange the cheese bombs on a wooden cutting board or slate serving plate for that artisanal look.
- Add a dipping station: Place a small bowl of warm marinara sauce in the center, surrounded by the cheese bombs.
- Garnish generously: Fresh parsley, a sprinkle of Parmesan, and a light drizzle of garlic butter make them visually stunning.
- Show the cheese pull: Break one open to display that gorgeous melted cheese—it’s an instant appetite trigger!
- Use toothpicks: For party settings, insert decorative toothpicks for easy grabbing.
Perfect Wine and Food Pairings for Cheese Bombs
These garlic butter cheese bombs pair wonderfully with various beverages and dishes. Here are my favorite combinations:
Wine Selections for Cheesy Garlic Appetizers
- Prosecco or Champagne: The bubbles cut through the richness of the butter and cheese beautifully.
- Pinot Grigio: A crisp, light white wine that complements without overpowering.
- Chianti: If you’re serving with marinara, a classic Italian red is perfect.
- Craft beer: A light lager or wheat beer pairs excellently for casual gatherings.
Complementary Dishes for Your Cheese Stuffed Biscuits
- Soups: Tomato soup, minestrone, or Italian wedding soup—the cheese bombs are perfect for dunking.
- Salads: A fresh Caesar or mixed green salad balances the richness.
- Pasta dishes: Serve alongside spaghetti and meatballs or fettuccine Alfredo.
- Charcuterie: Include them on an appetizer spread with cured meats and olives.
Storage and Reheating Tips for Garlic Cheese Bombs
While these are best fresh, here’s how to handle leftovers (if you have any!) and make-ahead preparation:
Refrigerator storage: Store cooled cheese bombs in an airtight container for up to 3 days. Reheat in a 350°F oven for 5-7 minutes until warmed through.
Freezing unbaked: Prepare the cheese bombs up to the baking step, freeze on a baking sheet, then transfer to a freezer bag. Bake from frozen at 375°F for 18-20 minutes.
Make-ahead tip: Prepare and refrigerate the unbaked bombs up to 24 hours in advance. Let them sit at room temperature for 10 minutes before baking.
Dietary Modifications for Cheese Bomb Recipe
Gluten-free version: Use gluten-free biscuit dough (available in most health food sections) or make a gluten-free dough from scratch using a 1:1 gluten-free flour blend.
Dairy-free adaptation: Substitute dairy-free mozzarella and vegan butter. Many brands now make excellent melting vegan cheeses.
Vegetarian note: This recipe is already vegetarian! Just ensure your cheese doesn’t contain animal rennet if you’re strict about it.
My Final Cooking Tip for Perfect Garlic Butter Cheese Bombs
After years of making these garlic butter cheese bombs, here’s my most valuable piece of advice: don’t rush the sealing process. I know it’s tempting to quickly pinch the dough closed and move on, but taking an extra few seconds to really work those seams together will be the difference between cheese bombs that hold their treasure inside and ones that leak all over your baking sheet.
Also, never underestimate the power of serving these immediately. There’s a magical window of about 10-15 minutes after they come out of the oven when the cheese is perfectly melted—stretchy but not yet starting to firm up. That’s your sweet spot. Set your timer, gather everyone around, and serve them straight from the oven for the ultimate experience.
These cheese stuffed biscuits have become my go-to recipe whenever I need to impress without stress. They look fancy, taste incredible, and take minimal effort once you’ve got the technique down. Whether you’re hosting a Super Bowl party, need a quick appetizer for unexpected guests, or just want to treat your family to something special on a weeknight, these garlic butter cheese bombs will never let you down.
Happy cooking, and may your cheese always stretch and your garlic butter always flow!
Garlic Butter Cheese Bombs Recipe: A Gooey, Cheesy Delight That Will Melt Your Heart
Description
What Makes These Garlic Butter Cheese Bombs Irresistible
The beauty of this cheesy garlic appetizer lies in its simplicity and the perfect harmony of flavors. Picture this: soft, pillowy biscuit dough wrapped around a generous cube of mozzarella cheese, brushed with a fragrant garlic butter mixture infused with Italian herbs, then baked until the exterior turns golden brown while the inside transforms into a molten cheese center.
Looking at these garlic butter cheese bombs fresh from the oven, you’ll notice how the tops are perfectly golden and glistening with herb-flecked butter. The biscuits puff up beautifully, and as you break one open, the mozzarella creates those gorgeous, Instagram-worthy cheese pulls that stretch on and on. Little flecks of fresh parsley dot the tops, adding both color and a subtle freshness that balances the richness of the butter and cheese.
What sets these cheese stuffed biscuits apart from other appetizers is their versatility. They’re sophisticated enough to serve at a dinner party, yet casual enough for a Sunday football game. They work as an appetizer, a side dish for pasta or soup, or even a midnight snack when you’re craving something warm and cheesy.
Ingredients
Essential Ingredients for Perfect Garlic Cheese Bombs
One of the best things about this cheese bomb recipe is how few ingredients you need. Most of these items are probably already in your kitchen, making this the perfect last-minute appetizer when unexpected guests arrive.
For the Stuffed Cheese Biscuits
- 1 can (16.3 oz) refrigerated biscuit dough (8 biscuits) – Pillsbury Grands or similar buttermilk biscuits work perfectly
- 8 oz mozzarella cheese – cut into 8 cubes (about 1-inch each), or use string cheese cut in half
the Aromatic Garlic Herb Butter
- 4 tablespoons unsalted butter, melted
- 2 cloves garlic, minced (or 1 teaspoon garlic powder)
- 1 teaspoon Italian seasoning
- 2 tablespoons fresh parsley, finely chopped
- ¼ teaspoon salt
- 2 tablespoons grated Parmesan cheese (optional but recommended)
For Serving Your Cheesy Garlic Appetizer
- Marinara sauce for dipping
- Ranch dressing (optional alternative)
- Additional fresh parsley for garnish
Instructions
Preparing Your Cheese Bombs for Baking
Preheat and prepare: Set your oven to 375°F (190°C). Line a baking sheet with parchment paper or a silicone baking mat. This prevents sticking and makes cleanup a breeze.
Prepare the cheese: Cut your mozzarella block into 8 equal cubes, approximately 1-inch each. If using string cheese, simply cut each stick in half. The cheese should be cold—this helps it hold its shape while you wrap the dough.
Open and separate biscuits: Open your can of refrigerated biscuits and separate them into 8 individual pieces. Don’t worry about the pop—we all jump a little!
Flatten the dough: Using your hands or a rolling pin, gently flatten each biscuit into a circle about 4 inches in diameter and ¼-inch thick. The dough should be thin enough to wrap around the cheese but thick enough to contain it.
Add the cheese: Place one cube of mozzarella in the center of each flattened biscuit.
Seal carefully: This is the crucial step! Bring the edges of the dough up around the cheese and pinch them together firmly to create a sealed ball. Make sure there are no gaps or thin spots where cheese might escape. Roll gently between your palms to smooth the surface.
Arrange on baking sheet: Place each sealed dough ball seam-side down on your prepared baking sheet, spacing them about 2 inches apart to allow for expansion.
Creating the Flavorful Garlic Herb Butter
Melt the butter: In a small microwave-safe bowl, melt the butter for about 30 seconds.
Add aromatics: Stir in the minced garlic, Italian seasoning, parsley, and salt. If using fresh garlic, you can briefly heat the mixture to mellow the raw garlic flavor.
First brush: Brush about half of the garlic butter mixture generously over each dough ball before baking.
Baking Your Cheese Stuffed Biscuits to Perfection
Bake: Place the baking sheet in the preheated oven and bake for 12-15 minutes, or until the tops are golden brown and the biscuits are cooked through.
Second brush: As soon as the cheese bombs come out of the oven, brush them with the remaining garlic butter while they’re still hot. This ensures the butter soaks into the warm dough.
Finish and serve: Sprinkle with Parmesan cheese and additional fresh parsley if desired. Serve immediately while the cheese is still gloriously melted and stretchy.
Expert Tips for the Best Garlic Butter Cheese Bombs
After making hundreds of these cheesy delights, I’ve gathered some invaluable tips that will elevate your cheese bombs from good to absolutely incredible.
Use cold cheese: Cold mozzarella is much easier to wrap and less likely to ooze out before baking. Consider putting your cheese cubes in the freezer for 10 minutes before wrapping.
Seal thoroughly: The most common mistake is not sealing the dough properly. Take your time pinching those seams closed—it’s worth the extra effort.
Don’t skip the double butter: Brushing before AND after baking creates that irresistible golden, garlicky exterior.
Fresh garlic vs. powder: Fresh minced garlic provides a more robust flavor, while garlic powder gives a mellower taste. Both work wonderfully—choose based on your preference.
Serve immediately: These are best enjoyed fresh from the oven when the cheese is at peak stretchiness. If you must reheat, a quick stint in the oven at 350°F for 5 minutes works better than the microwave.
Creative Variations for Your Cheese Bomb Recipe
Once you’ve mastered the basic garlic butter cheese bombs recipe, it’s time to get creative! Here are some delicious variations to keep things exciting.
Different Cheese Options for Stuffed Biscuits
Cheddar cheese bombs: Use sharp cheddar for a tangier, more robust flavor.
Pepper jack: Add a spicy kick with pepper jack cheese.
Four-cheese blend: Mix mozzarella, provolone, fontina, and Parmesan for a complex cheese flavor.
Gouda or Brie: For a more sophisticated twist, try smoked gouda or creamy brie.
Tasty Add-Ins for Extra Flavor
Bacon lovers: Add crispy bacon bits inside with the cheese or wrap the bombs in bacon before baking.
Pepperoni pizza style: Include mini pepperoni slices with the mozzarella and serve with pizza sauce.
Buffalo chicken: Add shredded chicken tossed in buffalo sauce along with the cheese.
Jalapeño popper: Mix cream cheese with diced jalapeños and wrap in the biscuit dough.
Herb variations: Try rosemary and thyme, or add a touch of lemon zest to the garlic butter for brightness.
Making Cheese Bombs from Scratch
For those who prefer homemade everything, you can make the dough from scratch. Combine 2 cups all-purpose flour, 1 tablespoon sugar, 2½ teaspoons baking powder, 1½ teaspoons garlic powder, and ¼ teaspoon salt. Cut in 5 tablespoons cold butter until the mixture resembles pea-sized crumbs, then add ¾ cup cold buttermilk. Knead gently, refrigerate for 10 minutes, then roll out and cut into squares for wrapping the cheese.
Nutritional Values for Garlic Cheese Bombs
While these cheesy garlic appetizers are definitely an indulgence, here’s what you’re looking at nutritionally per cheese bomb (makes 8 servings):
Calories: 160-200 kcal
Carbohydrates: 14-18g
Protein: 5-7g
Fat: 10-13g
Saturated Fat: 5-7g
Cholesterol: 20-35mg
Sodium: 350-420mg
Calcium: 90-120mg
Healthier modifications: Use reduced-fat cheese and less butter, opt for whole wheat biscuit dough when available, or try part-skim mozzarella for a lighter version.
Stunning Presentation Tips for Your Cheesy Appetizer
Presentation matters, especially when you’ve put effort into making these gorgeous cheese stuffed biscuits. Here’s how to make them look as good as they taste:
Serve on a rustic board: Arrange the cheese bombs on a wooden cutting board or slate serving plate for that artisanal look.
Add a dipping station: Place a small bowl of warm marinara sauce in the center, surrounded by the cheese bombs.
Garnish generously: Fresh parsley, a sprinkle of Parmesan, and a light drizzle of garlic butter make them visually stunning.
Show the cheese pull: Break one open to display that gorgeous melted cheese—it’s an instant appetite trigger!
Use toothpicks: For party settings, insert decorative toothpicks for easy grabbing.
Perfect Wine and Food Pairings for Cheese Bombs
These garlic butter cheese bombs pair wonderfully with various beverages and dishes. Here are my favorite combinations:
Wine Selections for Cheesy Garlic Appetizers
Prosecco or Champagne: The bubbles cut through the richness of the butter and cheese beautifully.
Pinot Grigio: A crisp, light white wine that complements without overpowering.
Chianti: If you’re serving with marinara, a classic Italian red is perfect.
Craft beer: A light lager or wheat beer pairs excellently for casual gatherings.
Complementary Dishes for Your Cheese Stuffed Biscuits
Soups: Tomato soup, minestrone, or Italian wedding soup—the cheese bombs are perfect for dunking.
Salads: A fresh Caesar or mixed green salad balances the richness.
Pasta dishes: Serve alongside spaghetti and meatballs or fettuccine Alfredo.
Charcuterie: Include them on an appetizer spread with cured meats and olives.
Storage and Reheating Tips for Garlic Cheese Bombs
While these are best fresh, here’s how to handle leftovers (if you have any!) and make-ahead preparation:
Refrigerator storage: Store cooled cheese bombs in an airtight container for up to 3 days. Reheat in a 350°F oven for 5-7 minutes until warmed through.
Freezing unbaked: Prepare the cheese bombs up to the baking step, freeze on a baking sheet, then transfer to a freezer bag. Bake from frozen at 375°F for 18-20 minutes.
Make-ahead tip: Prepare and refrigerate the unbaked bombs up to 24 hours in advance. Let them sit at room temperature for 10 minutes before baking.