I’ll never forget the first time I brought mini cheesecake cups to a dinner party. Everyone assumed I’d spent hours in the kitchen, carefully crafting these elegant individual desserts. The truth? These easy desserts mini cheesecake cups took me less than an hour of active work, and they were sitting in the refrigerator doing all the hard work while I relaxed with a glass of wine. When my friend bit into one and closed her eyes with pleasure, I knew I’d found a recipe that would become my go-to party dessert for years to come.
Why Mini Cheesecake Cups Are the Ultimate Easy Dessert
Traditional cheesecakes can be intimidating. Between the water bath, the risk of cracks, and the long baking time, many home bakers avoid them entirely. However, easy desserts mini cheesecake cups eliminate every single one of those concerns. Instead of one large, fragile cheesecake, you create individual portions that are virtually foolproof.
Moreover, the presentation is inherently impressive. Each guest receives their own perfect little dessert, complete with a graham cracker crust, creamy filling, and beautiful topping. The portion control is built right in, which makes these mini cheesecake cups ideal for parties where you want to offer multiple dessert options.
The Appeal of Individual Dessert Portions
There’s something special about individual desserts that makes them feel more luxurious than a slice cut from a larger cake. These easy desserts mini cheesecake cups arrive at the table looking like they came from a boutique bakery. The layers are clearly visible through clear cups or ramekins, and the toppings can be customized for each guest.
Additionally, mini portions mean people can try different flavors without committing to a large slice. At my last gathering, I made three varieties—classic, lemon curd, and chocolate—and everyone loved sampling all three without feeling overly full.
Essential Ingredients for Mini Cheesecake Cups
Crust:
- 1½ cups graham cracker crumbs
- ¼ cup granulated sugar
- 6 tablespoons unsalted butter, melted
- Pinch of salt
Cheesecake Filling:
- 16 oz cream cheese, softened to room temperature
- ⅔ cup granulated sugar
- 2 large eggs, room temperature
- ⅓ cup sour cream
- 2 teaspoons vanilla extract
- 1 tablespoon all-purpose flour
- Pinch of salt
Topping:
- 1 cup lemon curd or fruit compote
- Fresh strawberries
- Powdered sugar for dusting
Step-by-Step Instructions for Perfect Mini Cheesecakes
Preparing Your Workspace
Before starting, gather 12 clear cups, ramekins, or a muffin tin lined with cupcake liners. I prefer clear cups because they showcase the beautiful layers, but any heat-safe container works wonderfully. Preheat your oven to 325°F (163°C).
Creating the Perfect Graham Cracker Crust
First, combine graham cracker crumbs, sugar, melted butter, and salt in a medium bowl. The mixture should resemble wet sand and hold together when pressed. If it seems too dry, add another tablespoon of melted butter.
Next, divide the crumb mixture evenly among your containers, using about 2 tablespoons per cup. Press down firmly using the bottom of a small glass or a spoon. The crust should be compact and even. This compression is crucial—a loose crust will crumble when you eat the cheesecake.
Then, bake the crusts for 8 minutes. This pre-baking step ensures they stay crispy even after adding the creamy filling. Let them cool while you prepare the filling.
Making the Silky Cheesecake Filling
Ensure your cream cheese is genuinely soft before beginning. Cold cream cheese creates lumps that are nearly impossible to smooth out. I leave mine on the counter for at least an hour, sometimes two.
Beat the cream cheese and sugar together in a large bowl using an electric mixer on medium speed. Scrape down the sides frequently. Continue beating for about 3 minutes until the mixture is completely smooth and fluffy. This extended beating time incorporates air, which makes easy desserts mini cheesecake cups wonderfully light.
Subsequently, add eggs one at a time, beating just until incorporated after each addition. Overbeating after adding eggs can introduce too much air, which might cause cracks. Add the sour cream, vanilla extract, flour, and salt. Mix on low speed just until everything is combined and smooth.
Assembling and Baking Your Mini Cheesecake Cups
Pour or spoon the filling over the cooled crusts, filling each container about three-quarters full. The filling will puff slightly during baking, so leaving space at the top prevents overflow.
Place all containers on a baking sheet for easy handling. Bake at 325°F for 20-25 minutes. The edges should be set, but the centers should still jiggle slightly when you gently shake the pan. This wobble is perfect—it means your easy desserts mini cheesecake cups will be creamy, not rubbery.
Turn off the oven and crack the door open. Let the cheesecakes cool inside the oven for about 15 minutes. This gradual temperature change prevents the dramatic shrinking that often causes cracks.
The Critical Cooling and Chilling Process
After the oven cool-down, remove the mini cheesecakes and let them reach room temperature on the counter. This takes about an hour. Resist the temptation to rush this step by refrigerating them while still warm—the condensation can make your carefully crafted desserts watery.
Once completely cool, cover each cup with plastic wrap and refrigerate for at least 4 hours, preferably overnight. The extended chilling time allows the flavors to develop and the texture to become perfectly creamy.
Creating Beautiful Toppings for Mini Cheesecake Cups
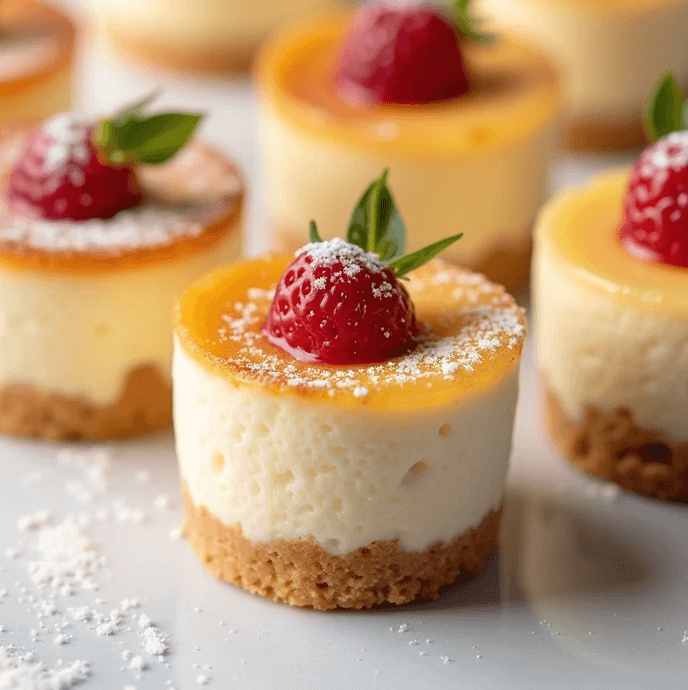
The topping transforms these from simple to stunning. Looking at the image, you can see how a glossy lemon curd topping, a fresh strawberry, and a light dusting of powdered sugar create a professional appearance.
For lemon curd topping, spoon about 2 tablespoons onto each chilled cheesecake, spreading it gently to the edges. The bright yellow color contrasts beautifully with the white cheesecake. Top each one with a fresh strawberry, placing it carefully in the center. Finally, dust lightly with powdered sugar using a fine-mesh sieve.
Alternatively, try these topping combinations:
Berry Compote: Simmer mixed berries with sugar until thick and syrupy. Cool completely before adding.
Chocolate Ganache: Pour warm ganache over chilled cheesecakes for a decadent finish.
Caramel Pecan: Drizzle with caramel sauce and sprinkle toasted pecans on top.
Oreo Crumble: Crush Oreos and sprinkle generously over each cup for a cookies-and-cream version.
Pro Tips for Easy Desserts Mini Cheesecake Cups
Throughout years of making these, I’ve discovered several tricks that ensure perfect results every time. First, never skip bringing ingredients to room temperature. Cold eggs and cream cheese don’t blend properly, resulting in a lumpy filling.
Second, use a food processor to make graham cracker crumbs. While you can buy pre-made crumbs, fresh ones taste significantly better and have superior texture.
Third, check your oven temperature with an oven thermometer. Many home ovens run hot or cold, and even a 25-degree difference can affect baking time and texture.
Fourth, don’t overbake. Cheesecake continues cooking as it cools. Slightly underdone in the oven means perfectly cooked after cooling.
Storage and Make-Ahead Instructions
One of the best features of easy desserts mini cheesecake cups is their make-ahead friendly nature. You can prepare them up to three days in advance, keeping them covered in the refrigerator until serving time. Add the topping the day of serving for the freshest appearance.
These cheesecakes also freeze beautifully. Without toppings, wrap each cup tightly in plastic wrap, then aluminum foil. Freeze for up to two months. Thaw overnight in the refrigerator, then add your chosen topping before serving.
Nutritional Information per Mini Cheesecake Cup
- Calories: 285
- Total Fat: 18g
- Saturated Fat: 10g
- Cholesterol: 85mg
- Sodium: 210mg
- Total Carbohydrates: 26g
- Dietary Fiber: 0g
- Sugars: 20g
- Protein: 5g
Serving Suggestions for Your Mini Cheesecakes
Presentation matters, especially with desserts this elegant. I arrange easy desserts mini cheesecake cups on a large platter or cake stand, spacing them evenly. Fresh herb sprigs like mint scattered between cups add a pop of color.
For formal dinners, place one cup at each setting before guests sit down. The visual impact of everyone receiving their own personal dessert creates a memorable moment.
Consider serving these with dessert wine or coffee. The richness of cheesecake pairs wonderfully with a sweet Riesling or Moscato. For coffee lovers, a French press with medium-roast beans complements the creamy texture perfectly.
Troubleshooting Common Issues
Even with a foolproof recipe, sometimes things go wrong. If your cheesecake filling is lumpy, you likely used cold cream cheese. Unfortunately, there’s no fixing this once it’s mixed. Prevention is key—always start with room temperature ingredients.
If cracks develop on top, your oven was too hot or you overbaked them. While cracks don’t affect flavor, they’re disappointing visually. Fortunately, toppings hide any imperfections completely.
If the crust is soggy, you either didn’t press it firmly enough or skipped the pre-baking step. Both are essential for crispy crusts that stay intact.
Seasonal Variations for Year-Round Enjoyment
Adapt easy desserts mini cheesecake cups to any season by changing the toppings. Spring calls for fresh berries and lemon curd. Summer features peaches or tropical fruits. Fall welcomes pumpkin spice or caramel apple. Winter shines with peppermint, chocolate, or cranberry.
I love creating themed versions for holidays. Red velvet crust with cream cheese frosting topping for Valentine’s Day. Pumpkin cheesecake filling for Thanksgiving. Gingerbread crust with eggnog filling for Christmas.
Why These Mini Cheesecakes Always Impress
There’s something magical about the moment you set down a tray of these beautiful cups and watch people’s reactions. The perfectly layered appearance, the smooth creamy filling visible through clear cups, the jewel-like fruit topping—everything about easy desserts mini cheesecake cups says you went to extraordinary effort.
The secret is that they’re genuinely easy. Once you master the basic technique, you can create endless variations with minimal effort. They’ve become my signature dessert, the thing people request when they invite me to potlucks.
The image captures exactly what you’ll create: those elegant little cups with their golden graham cracker base, pristine white cheesecake layer, glossy yellow lemon curd topping, and fresh strawberry garnish. The light dusting of powdered sugar adds the final touch of sophistication. It’s a dessert that looks like it belongs in a French patisserie but tastes like home.
Print
Easy Desserts Mini Cheesecake Cups
Description
The Appeal of Individual Dessert Portions
There’s something special about individual desserts that makes them feel more luxurious than a slice cut from a larger cake. These easy desserts mini cheesecake cups arrive at the table looking like they came from a boutique bakery. The layers are clearly visible through clear cups or ramekins, and the toppings can be customized for each guest.
Additionally, mini portions mean people can try different flavors without committing to a large slice. At my last gathering, I made three varieties—classic, lemon curd, and chocolate—and everyone loved sampling all three without feeling overly full.
Ingredients
Essential Ingredients for Mini Cheesecake Cups
Crust:
- 1½ cups graham cracker crumbs
- ¼ cup granulated sugar
- 6 tablespoons unsalted butter, melted
- Pinch of salt
Cheesecake Filling:
- 16 oz cream cheese, softened to room temperature
- ⅔ cup granulated sugar
- 2 large eggs, room temperature
- ⅓ cup sour cream
- 2 teaspoons vanilla extract
- 1 tablespoon all-purpose flour
- Pinch of salt
Topping:
- 1 cup lemon curd or fruit compote
- Fresh strawberries
- Powdered sugar for dusting
Instructions
Before starting, gather 12 clear cups, ramekins, or a muffin tin lined with cupcake liners. I prefer clear cups because they showcase the beautiful layers, but any heat-safe container works wonderfully. Preheat your oven to 325°F (163°C).
First, combine graham cracker crumbs, sugar, melted butter, and salt in a medium bowl. The mixture should resemble wet sand and hold together when pressed. If it seems too dry, add another tablespoon of melted butter.
Next, divide the crumb mixture evenly among your containers, using about 2 tablespoons per cup. Press down firmly using the bottom of a small glass or a spoon. The crust should be compact and even. This compression is crucial—a loose crust will crumble when you eat the cheesecake.
Then, bake the crusts for 8 minutes. This pre-baking step ensures they stay crispy even after adding the creamy filling. Let them cool while you prepare the filling.
Ensure your cream cheese is genuinely soft before beginning. Cold cream cheese creates lumps that are nearly impossible to smooth out. I leave mine on the counter for at least an hour, sometimes two.
Beat the cream cheese and sugar together in a large bowl using an electric mixer on medium speed. Scrape down the sides frequently. Continue beating for about 3 minutes until the mixture is completely smooth and fluffy. This extended beating time incorporates air, which makes easy desserts mini cheesecake cups wonderfully light.
Subsequently, add eggs one at a time, beating just until incorporated after each addition. Overbeating after adding eggs can introduce too much air, which might cause cracks. Add the sour cream, vanilla extract, flour, and salt. Mix on low speed just until everything is combined and smooth.
Pour or spoon the filling over the cooled crusts, filling each container about three-quarters full. The filling will puff slightly during baking, so leaving space at the top prevents overflow.
Place all containers on a baking sheet for easy handling. Bake at 325°F for 20-25 minutes. The edges should be set, but the centers should still jiggle slightly when you gently shake the pan. This wobble is perfect—it means your easy desserts mini cheesecake cups will be creamy, not rubbery.
Turn off the oven and crack the door open. Let the cheesecakes cool inside the oven for about 15 minutes. This gradual temperature change prevents the dramatic shrinking that often causes cracks.
After the oven cool-down, remove the mini cheesecakes and let them reach room temperature on the counter. This takes about an hour. Resist the temptation to rush this step by refrigerating them while still warm—the condensation can make your carefully crafted desserts watery.
Once completely cool, cover each cup with plastic wrap and refrigerate for at least 4 hours, preferably overnight. The extended chilling time allows the flavors to develop and the texture to become perfectly creamy.
The topping transforms these from simple to stunning. Looking at the image, you can see how a glossy lemon curd topping, a fresh strawberry, and a light dusting of powdered sugar create a professional appearance.
For lemon curd topping, spoon about 2 tablespoons onto each chilled cheesecake, spreading it gently to the edges. The bright yellow color contrasts beautifully with the white cheesecake. Top each one with a fresh strawberry, placing it carefully in the center. Finally, dust lightly with powdered sugar using a fine-mesh sieve.
Alternatively, try these topping combinations:
Berry Compote: Simmer mixed berries with sugar until thick and syrupy. Cool completely before adding.
Chocolate Ganache: Pour warm ganache over chilled cheesecakes for a decadent finish.
Caramel Pecan: Drizzle with caramel sauce and sprinkle toasted pecans on top.
Oreo Crumble: Crush Oreos and sprinkle generously over each cup for a cookies-and-cream version.