There’s something magical about the combination of chocolate and peanut butter that makes my heart skip a beat every single time. I’ll never forget the afternoon my grandmother first taught me how to make chocolate peanut butter cookies in her cozy kitchen. The aroma of cocoa and roasted peanuts filled the air, and I knew I was about to discover something truly special. These have since become my go-to recipe whenever I need to lift someone’s spirits or satisfy my own sweet tooth cravings.
The beauty of this chocolate peanut butter cookie recipe lies in its simplicity and the incredible texture it produces. When you bite into one of these beauties, you’re greeted with a slightly crispy exterior that gives way to a soft, fudgy center. The rich chocolate flavor mingles perfectly with the nutty, salty-sweet notes of peanut butter, creating a harmony that’s simply unforgettable.
Why This Chocolate Peanut Butter Cookie Recipe Works
What makes these peanut butter chocolate cookies stand out from all the others? It’s all about the balance. I’ve spent years perfecting this recipe, tweaking the ratios until I achieved that ideal texture where the cookies are chewy without being cakey, and chocolatey without being overwhelmingly rich.
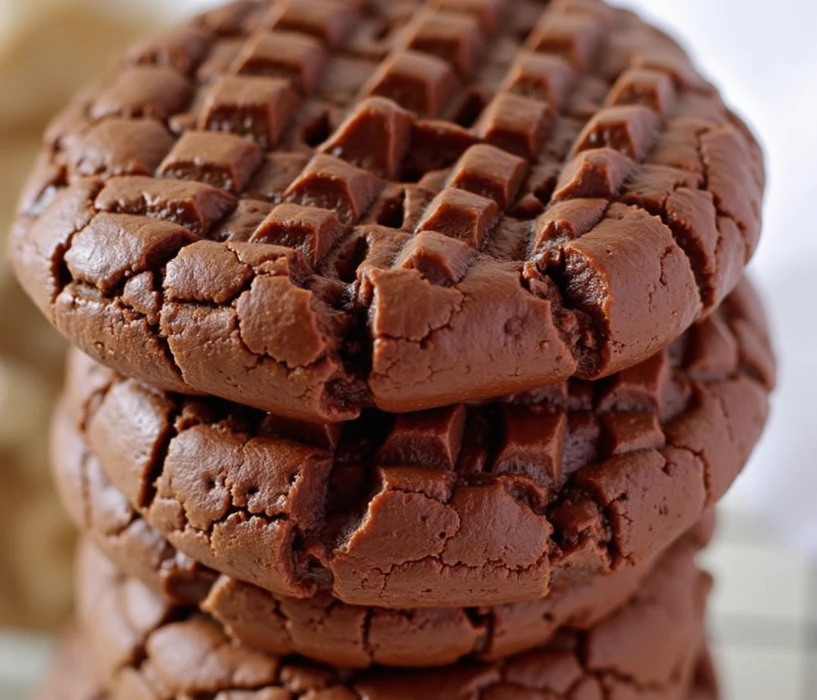
The secret lies in using both cocoa powder and the natural oils from peanut butter. Together, they create a cookie that’s intensely flavored yet surprisingly light. The characteristic crisscross pattern pressed into the top isn’t just decorative – it helps the cookies bake evenly and creates those beautiful crackled edges you can see stacked in a gorgeous tower, each cookie displaying its distinct ridged texture and deep brown color.
Essential Ingredients for Perfect Chocolate Peanut Butter Cookies
Main Ingredients for Your Peanut Butter Chocolate Cookies
- 1 cup creamy peanut butter (not natural, for best texture)
- 1 cup granulated sugar
- ½ cup packed light brown sugar
- 2 large eggs, room temperature
- 1 teaspoon pure vanilla extract
- ⅓ cup unsweetened cocoa powder
- 1 teaspoon baking soda
- ½ teaspoon salt
- ¼ cup all-purpose flour
Why These Ingredients Matter
Each ingredient plays a crucial role in creating the perfect chocolate peanut butter cookie. The peanut butter serves as the base, providing both fat and structure. I always use conventional creamy peanut butter rather than natural because the added oils and stabilizers actually help create that perfect chewy texture.
The combination of white and brown sugar isn’t random either. Granulated sugar creates crispness, while brown sugar adds moisture and that deep, almost caramel-like flavor that complements the chocolate beautifully. The cocoa powder transforms these from ordinary peanut butter cookies into chocolate-forward treats that chocolate lovers will adore.

How to Make Chocolate Peanut Butter Cookies Step by Step
Preparing Your Cookie Dough
Start by preheating your oven to 350°F (175°C) and lining two baking sheets with parchment paper. This prevents sticking and ensures even baking for your peanut butter chocolate cookies.
In a large mixing bowl, combine the peanut butter, granulated sugar, and brown sugar. Using an electric mixer on medium speed, beat these together for about two minutes until the mixture becomes light and fluffy. This step is crucial – you’re incorporating air into the dough, which helps create that tender texture.
Add the eggs one at a time, beating well after each addition. Then mix in the vanilla extract. The mixture should look smooth and well combined at this point.
Incorporating the Dry Ingredients
In a separate bowl, whisk together the cocoa powder, baking soda, salt, and flour. This ensures even distribution of the leavening agent and prevents clumps of cocoa powder in your finished cookies.
Gradually add the dry ingredients to the wet mixture, mixing on low speed just until everything comes together. Don’t overmix – this is where many people go wrong with chocolate peanut butter cookies. Overmixing develops too much gluten, resulting in tough cookies rather than tender ones.
Shaping and Baking
Using a cookie scoop or tablespoon, portion out the dough into balls about 1½ inches in diameter. Roll each portion between your palms to create smooth balls, then place them on your prepared baking sheets, spacing them about 2 inches apart.
Here comes the fun part – the signature crisscross pattern! Dip a fork in sugar (this prevents sticking), then press it into each cookie ball to flatten it slightly. Rotate the fork 90 degrees and press again, creating that classic crosshatch design. This pattern isn’t just beautiful – it helps the cookies spread properly and creates more surface area for those delightful crispy edges.
Bake for 10-12 minutes. The cookies should look set around the edges but still slightly soft in the center. They’ll continue cooking on the hot pan after you remove them from the oven, so don’t overbake! Let them cool on the baking sheet for 5 minutes before transferring to a wire rack.
When properly baked, your cookies will look like the stunning stack in the photo – each one displaying gorgeous crackled surfaces, deep chocolate color, and those distinctive ridges from the fork. The way they’re piled high shows off their sturdy yet tender texture.
Perfecting the Texture of Your Peanut Butter Chocolate Cookies
Achieving That Ideal Crackle
That beautiful crackled surface you see on perfectly baked chocolate peanut butter cookies happens when the exterior sets while the interior is still expanding. The key is getting your oven temperature right and not overbaking.
I learned this the hard way after countless batches. Too high a temperature and they crack too quickly then burn. Too low and they spread too much without developing that signature texture. At 350°F, magic happens.
The Cooling Process Matters
Patience is essential here. I know it’s tempting to immediately devour these chocolate peanut butter cookies straight from the oven, but giving them those crucial five minutes on the baking sheet allows them to set properly. Transfer them too soon and they might break apart. Leave them too long and they’ll stick to the parchment.
Nutritional Information
Understanding what’s in your treats helps you enjoy them mindfully. Here’s the breakdown per cookie (recipe makes approximately 24 cookies):
- Calories: 145
- Total Fat: 7g
- Saturated Fat: 1.5g
- Cholesterol: 15mg
- Sodium: 125mg
- Total Carbohydrates: 18g
- Dietary Fiber: 1g
- Sugars: 14g
- Protein: 4g
These peanut butter chocolate cookies offer a decent amount of protein from the peanut butter, making them slightly more substantial than regular cookies. They’re a treat, certainly, but not an empty-calorie one.
Presentation Tips
Serving Suggestions
The visual appeal of these cookies is undeniable. When I photograph my chocolate peanut butter cookies, I love stacking them high just like in the image – it showcases their uniform shape and that gorgeous crackled texture. The way the light catches the ridges and crevices makes them look absolutely irresistible.
For casual family gatherings, I arrange them on a simple white plate. The deep chocolate color pops beautifully against white porcelain. For more elegant affairs, I’ve placed them in a rustic wicker basket lined with a red checkered cloth, which you can see in the close-up shot – it adds that homey, farmhouse feel that makes everyone feel welcome.
Plating Like a Pro
If you’re serving these peanut butter chocolate cookies for guests, consider dusting them lightly with powdered sugar just before serving. The white powder settles into those fork-pressed grooves, creating stunning contrast. Alternatively, drizzle melted chocolate or peanut butter in thin lines across the top for an extra-fancy presentation.
Perfect Pairings with Chocolate Peanut Butter Cookies
Beverage Companions
These chocolate peanut butter cookies pair wonderfully with cold milk – that’s classic for a reason. But I’ve discovered they’re equally delightful with a strong cup of coffee. The bitterness of the coffee balances the sweetness of the cookies, while the chocolate flavors complement each other beautifully.
For evening entertaining, try serving these peanut butter chocolate cookies alongside a glass of ruby port. The wine’s sweetness and fruity notes harmonize surprisingly well with the chocolate and peanut butter. If you prefer something lighter, a nice dessert Riesling works beautifully too.
Ice Cream Sandwiches
Want to take these chocolate peanut butter cookies to the next level? Use them to make ice cream sandwiches! Let the cookies cool completely, then sandwich a scoop of vanilla, chocolate, or even peanut butter ice cream between two cookies. Roll the edges in mini chocolate chips or chopped peanuts. Wrap individually in plastic wrap and freeze. You’ll have gourmet ice cream sandwiches ready whenever a craving strikes.
Delicious Variations of This Chocolate Peanut Butter Cookie Recipe
Adding Mix-Ins to Your Peanut Butter Chocolate Cookies
While the original recipe is perfection, sometimes it’s fun to experiment. Here are variations I’ve tried and loved:
Chocolate Chip Version: Fold in ½ cup of mini chocolate chips to the dough before shaping. The additional chocolate creates pockets of melty goodness throughout.
Peanut Butter Cup Cookies: Press a miniature peanut butter cup into the center of each cookie immediately after removing them from the oven. The heat softens the candy slightly, creating an incredible surprise in every bite.
Double Peanut Butter: Add ¼ cup of peanut butter chips to the dough for extra peanut butter flavor. These little chips maintain their shape during baking and provide bursts of intense peanut butter taste.
Sea Salt Chocolate: Sprinkle flaky sea salt on top of the cookies right after pressing the fork pattern. The salt enhances the chocolate flavor and adds a sophisticated touch.
Dietary Modifications for Chocolate Peanut Butter Cookies
Gluten-Free: These chocolate peanut butter cookies are naturally almost gluten-free, containing only ¼ cup of flour. You can substitute this with a gluten-free flour blend or even oat flour with excellent results.
Sugar-Free: Replace the sugars with your preferred sugar substitute that measures 1:1 like sugar. I’ve had success with monk fruit sweetener. The texture will be slightly different but still delicious.
Almond Butter Version: Swap the peanut butter for almond butter to create almond butter chocolate cookies. The flavor is more delicate but equally delicious.
Storing and Freezing
Short-Term Storage
These peanut butter chocolate cookies stay fresh for up to one week when stored properly. Place them in an airtight container at room temperature, separating layers with parchment paper. I’ve found that adding a slice of bread to the container helps maintain their soft, chewy texture – the cookies absorb moisture from the bread.
Freezing Instructions
Good news – these chocolate peanut butter cookies freeze beautifully! You have two options:
Freezing Baked Cookies: Let the cookies cool completely, then arrange them in a single layer on a baking sheet and freeze until solid. Transfer to a freezer-safe container or bag, separating layers with parchment. They’ll keep for up to 3 months. Thaw at room temperature for about 30 minutes before serving.
Freezing Cookie Dough: Shape the dough into balls and place them on a parchment-lined baking sheet. Freeze until solid, then transfer to a freezer bag. When you’re ready to bake, there’s no need to thaw – just add 1-2 minutes to the baking time. Having frozen dough on hand means fresh chocolate peanut butter cookies whenever the craving hits!
Troubleshooting Common Cookie Problems
Why Are My Chocolate Peanut Butter Cookies Too Dry?
If your peanut butter chocolate cookies turn out dry or crumbly, you’ve likely overbaked them or used natural peanut butter. Natural peanut butter lacks the stabilizers that help create the right texture. Stick with conventional creamy peanut butter for best results.
My Cookies Spread Too Much
Overly flat cookies usually result from dough that’s too warm or an oven that’s not hot enough. Make sure your oven is fully preheated, and if your kitchen is very warm, refrigerate the shaped dough balls for 15 minutes before baking.
They’re Too Hard
Hard chocolate peanut butter cookies are simply overbaked. Remember, they continue cooking on the hot baking sheet after leaving the oven. Pull them out when they still look slightly underdone in the center.
The Science Behind Perfect Peanut Butter Chocolate Cookies
I find the chemistry of baking fascinating. In this recipe, the peanut butter serves multiple roles. Its fat content keeps the cookies tender, while its proteins provide structure. The minimal flour means these are naturally tender – there’s simply less gluten development.
The cocoa powder absorbs moisture, which is why we don’t need as much flour as traditional cookies. The baking soda reacts with the natural acidity in the brown sugar and cocoa, creating lift and contributing to that beautiful crackled surface.
When you press the fork pattern into each cookie, you’re not just decorating – you’re also ensuring even baking by creating a more uniform thickness.
Making These Chocolate Peanut Butter Cookies with Kids
This recipe is wonderfully kid-friendly. The dough is easy to work with, and children love rolling the balls and creating the fork patterns. My niece calls this the “making X’s and O’s” part, and it’s her favorite step.
Let kids measure ingredients, crack eggs (with supervision), and definitely handle the fork-pressing. It’s a great way to teach them about following recipes and working with measurements. Plus, the reward of homemade chocolate peanut butter cookies makes the learning deliciously worthwhile.
A Baker’s Final Tip for Chocolate Peanut Butter Cookie Success
After years of making these chocolate peanut butter cookies, here’s my most valuable advice: invest in a kitchen scale. Measuring by weight rather than volume ensures consistency every single time. It’s the difference between good cookies and great ones.
Also, don’t skip the step of bringing your eggs to room temperature. Cold eggs don’t incorporate as well into the peanut butter mixture, which can affect the final texture. Simply place them in a bowl of warm water for five minutes before starting.
The most important ingredient, though, isn’t something you measure – it’s the love and intention you bring to your baking. These chocolate peanut butter cookies have brought joy to my family for years. Whether you’re baking them for a special occasion or just because it’s Tuesday and you need something sweet, I hope they bring you as much happiness as they’ve brought me. That first bite, when the chocolate and peanut butter flavors meld together perfectly, makes every moment in the kitchen worthwhile.
Print
The Ultimate Chocolate Peanut Butter Cookies Recipe
Description
There’s something magical about the combination of chocolate and peanut butter that makes my heart skip a beat every single time. I’ll never forget the afternoon my grandmother first taught me how to make chocolate peanut butter cookies in her cozy kitchen. The aroma of cocoa and roasted peanuts filled the air, and I knew I was about to discover something truly special. These have since become my go-to recipe whenever I need to lift someone’s spirits or satisfy my own sweet tooth cravings.
The beauty of this chocolate peanut butter cookie recipe lies in its simplicity and the incredible texture it produces. When you bite into one of these beauties, you’re greeted with a slightly crispy exterior that gives way to a soft, fudgy center. The rich chocolate flavor mingles perfectly with the nutty, salty-sweet notes of peanut butter, creating a harmony that’s simply unforgettable.
Ingredients
Essential Ingredients for Perfect Chocolate Peanut Butter Cookies
Main Ingredients for Your Peanut Butter Chocolate Cookies
- 1 cup creamy peanut butter (not natural, for best texture)
- 1 cup granulated sugar
- ½ cup packed light brown sugar
- 2 large eggs, room temperature
- 1 teaspoon pure vanilla extract
- ⅓ cup unsweetened cocoa powder
- 1 teaspoon baking soda
- ½ teaspoon salt
- ¼ cup all-purpose flour
Instructions
Each ingredient plays a crucial role in creating the perfect chocolate peanut butter cookie. The peanut butter serves as the base, providing both fat and structure. I always use conventional creamy peanut butter rather than natural because the added oils and stabilizers actually help create that perfect chewy texture.
The combination of white and brown sugar isn’t random either. Granulated sugar creates crispness, while brown sugar adds moisture and that deep, almost caramel-like flavor that complements the chocolate beautifully. The cocoa powder transforms these from ordinary peanut butter cookies into chocolate-forward treats that chocolate lovers will adore.
Start by preheating your oven to 350°F (175°C) and lining two baking sheets with parchment paper. This prevents sticking and ensures even baking for your peanut butter chocolate cookies.
In a large mixing bowl, combine the peanut butter, granulated sugar, and brown sugar. Using an electric mixer on medium speed, beat these together for about two minutes until the mixture becomes light and fluffy. This step is crucial – you’re incorporating air into the dough, which helps create that tender texture.
Add the eggs one at a time, beating well after each addition. Then mix in the vanilla extract. The mixture should look smooth and well combined at this point.
In a separate bowl, whisk together the cocoa powder, baking soda, salt, and flour. This ensures even distribution of the leavening agent and prevents clumps of cocoa powder in your finished cookies.
Gradually add the dry ingredients to the wet mixture, mixing on low speed just until everything comes together. Don’t overmix – this is where many people go wrong with chocolate peanut butter cookies. Overmixing develops too much gluten, resulting in tough cookies rather than tender ones.
Using a cookie scoop or tablespoon, portion out the dough into balls about 1½ inches in diameter. Roll each portion between your palms to create smooth balls, then place them on your prepared baking sheets, spacing them about 2 inches apart.
Here comes the fun part – the signature crisscross pattern! Dip a fork in sugar (this prevents sticking), then press it into each cookie ball to flatten it slightly. Rotate the fork 90 degrees and press again, creating that classic crosshatch design. This pattern isn’t just beautiful – it helps the cookies spread properly and creates more surface area for those delightful crispy edges.
Bake for 10-12 minutes. The cookies should look set around the edges but still slightly soft in the center. They’ll continue cooking on the hot pan after you remove them from the oven, so don’t overbake! Let them cool on the baking sheet for 5 minutes before transferring to a wire rack.
When properly baked, your cookies will look like the stunning stack in the photo – each one displaying gorgeous crackled surfaces, deep chocolate color, and those distinctive ridges from the fork. The way they’re piled high shows off their sturdy yet tender texture.
That beautiful crackled surface you see on perfectly baked chocolate peanut butter cookies happens when the exterior sets while the interior is still expanding. The key is getting your oven temperature right and not overbaking.
I learned this the hard way after countless batches. Too high a temperature and they crack too quickly then burn. Too low and they spread too much without developing that signature texture. At 350°F, magic happens.
Patience is essential here. I know it’s tempting to immediately devour these chocolate peanut butter cookies straight from the oven, but giving them those crucial five minutes on the baking sheet allows them to set properly. Transfer them too soon and they might break apart. Leave them too long and they’ll stick to the parchment.
Notes
Serving Suggestions
The visual appeal of these cookies is undeniable. When I photograph my chocolate peanut butter cookies, I love stacking them high just like in the image – it showcases their uniform shape and that gorgeous crackled texture. The way the light catches the ridges and crevices makes them look absolutely irresistible.
For casual family gatherings, I arrange them on a simple white plate. The deep chocolate color pops beautifully against white porcelain. For more elegant affairs, I’ve placed them in a rustic wicker basket lined with a red checkered cloth, which you can see in the close-up shot – it adds that homey, farmhouse feel that makes everyone feel welcome.
Plating Like a Pro
If you’re serving these peanut butter chocolate cookies for guests, consider dusting them lightly with powdered sugar just before serving. The white powder settles into those fork-pressed grooves, creating stunning contrast. Alternatively, drizzle melted chocolate or peanut butter in thin lines across the top for an extra-fancy presentation.
Perfect Pairings with Chocolate Peanut Butter Cookies
Beverage Companions
These chocolate peanut butter cookies pair wonderfully with cold milk – that’s classic for a reason. But I’ve discovered they’re equally delightful with a strong cup of coffee. The bitterness of the coffee balances the sweetness of the cookies, while the chocolate flavors complement each other beautifully.
For evening entertaining, try serving these peanut butter chocolate cookies alongside a glass of ruby port. The wine’s sweetness and fruity notes harmonize surprisingly well with the chocolate and peanut butter. If you prefer something lighter, a nice dessert Riesling works beautifully too.
Ice Cream Sandwiches
Want to take these chocolate peanut butter cookies to the next level? Use them to make ice cream sandwiches! Let the cookies cool completely, then sandwich a scoop of vanilla, chocolate, or even peanut butter ice cream between two cookies. Roll the edges in mini chocolate chips or chopped peanuts. Wrap individually in plastic wrap and freeze. You’ll have gourmet ice cream sandwiches ready whenever a craving strikes.
Delicious Variations of This Chocolate Peanut Butter Cookie Recipe
Adding Mix-Ins to Your Peanut Butter Chocolate Cookies
While the original recipe is perfection, sometimes it’s fun to experiment. Here are variations I’ve tried and loved:
Chocolate Chip Version: Fold in ½ cup of mini chocolate chips to the dough before shaping. The additional chocolate creates pockets of melty goodness throughout.
Peanut Butter Cup Cookies: Press a miniature peanut butter cup into the center of each cookie immediately after removing them from the oven. The heat softens the candy slightly, creating an incredible surprise in every bite.
Double Peanut Butter: Add ¼ cup of peanut butter chips to the dough for extra peanut butter flavor. These little chips maintain their shape during baking and provide bursts of intense peanut butter taste.
Sea Salt Chocolate: Sprinkle flaky sea salt on top of the cookies right after pressing the fork pattern. The salt enhances the chocolate flavor and adds a sophisticated touch.
Dietary Modifications for Chocolate Peanut Butter Cookies
Gluten-Free: These chocolate peanut butter cookies are naturally almost gluten-free, containing only ¼ cup of flour. You can substitute this with a gluten-free flour blend or even oat flour with excellent results.
Sugar-Free: Replace the sugars with your preferred sugar substitute that measures 1:1 like sugar. I’ve had success with monk fruit sweetener. The texture will be slightly different but still delicious.
Almond Butter Version: Swap the peanut butter for almond butter to create almond butter chocolate cookies. The flavor is more delicate but equally delicious.
Storing and Freezing
Short-Term Storage
These peanut butter chocolate cookies stay fresh for up to one week when stored properly. Place them in an airtight container at room temperature, separating layers with parchment paper. I’ve found that adding a slice of bread to the container helps maintain their soft, chewy texture – the cookies absorb moisture from the bread.
Freezing Instructions
Good news – these chocolate peanut butter cookies freeze beautifully! You have two options:
Freezing Baked Cookies: Let the cookies cool completely, then arrange them in a single layer on a baking sheet and freeze until solid. Transfer to a freezer-safe container or bag, separating layers with parchment. They’ll keep for up to 3 months. Thaw at room temperature for about 30 minutes before serving.
Freezing Cookie Dough: Shape the dough into balls and place them on a parchment-lined baking sheet. Freeze until solid, then transfer to a freezer bag. When you’re ready to bake, there’s no need to thaw – just add 1-2 minutes to the baking time. Having frozen dough on hand means fresh chocolate peanut butter cookies whenever the craving hits!