I’ll never forget the Christmas when my aunt taught me how to pipe butter cookies. I was eight years old, standing on a step stool at her kitchen counter, watching in amazement as she transformed simple dough into beautiful swirled rosettes with just a squeeze of a piping bag. The butter cookies that came out of her oven that day were golden, buttery, and absolutely perfect – crisp on the edges with a tender, melt-in-your-mouth center. That memory sparked a lifelong love affair with butter cookies, and today I’m sharing everything I’ve learned about making these classic treats. Whether you’re making them for the holidays, a special occasion, or just because you deserve something delicious, this butter cookie recipe will become your go-to.
Why Butter Cookies Are Timeless Favorites
Butter cookies hold a special place in baking traditions around the world. Known as Danish butter cookies, spritz cookies, or simply butter cookies depending on the region and shape, these treats share one essential quality: they let the pure, rich flavor of butter shine through. Unlike cookies loaded with chocolate chips or frosting, butter cookies celebrate simplicity and technique.
The magic of these classic butter cookies lies in their versatility. You can pipe them into intricate shapes, cut them with cookie cutters, or shape them by hand. They’re perfect plain, or you can add sprinkles, jam, chocolate, or nuts. They keep well, ship beautifully, and look elegant on any dessert table.
The History of Butter Cookies
Butter cookies have European roots, with Denmark particularly famous for their butter cookie tins that have become a holiday staple worldwide. The buttery shortbread-style cookies were originally a luxury because butter was expensive. Today, they’re beloved because they represent quality – made with just a few simple ingredients that each must be the best you can afford.
Essential Ingredients for Perfect Butter Cookies
The beauty of this butter cookie recipe is its simplicity, but that means every ingredient matters tremendously. Here’s what you’ll need:
Main Ingredients:
- 1 cup (2 sticks) unsalted butter, softened to room temperature
- 3/4 cup granulated sugar
- 1 large egg, room temperature
- 2 teaspoons pure vanilla extract
- 1/4 teaspoon almond extract (optional, but highly recommended)
- 2 1/2 cups all-purpose flour
- 1/2 teaspoon salt
- 1/4 teaspoon baking powder
Decoration (Optional):
- Colored sanding sugar
- Sprinkles (red, green, white, or multicolored)
- Pearl sugar
- Jam for thumbprint variations
- Melted chocolate for drizzling
Equipment You’ll Need:
- Stand mixer or electric hand mixer
- Cookie sheets lined with parchment paper
- Cookie press or piping bag with star tip
- Cookie cutters (if not piping)
- Cooling racks
Step-by-Step Instructions for Making Butter Cookies
Step 1: Prepare Your Butter and Eggs
The foundation of excellent butter cookies starts with properly softened butter. Remove your butter from the refrigerator about 45 minutes before you plan to bake. It should be soft enough that your finger leaves an impression when you press it, but it shouldn’t be greasy or melting. This is crucial for creating the light, creamy texture needed for these classic butter cookies.
Similarly, let your egg come to room temperature. Cold eggs can cause the butter to seize up and create a less smooth dough.
Step 2: Cream the Butter and Sugar
Place the softened butter in the bowl of your stand mixer (or a large bowl if using a hand mixer). Add the granulated sugar. Beat on medium speed for 3-4 minutes until the mixture is light, fluffy, and pale in color. This creaming process incorporates air into the butter, which helps create tender cookies with a delicate crumb.
Don’t rush this step. Properly creamed butter should look almost white and have increased noticeably in volume. Scrape down the sides of the bowl midway through to ensure even mixing.
Step 3: Add the Egg and Flavorings
Add your room-temperature egg to the creamed butter mixture. Beat on medium speed until fully incorporated – about 30 seconds. The mixture might look slightly curdled at first, but it will come together.
Now add the vanilla extract and almond extract. The almond extract is optional, but I highly recommend it. It adds a subtle, sophisticated depth that makes these taste like professional bakery butter cookies. Beat everything together until smooth and uniform.
Step 4: Combine the Dry Ingredients
In a separate bowl, whisk together the flour, salt, and baking powder. Whisking helps distribute the salt and baking powder evenly throughout the flour, ensuring consistent cookies.
The baking powder is used in a very small amount – just enough to give the butter cookies a tiny bit of lift without making them cakey. We want them to hold their piped shape while still having a pleasant texture.
Step 5: Mix the Dough
Add the dry ingredients to the wet ingredients all at once. Mix on low speed just until the flour is incorporated and no streaks remain. Don’t overmix – as soon as the dough comes together, stop mixing. Overmixing develops gluten, which can make your butter cookies tough instead of tender.
The dough should be soft but not sticky. It should hold together when pressed and be firm enough to pipe through a cookie press or piping bag without being too stiff.
Step 6: Prepare to Pipe or Shape
If you’re piping your butter cookies (which creates those gorgeous rosettes shown in the image), you have two options:
Cookie Press Method: Fill your cookie press according to the manufacturer’s instructions. Choose your desired disc (a star shape creates beautiful swirled cookies). Press the cookies directly onto ungreased cookie sheets, spacing them about 1 inch apart.
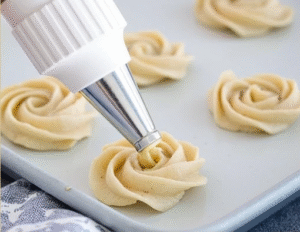
Piping Bag Method: Fit a large piping bag with a large star tip (Wilton 1M or 2D work beautifully). Fill the bag about two-thirds full with dough. Pipe rosettes onto parchment-lined baking sheets by holding the piping bag perpendicular to the sheet and piping in a circular motion, releasing pressure and pulling up when done.
The image beautifully illustrates the piping technique, showing a piping bag creating those classic swirled patterns. The piped butter cookies on the baking sheet in the image display perfect rosette shapes with defined ridges – this is exactly what you’re aiming for with your technique.
If you’re not piping, you can roll the dough to 1/4-inch thickness and use cookie cutters, or roll tablespoons of dough into balls and flatten slightly with the bottom of a glass.
Step 7: Add Decorations
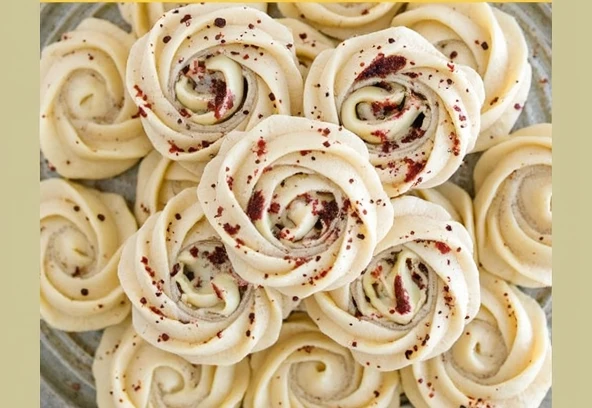
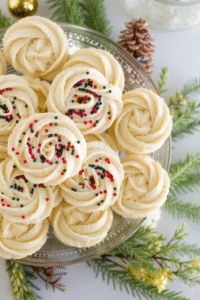
While the dough is still soft, add your decorations. The lower portion of the image shows finished butter cookies with festive sprinkles – some with red and green nonpareils, others plain. This variety creates a beautiful assortment.
To add sprinkles to piped cookies, gently press them onto the surface immediately after piping. For cut-out shapes, you can sprinkle colored sugar over them or leave them plain for a more classic appearance.
Step 8: Chill the Dough (If Needed)
If your kitchen is warm or your dough seems too soft, refrigerate the piped cookies on their sheets for 15 minutes before baking. This helps them hold their shape better in the oven. Classic butter cookies should maintain their piped or cut shapes with minimal spreading.
Step 9: Bake to Golden Perfection
Preheat your oven to 350°F (175°C). Position your oven racks in the upper and lower thirds of the oven.
Bake the butter cookies for 10-12 minutes, rotating the sheets halfway through baking for even coloring. The cookies are done when the edges are just beginning to turn golden brown. The centers might still look pale – that’s perfect. They’ll continue to firm up as they cool.
Don’t overbake these delicate cookies. They should be crisp but not hard, and overbaking will make them dry. Watch them carefully in the last few minutes of baking.
Step 10: Cool and Store
Let the butter cookies cool on the baking sheets for 5 minutes. They’ll be very delicate when first removed from the oven. After 5 minutes, carefully transfer them to a wire cooling rack to cool completely.
Once completely cool, store your classic butter cookies in an airtight container at room temperature. They’ll stay fresh for up to 2 weeks, though they rarely last that long in my house!
Tips for Perfect Butter Cookies Every Time
Use Quality Butter
Since butter is the star ingredient, use the best quality you can afford. European-style butter with higher fat content creates even richer, more flavorful cookies. Avoid margarine or butter substitutes – they simply won’t give you the same results.
Don’t Skip the Almond Extract
While optional, the almond extract adds a subtle complexity that elevates these from good to extraordinary. It’s a secret ingredient that makes people ask, “What makes these taste so good?”
Keep Your Dough Cool
If your dough becomes too warm while piping, it will be difficult to work with and the cookies may spread too much during baking. Refrigerate the dough for 10-15 minutes if it becomes too soft.
Consistent Size Matters
Try to make all your butter cookies roughly the same size so they bake evenly. Smaller cookies will bake faster than larger ones, so uniform sizing ensures everything is perfectly done at the same time.
Creative Variations on Butter Cookies
Chocolate-Dipped Butter Cookies
After cooling completely, dip half of each butter cookie in melted dark, milk, or white chocolate. Let them set on parchment paper. This adds an elegant touch and creates a nice textural contrast.
Jam-Filled Thumbprint Butter Cookies
Instead of piping rosettes, roll the dough into 1-inch balls. Press your thumb into the center of each ball to create an indentation. Fill with a small amount of jam (raspberry, strawberry, or apricot work beautifully) before baking.
Lemon Butter Cookies
Add 2 tablespoons of fresh lemon zest and 1 teaspoon of lemon extract to the dough. These are wonderfully bright and perfect for spring and summer occasions.
Chocolate Butter Cookies
Replace 1/4 cup of the flour with unsweetened cocoa powder for chocolate butter cookies. These are divine with a dusting of powdered sugar or dipped in white chocolate.
Nut-Studded Variations
Press a whole almond, pecan half, or walnut piece into the center of each cookie before baking for a classic European-style presentation.
Nutritional Information for Butter Cookies
Per cookie (based on 48 cookies):
- Calories: 75
- Total Fat: 4g
- Saturated Fat: 2.5g
- Cholesterol: 15mg
- Sodium: 35mg
- Total Carbohydrates: 9g
- Dietary Fiber: 0g
- Sugars: 4g
- Protein: 1g
These classic butter cookies are rich treats meant to be savored. The portion size is small, which allows you to enjoy their buttery goodness without overindulging.
Presentation Ideas for Butter Cookies
Cookie Tins and Gift Boxes
Butter cookies are classic gift items. Layer them in decorative tins with parchment paper between layers. These ship beautifully and arrive intact, making them perfect for mailing to distant loved ones.
Tea Party Arrangements
Arrange an assortment of plain and decorated butter cookies on a tiered stand for elegant tea parties. Mix rosette shapes with cut-out shapes for visual variety.
Holiday Cookie Platters
The image shows a beautiful presentation approach – some cookies with colorful sprinkles, others plain. This variety is perfect for holiday platters. Group them by decoration style for an organized, appealing look.
Pairing Suggestions for Butter Cookies
Beverage Pairings
These buttery delights pair wonderfully with:
- Hot tea (Earl Grey, English Breakfast, or herbal teas)
- Fresh coffee
- Hot chocolate
- Milk (especially for children)
- Dessert wines like late-harvest Riesling
- Champagne or sparkling wine for celebrations
The delicate flavor and crisp texture make butter cookies an ideal accompaniment to beverages without overwhelming them.
Serving Occasions
Butter cookies fit perfectly at:
- Holiday cookie exchanges
- Wedding receptions and showers
- Baby showers
- Afternoon tea parties
- Valentine’s Day treats
- Birthday celebrations
- Thank-you gifts
Troubleshooting Common Issues
Cookies Spreading Too Much
If your butter cookies spread excessively during baking, the dough was likely too warm. Chill the piped cookies before baking, and make sure your butter wasn’t overly soft when you started.
Dough Too Soft to Pipe
If the dough is too soft to hold shape in the piping bag, refrigerate it for 30 minutes. You can also add 1-2 tablespoons more flour, but don’t overdo it or the cookies will be dry.
Cookies Too Hard or Dry
Overbaking is usually the culprit for hard butter cookies. Remove them when the edges are just barely golden. Also, make sure you measured the flour correctly – too much flour makes dry cookies.
Dough Sticking to Cookie Press
If using a cookie press and the dough sticks to the press instead of the baking sheet, the dough might be too cold, or you’re using parchment paper. Cookie press dough adheres better to an ungreased metal baking sheet.
Make-Ahead and Storage Tips
Making Dough in Advance
You can prepare the butter cookie dough up to 3 days in advance. Wrap it tightly in plastic wrap and refrigerate. Let it sit at room temperature for about 30 minutes before piping to soften slightly.
Freezing Dough
The dough freezes beautifully for up to 3 months. Thaw overnight in the refrigerator, then bring to room temperature before using.
Freezing Baked Cookies
Baked butter cookies also freeze well. Layer them between parchment paper in an airtight container and freeze for up to 3 months. Thaw at room temperature for 30 minutes before serving.
Keeping Cookies Fresh
Store baked butter cookies in an airtight container with a piece of bread (yes, really!). The bread releases just enough moisture to keep the cookies from becoming too dry while maintaining their crisp texture.
The Art of Perfect Piping
Piping butter cookies beautifully takes a bit of practice, but it’s easier than you might think. Here are my best tips:
Hold the piping bag perpendicular to the baking sheet. Apply steady, even pressure while moving in a circular motion from the outside toward the center. When you’ve created your rosette, stop squeezing and pull straight up quickly. This creates that signature peaked center you see in bakery cookies.
The butter cookies in the image show excellent piping technique – notice how each rosette has well-defined ridges and a centered peak. With practice, yours will look just as professional.
Why These Classic Butter Cookies Matter
In a world of increasingly complex desserts, butter cookies represent something beautifully simple – proof that you don’t need exotic ingredients or complicated techniques to create something truly special. These cookies are about honoring tradition, celebrating quality ingredients, and taking the time to do something with care.
When you give someone homemade , you’re giving them more than a sweet treat. You’re giving them a piece of culinary heritage, wrapped in the warmth of homemade goodness.
My Personal Cooking Tip
After years of making , here’s my most valuable tip: invest in a good piping bag and star tip if you plan to make these regularly. While a cookie press works, I find that piping gives you more control and creates those gorgeously defined ridges. Practice your piping technique on parchment paper before committing to your final shapes – you can scrape up the practice cookies and re-pipe them. And here’s a secret: if your rosettes aren’t perfect, place a sprinkle or pearl sugar right in the center – it hides any imperfections and looks intentional and beautiful. Remember, even imperfect homemade butter cookies taste infinitely better than anything store-bought, so don’t stress about making them look flawless. The love you put into making them is what makes them special.