There’s something undeniably magical about biting into a warm, freshly baked cookie that instantly transports you back to childhood. If Pop-Tarts were a staple in your pantry growing up, you’re about to experience the ultimate nostalgia trip. Brown Sugar Pop Tart Cookies combine the best of both worlds – the buttery, flaky crust of a homemade cookie with the sweet, caramelized filling of everyone’s favorite breakfast pastry. As someone who’s spent countless hours perfecting this recipe in my own kitchen, I’m thrilled to share it with you today.
Why Brown Sugar Pop Tart Cookies Are Worth Your Time
Before diving into the recipe, let me tell you why these cookies deserve a spot in your baking rotation. Unlike store-bought Pop-Tarts, which often contain preservatives and artificial flavors, these homemade versions allow you to control every ingredient. The result? A more nuanced, buttery pastry with a rich brown sugar filling that puts the commercial version to shame.
Plus, there’s something deeply satisfying about creating these treats from scratch. The process of rolling out the dough, filling each cookie, and seeing them transform in the oven gives a sense of accomplishment that simply opening a silver package never could. And let’s be honest – the aroma of brown sugar and vanilla wafting through your home is reason enough to give these a try.
The Perfect Occasion
These cookies shine at brunches, afternoon tea gatherings, holiday cookie exchanges, or as an after-school treat that will earn you serious points with the kids. They’re substantial enough to feel like a special indulgence but familiar enough to appeal to even picky eaters. I’ve brought these to countless potlucks and gatherings, and they’re always the first to disappear from the dessert table.
Ingredients You’ll Need
For the cookie dough:
- 2½ cups all-purpose flour
- 1 tablespoon granulated sugar
- 1 teaspoon salt
- 1 cup cold unsalted butter, cubed
- ¼ cup ice water
- 1 large egg (for egg wash)
For the brown sugar filling:
- ¾ cup light brown sugar, packed
- 1½ tablespoons all-purpose flour
- ¼ teaspoon salt
- ¼ teaspoon ground cinnamon
- 2 tablespoons unsalted butter, melted
- 1 teaspoon vanilla extract
For the finishing touch:
- ¼ cup powdered sugar for dusting
Equipment Essentials
Before getting started, gather these tools:
- Rolling pin
- Parchment paper
- Baking sheets
- Round cookie cutter (approximately 3 inches in diameter)
- Fork (for crimping edges)
- Pastry brush (for egg wash)
- Fine mesh sieve (for dusting powdered sugar)
Step-by-Step Instructions
Preparing the Cookie Dough
- Create the base: In a large bowl, whisk together the flour, granulated sugar, and salt. This not only ensures even distribution of the ingredients but also aerates the flour slightly, contributing to a more tender pastry.
- Cut in the butter: Using a pastry cutter or your fingertips, work the cold butter into the flour mixture until you have pea-sized pieces. This is crucial – those small pieces of butter will create steam pockets during baking, resulting in that coveted flaky texture.
- Add ice water gradually: Drizzle in the ice water, one tablespoon at a time, gently mixing until the dough just comes together. You might not need all the water, so proceed carefully. The dough should hold together when squeezed but shouldn’t feel wet or sticky.
- Rest the dough: Divide the dough into two equal portions, shape each into a disk, wrap in plastic wrap, and refrigerate for at least one hour. This resting period allows the gluten to relax and the butter to firm up again, both essential for achieving that perfect texture.
Making the Brown Sugar Filling
While the dough chills, prepare the star of the show – the brown sugar filling:
- Combine dry ingredients: In a medium bowl, mix together the brown sugar, flour, salt, and cinnamon. The flour might seem like a strange addition, but it helps thicken the filling and prevents it from becoming too runny during baking.
- Add wet ingredients: Stir in the melted butter and vanilla extract until thoroughly combined. The mixture should resemble wet sand and clump together when pressed. Set aside to cool completely.
Assembling the Cookies
Now comes the fun part – putting everything together:
- Roll the dough: On a lightly floured surface, roll one disk of dough to about ⅛-inch thickness. Try to maintain an even thickness throughout – this ensures uniform baking.
- Cut circles: Using your cookie cutter, cut out as many circles as possible. Re-roll scraps as needed, but try not to overwork the dough. Place half of the circles on a parchment-lined baking sheet, spacing them about 1 inch apart.
- Add filling: Place approximately 1-2 teaspoons of brown sugar filling in the center of each circle on the baking sheet, leaving a ½-inch border around the edges. Resist the urge to overfill – it will make sealing the cookies much more difficult.
- Create tops: Beat the egg with a splash of water to create an egg wash. Brush the borders of the filled circles with egg wash, then place the remaining circles on top.
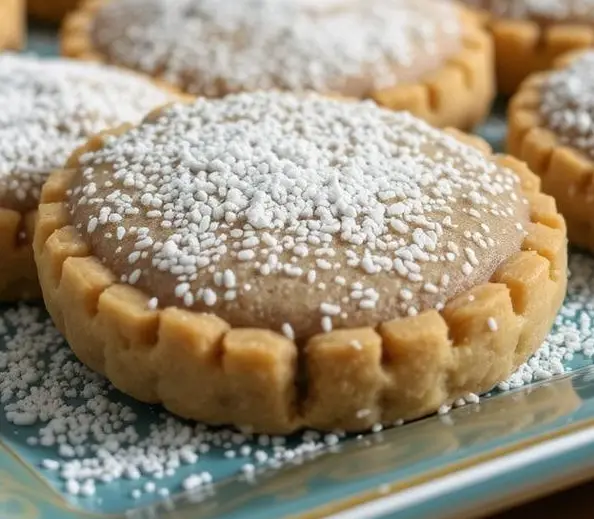
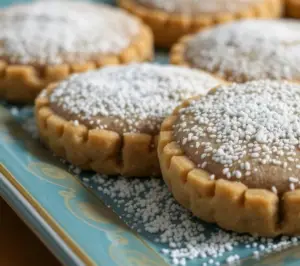
- Seal the edges: Press the edges together with your fingers, then use a fork to create that classic crimped edge all around. This not only gives them that iconic Pop-Tart look but also ensures they’re properly sealed.
- Vent the tops: Use a toothpick to poke a few small holes in the top of each cookie. This allows steam to escape during baking and prevents the filling from bursting through the sides.
- Chill again: Return the assembled cookies to the refrigerator for at least 15 minutes. This final chill helps the butter firm up once more, which is key to achieving flaky layers.
Baking to Perfection
- Preheat: While the cookies chill, preheat your oven to 350°F (175°C).
- Egg wash: Just before baking, brush the tops of the cookies with the remaining egg wash. This will give them a beautiful golden sheen as they bake.
- Bake: Slide the cookies into the oven and bake for 20-25 minutes, or until they’re golden brown around the edges. The gorgeous aroma of caramelizing brown sugar will let you know they’re getting close.
- Cool slightly: Allow the cookies to cool on the baking sheet for 5 minutes before transferring them to a wire rack. This brief resting period allows them to firm up enough to move without breaking.
- Finish with sugar: While the cookies are still warm (but not hot), dust them generously with powdered sugar through a fine mesh sieve. The warmth helps the sugar adhere beautifully to the surface.
Troubleshooting Tips
Even experienced bakers encounter challenges. Here are solutions to common issues:
- Filling leakage: If your filling escapes during baking, you likely didn’t seal the edges well enough. Make sure to press firmly with the fork and create those distinctive crimped edges.
- Tough dough: Overworking the dough or adding too much water can make it tough. Handle it gently and add water gradually.
- Soggy bottom: If the bottoms of your cookies aren’t crisp, try baking on a lower rack in the oven or extending the baking time by a few minutes.
Variations to Try
Once you’ve mastered the classic brown sugar version, consider these delicious variations:
- Cinnamon Apple: Add finely diced apples to the brown sugar mixture and increase the cinnamon for an autumn-inspired treat.
- Maple Pecan: Replace some of the brown sugar with pure maple syrup and add finely chopped toasted pecans to the filling.
- Chocolate Lover’s Dream: Swap the brown sugar filling for a mixture of cocoa powder, sugar, and a touch of espresso powder for depth.
- Strawberry Shortcake: Fill with strawberry preserves and dust with vanilla-infused powdered sugar for a fruity alternative.
Storing Your Creations
These cookies will keep in an airtight container at room temperature for up to 3 days, though they’re at their absolute best within 24 hours of baking. For longer storage, you can freeze the unbaked, assembled cookies for up to 3 months – simply add a few extra minutes to the baking time when cooking from frozen.
Why These Cookies Stand Out
What sets these Brown Sugar Pop Tart Cookies apart from other treats is their perfect balance of textures and flavors. The buttery, flaky exterior gives way to a sweet, slightly molten center that hits all the right notes. They’re substantial without being heavy, sweet without being cloying, and sophisticated enough for adults while capturing the whimsy that appeals to children.
Unlike many cookies that become one-note after a few bites, these pastries offer a complex experience from start to finish. The contrast between the crisp, delicate crust and the rich, caramelized filling creates a harmony that keeps you reaching for “just one more.”
Perfect Pairings
These cookies pair beautifully with:
- A steaming cup of black coffee, whose bitterness cuts through the sweetness
- A tall glass of cold milk for that classic cookies-and-milk experience
- Vanilla ice cream for an elevated dessert (warm the cookie slightly first)
- Hot tea, especially chai or English breakfast varieties
Final Thoughts
Making Brown Sugar Pop Tart Cookies is more than just following a recipe – it’s about creating memories. There’s something deeply nostalgic about recreating a childhood favorite in your own kitchen, perhaps sharing the experience with children or friends. The process itself becomes part of the joy.
What I love most about these cookies is how they bridge the gap between homemade goodness and familiar comfort food. They’re impressive enough to serve to guests but approachable enough that anyone can enjoy them without pretension. In a world of increasingly complex desserts, there’s something refreshingly honest about these cookies.
So the next time you’re craving something sweet that hits all the right notes of nostalgia and novelty, give these Brown Sugar Pop Tart Cookies a try. Your kitchen will smell amazing, your taste buds will thank you, and you’ll have created something truly special – a homemade version of a classic treat that’s infinitely more delicious than anything that could come from a box.