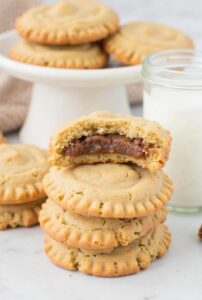
Remember those Saturday mornings as a kid, rushing through breakfast to catch cartoons? Pop Tarts were probably part of that ritual. Now imagine capturing that same nostalgic sweetness in a homemade cookie that’s infinitely better than anything from a toaster. These brown sugar pop tart cookies deliver all the comfort of your childhood favorite with the satisfaction of a freshly baked treat.
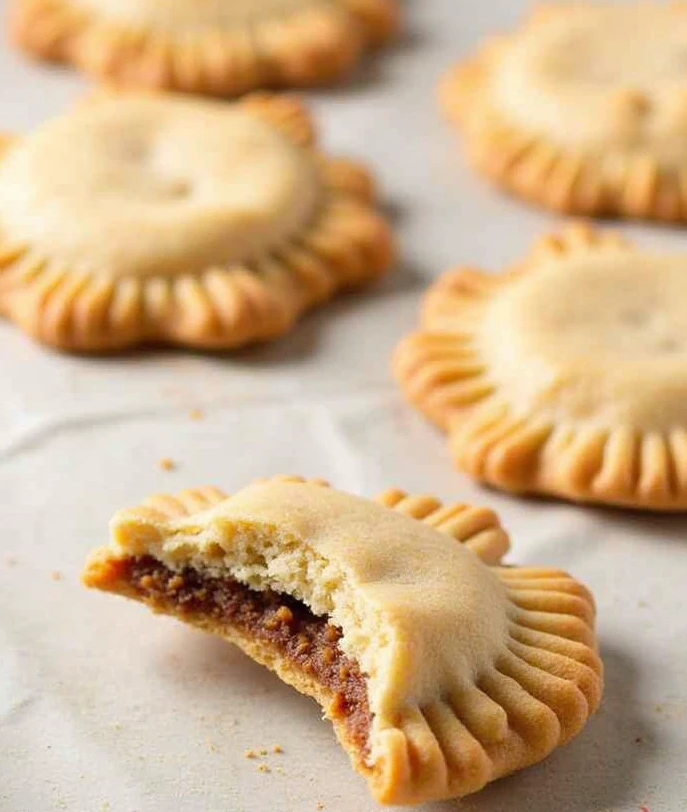
What makes these cookies special isn’t just their adorable miniature pop tart appearance – it’s the way they perfectly balance a tender, buttery cookie exterior with a gooey brown sugar filling that oozes slightly when you bite into it. They’re like the sophisticated cousin of the breakfast pastry you grew up with.
Why Brown Sugar Makes All the Difference
While store-bought pop tarts come in dozens of flavors, there’s something uniquely comforting about brown sugar. It’s not just sweet – it has depth and complexity that white sugar simply can’t match. The molasses in brown sugar adds a subtle caramel note that pairs beautifully with butter and vanilla in cookie dough.
When heated, brown sugar becomes almost toffee-like, creating that perfect gooey center that makes these cookies so addictive. Unlike jam-filled cookies that can be overly sweet or tart, the brown sugar filling provides just the right amount of richness without overwhelming the delicate cookie base.
The Science Behind the Perfect Cookie Dough
Creating cookies that look like pop tarts requires a specific type of dough – one that’s sturdy enough to hold its shape when filled and sealed, but tender enough to bite through easily. The secret lies in the butter-to-flour ratio and how you handle the dough.
Room temperature butter is crucial here. It needs to be soft enough to cream properly with the sugars, creating those tiny air pockets that give the cookies their tender texture. But it shouldn’t be so soft that it’s melting – that leads to cookies that spread too much and lose their defined edges.
The other key is not overworking the dough once you add the flour. Mix just until the ingredients come together. Overmixing develops the gluten in the flour, resulting in tough, chewy cookies instead of the tender, crisp texture we’re after.
Essential Ingredients and Smart Swaps
For the Cookie Dough:
- 2 1/4 cups all-purpose flour
- 1/2 cup unsalted butter, room temperature
- 1/2 cup brown sugar, packed
- 1/4 cup granulated sugar
- 1 large egg
- 2 tsp vanilla extract
- 1/2 tsp salt
- 1/2 tsp baking powder
For the Brown Sugar Filling:
- 1/2 cup brown sugar, packed
- 2 tbsp butter, melted
- 1 tbsp flour
- 1/4 tsp cinnamon
- Pinch of salt

Ingredient Substitutions That Work
If you only have salted butter on hand, reduce the added salt to 1/4 teaspoon. For a richer flavor, try using all brown sugar in the cookie dough instead of the brown and white sugar combination. Dark brown sugar will give you a more intense molasses flavor, while light brown sugar keeps things milder.
The filling is quite forgiving too. You can add a tablespoon of maple syrup for extra depth, or throw in some mini chocolate chips for a s’mores vibe. Just remember that wet ingredients will make the filling harder to work with, so adjust the flour accordingly.
Step-by-Step Cookie Construction
Making the Perfect Dough
Start by creaming your room temperature butter with both sugars until the mixture is light and fluffy – this usually takes about 3 minutes with an electric mixer. The mixture should look pale and have increased in volume. Beat in the egg and vanilla until well combined.
In a separate bowl, whisk together flour, salt, and baking powder. Gradually add this to the butter mixture, mixing on low speed just until the dough comes together. It should be soft but not sticky. If it’s too sticky to work with, wrap it in plastic and chill for 30 minutes.
Preparing the Brown Sugar Filling
While your dough chills, mix together all the filling ingredients until you have a paste-like consistency. The mixture should hold together when pressed but not be so wet that it runs. If it seems too dry, add another teaspoon of melted butter. Too wet? Add a bit more flour.
Assembly Techniques That Actually Work
Here’s where things get fun, but also where many people struggle. Roll your dough to about 1/8-inch thickness on a lightly floured surface. Cut into rectangles roughly 3×2 inches – you’ll need an even number since these are sandwich cookies.
Place a small spoonful of filling in the center of half your rectangles, leaving about 1/4 inch border around the edges. Don’t overfill – less is definitely more here. Brush the edges lightly with water, then top with the remaining rectangles.
The sealing step is crucial. Use a fork to crimp the edges all around, making sure there are no gaps where the filling can leak out. Those little fork marks aren’t just decorative – they’re functional seals that keep your cookies intact during baking.
Baking Tips for Professional Results
Preheat your oven to 350°F and line your baking sheets with parchment paper. This prevents sticking and makes cleanup easier. Space your cookies about 2 inches apart – they won’t spread much, but they need room for even air circulation.
Bake for 12-15 minutes, until the edges are lightly golden. The centers might look slightly underdone, but they’ll continue cooking on the hot pan after you remove them from the oven. This prevents overbaking, which can make the cookies hard and dry.
Let them cool on the baking sheet for 5 minutes before transferring to a wire rack. This brief cooling period helps them set up properly and reduces the chance of breaking.
Troubleshooting Common Problems
Filling leaks out during baking: This usually means you’ve overfilled them or didn’t seal the edges properly. Make sure to crimp firmly with a fork and don’t be generous with the filling.
Cookies spread too much: Your butter was probably too warm, or the dough needs chilling. Next time, make sure your butter is just soft enough to press with your finger, not squishy.
Tough, hard cookies: Overbaking is the usual culprit, but overmixing the dough can also cause this. Mix just until ingredients are combined, and watch the oven timer carefully.
Flavor Variations to Explore
Once you master the basic brown sugar version, the possibilities are endless:
Cinnamon Roll Style: Add extra cinnamon to both the dough and filling, plus a simple glaze made with powdered sugar and milk.
Chocolate Chip Paradise: Mix mini chocolate chips into the brown sugar filling for a cookie-meets-pop-tart-meets-chocolate-chip situation.
Apple Pie Dreams: Replace some of the brown sugar filling with finely diced apples mixed with cinnamon and a touch of maple syrup.
Peanut Butter Twist: Add a tablespoon of peanut butter to the filling and replace some of the flour in the dough with finely ground peanuts.
Storage and Make-Ahead Tips
These cookies stay fresh in an airtight container for up to a week, though they’re definitely best within the first few days. If you want to make them ahead for a party or gathering, you can prepare the dough and filling separately up to 3 days in advance.
For longer storage, freeze the assembled but unbaked cookies on a baking sheet, then transfer to freezer bags once solid. They’ll keep for up to 3 months and can be baked straight from frozen – just add an extra minute or two to the baking time.
When to Serve These Nostalgic Treats
Brown sugar pop tart cookies work in so many situations. They’re perfect for:
- School bake sales and PTA events
- Office potlucks where you want to stand out
- Kids’ birthday parties with a retro theme
- Coffee dates with friends who appreciate homemade treats
- Holiday cookie exchanges when you want something different
They also make wonderful gifts. Package them in clear cellophane bags with ribbon, and you’ve got something that looks professionally made but carries the personal touch of homemade.
The Adult Appeal of Childhood Favorites
There’s something deeply satisfying about recreating childhood foods with adult baking skills. These cookies capture the essence of what made pop tarts appealing – that sweet, comforting simplicity – while elevating the experience with real butter, quality ingredients, and the satisfaction of making something from scratch.
Unlike their commercial counterparts, these cookies don’t have that artificial aftertaste or overly sweet filling. The brown sugar provides complexity without being cloying, and the homemade cookie dough has a tender, buttery quality that no factory-made product can match.
Final Thoughts on This Sweet Success
Brown sugar pop tart cookies represent the best of both worlds: the nostalgic comfort of a beloved childhood treat and the superior taste and satisfaction of homemade baking. They’re surprisingly simple to make once you get the hang of the assembly process, and they never fail to bring smiles to people’s faces.
Whether you’re looking to impress at your next gathering, want a fun weekend baking project, or simply craving something that tastes like childhood but better, these cookies deliver. They’re proof that sometimes the best innovations come from looking backward and asking, “How can I make this even better?”
The beauty of this recipe lies in its versatility and reliability. Once you master the basic technique, you’ll find yourself experimenting with different fillings and flavors, creating your own signature versions. But even if you never stray from the classic brown sugar filling, you’ll have a recipe that brings joy to everyone who tries it.
