There’s something undeniably irresistible about biting into a warm Brazilian cheese bread roll. That crispy exterior giving way to a chewy, cheesy center creates a textural experience that’s utterly unique in the world of bread. Having spent years perfecting various global recipes, I can confidently say that Pão de Queijo (literally “cheese bread” in Portuguese) offers one of the most satisfying baking experiences for both novice and experienced bakers alike.
These golden, puffy cheese balls originated in the southeastern state of Minas Gerais in Brazil, where they’ve been a staple for centuries. What started as a creative use of cassava roots by enslaved Africans has evolved into one of Brazil’s most beloved snacks, now enjoyed worldwide. Their naturally gluten-free nature—thanks to tapioca flour—has only increased their popularity in recent years.
What Makes Brazilian Cheese Bread Special?
Before diving into the recipe itself, let’s explore what makes this bread so unique and beloved:
The Tapioca Flour Foundation
Unlike conventional wheat breads, Pão de Queijo relies on tapioca flour (also called cassava starch), derived from the cassava root. This starchy flour creates that distinctive chewy texture that’s impossible to achieve with wheat flour. It also makes these rolls naturally gluten-free, perfect for those with celiac disease or gluten sensitivity.
The Unusual Cooking Method
The technique used to make Brazilian cheese bread is somewhat unique in bread making. It involves cooking part of the dough before combining all ingredients—similar to pâte à choux (the dough used for eclairs and cream puffs). This pre-cooking step gelatinizes the starch in the tapioca flour, creating that signature chewy interior texture.
The Versatility
While traditional Pão de Queijo recipes often call for specific Brazilian cheeses like queijo minas, part of their global appeal is their adaptability to locally available ingredients. As you’ll see in this recipe, readily available cheeses like mozzarella and parmesan work beautifully.
Ingredients Breakdown
Let’s take a closer look at each ingredient in this recipe and understand its role:
- 1⅓ cups (170g) Tapioca flour: The foundation of the recipe, providing the characteristic chew and elasticity. Look for it labeled as tapioca starch or polvilho doce in specialty or Latin American markets.
- ⅔ cup (160ml) Milk: Adds moisture and helps activate the tapioca starch when heated. Whole milk provides the best flavor, but you can substitute plant-based milk for a dairy-free version.
- ⅓ cup (80ml) Oil: Provides richness and helps create a crisp exterior. Neutral oils like vegetable or canola work well, though some bakers prefer the flavor of olive oil.
- 1 Large egg: Acts as a binding agent and helps the bread puff up during baking.
- ½ teaspoon Salt: Enhances all the flavors, especially important when working with cheese.
- ⅔ cup (85g) Grated mozzarella cheese: Provides that stretchy, melty texture inside the bread. Fresh mozzarella can be too wet; stick with low-moisture varieties.
- ¼ cup (25g) Parmesan cheese, grated: Adds a sharp, salty depth of flavor that complements the milder mozzarella.
Equipment You’ll Need
- Medium saucepan
- Large mixing bowl
- Wooden spoon or sturdy spatula
- Measuring cups and spoons
- Baking sheet
- Parchment paper
- Ice cream scoop or tablespoon (for portioning dough)
Step-by-Step Instructions
1. Prepare Your Station
Preheat your oven to 400°F (200°C). Line a baking sheet with parchment paper. This preparation is important as the dough comes together quickly once you start, and you’ll want everything ready to go.
2. Prepare the Tapioca Flour
Place the tapioca flour in a large bowl. Creating this “well” of flour will make it easier to incorporate the hot liquid in the next step.
3. Create the Base Mixture
In a medium saucepan, combine the milk, oil, and salt. Bring this mixture to a boil over medium heat, stirring occasionally. Watch it carefully—the moment it reaches a boil is crucial. If the mixture boils too long, too much liquid will evaporate, affecting the final texture.
4. Form the Initial Dough
Immediately pour the hot milk mixture over the tapioca flour. Begin stirring with a wooden spoon or sturdy spatula. The tapioca will initially look lumpy and separated—this is normal! Keep stirring until it comes together into a more uniform, gelatinous mixture.
Allow this mixture to cool for about 5 minutes. This cooling step is essential before adding the egg; otherwise, you risk scrambling it.
5. Add the Remaining Ingredients
Once the dough has cooled slightly, add the egg and stir vigorously until fully incorporated. This will take some arm strength as the dough will be quite sticky.
Next, add both cheeses and continue stirring until they’re evenly distributed throughout the dough. The finished dough will be very sticky, stretchy, and soft—somewhat like a thick cake batter rather than a traditional bread dough. Don’t worry if it seems too soft; this is exactly the texture you want.
6. Shape and Bake
Using lightly oiled hands, a small ice cream scoop, or two spoons, portion the dough into approximately 16 equal balls. Place them on your prepared baking sheet, leaving about 1-2 inches between each ball to allow for expansion.
If the dough is sticking too much to your hands or tools, a light coating of oil can help (avoid using flour, as it will change the texture).
Transfer the baking sheet to your preheated oven and bake for 15-20 minutes. The rolls are done when they’ve puffed up significantly and have turned a light golden color on top. Be careful not to overbake them, as they can quickly dry out.
7. Serve and Enjoy
Brazilian cheese bread is at its absolute best when served warm from the oven, when the exterior is crisp and the interior is still gooey and stretchy. Allow them to cool just enough that you can handle them without burning yourself—about 5 minutes.
Serving Suggestions
Pão de Queijo is versatile when it comes to serving options:
- Breakfast companion: Serve alongside your morning coffee or tea for a savory start to the day.
- Appetizer or snack: Offer them as an appetizer before a meal, possibly with a dipping sauce like chimichurri or marinara.
- Meal accompaniment: They pair wonderfully with soups, stews, and salads, replacing traditional dinner rolls.
- Party offering: Make mini versions for a cocktail party—they’re guaranteed to disappear quickly.
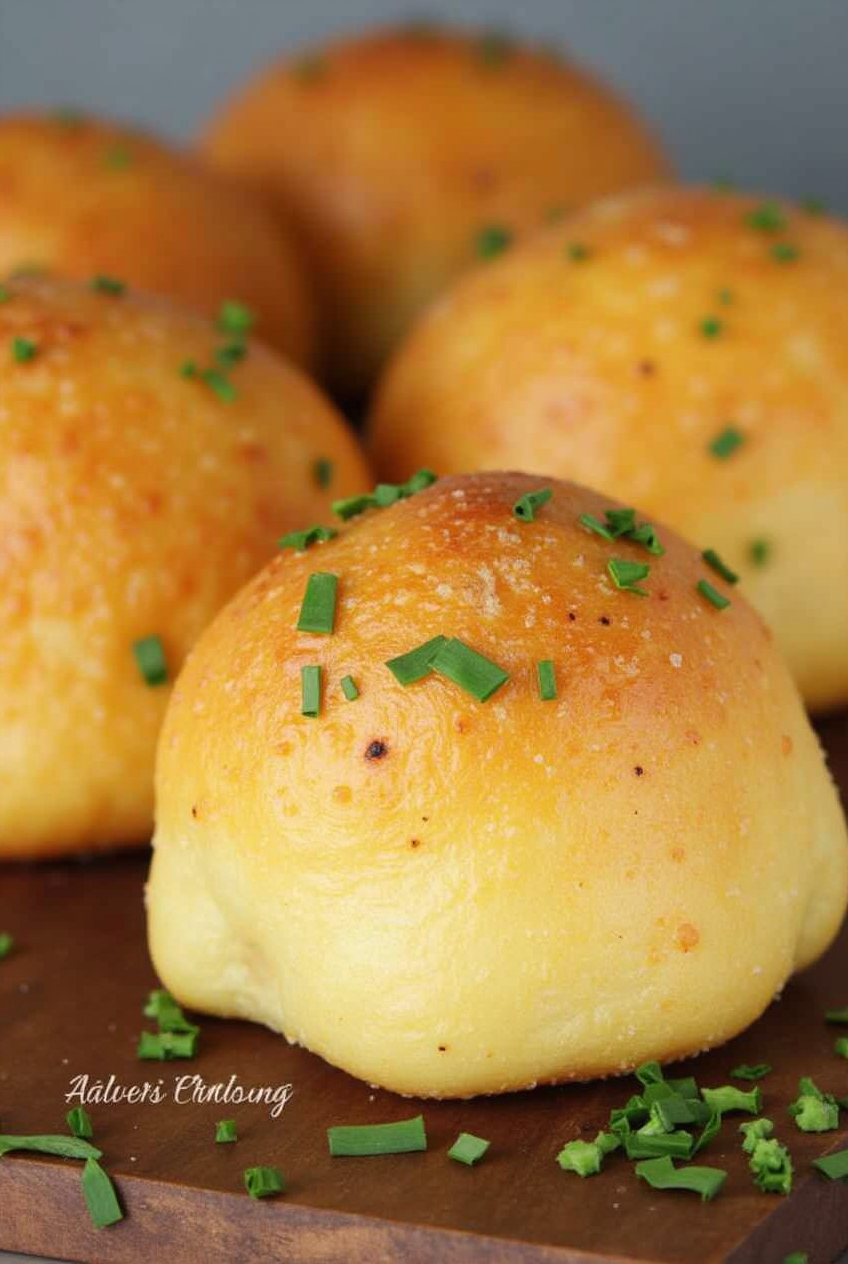
For an extra special touch, sprinkle fresh herbs like chives (as shown in the image) or parsley on top just after baking.

Creative Variations
Once you’ve mastered the basic recipe, consider these delicious variations:
- Herb-infused: Add 1-2 tablespoons of fresh herbs like rosemary, thyme, or basil to the dough.
- Spicy kick: Mix in a finely chopped jalapeño or a teaspoon of red pepper flakes.
- Bacon bits: Fold in ¼ cup of crispy bacon pieces for a smoky flavor.
- Different cheese blends: Try combinations like cheddar and gruyère, or blue cheese and mozzarella for different flavor profiles.
- Garlic lover’s version: Add 2-3 cloves of minced garlic to the milk mixture before boiling.
Troubleshooting Common Issues
Even experienced bakers sometimes encounter challenges with this unique bread. Here are solutions to common problems:
- Dough too wet: If your dough seems unusually liquid, add a bit more tapioca flour, one tablespoon at a time.
- Dough too dry: Add a splash more milk until you reach the sticky consistency needed.
- Bread didn’t puff up: This usually happens if your oven isn’t hot enough. Make sure it’s fully preheated to 400°F (200°C).
- Bread deflated after baking: Some slight deflation is normal, but significant collapse might indicate underbaking or too much moisture in the dough.
- Cheese leaked out during baking: The cheese was likely not fully incorporated into the dough, or your cheese pieces were too large.
Make-Ahead and Storage Tips
Brazilian cheese bread is ideal for preparing in advance:
Room Temperature Storage
As noted in the recipe, you can store baked Pão de Queijo at room temperature for up to 3 days in an airtight container. However, they do lose some of their magic after the first day.
Freezing Unbaked Dough
The freezing method mentioned in the recipe is particularly brilliant. By shaping the dough into balls and freezing them individually first, you create your own “ready to bake” stash that doesn’t stick together in storage.
To bake from frozen:
- Preheat your oven to 375°F (190°C) – slightly lower than for fresh dough
- Place frozen balls directly on a parchment-lined baking sheet
- Bake for 20-25 minutes until golden
There’s no need to thaw first, making this perfect for last-minute entertaining or satisfying sudden cravings.
Reheating Tips
To restore some of the original texture when reheating:
- Oven method: Wrap in foil and heat at 350°F (175°C) for about 5 minutes
- Microwave: 10-15 seconds on high, though this won’t restore the crisp exterior
- Air fryer: 2 minutes at 350°F (175°C) for the best texture rehabilitation
Nutritional Considerations
Brazilian cheese bread offers some interesting nutritional aspects:
- Gluten-free: Naturally free from gluten, making it safe for those with celiac disease
- Higher protein: Thanks to the cheese and egg, these rolls have more protein than many bread options
- Calcium-rich: The cheese provides a good dose of calcium
- More calorie-dense: Due to the cheese and oil content, these are more caloric than regular rolls
For those watching their sodium intake, consider reducing the salt slightly and using part-skim mozzarella.
Cultural Significance
Pão de Queijo isn’t just delicious—it’s an important cultural icon in Brazil. These cheese rolls are found everywhere from humble home kitchens to high-end bakeries and coffee shops. They’re typically enjoyed as part of a casual breakfast or afternoon coffee break known as “lanche da tarde.”
The history of this bread reflects Brazil’s resourceful culinary heritage. When European colonizers brought cheese-making techniques to Brazil, they were combined with indigenous knowledge of working with cassava root—a staple crop that thrived in Brazilian soil when wheat would not. The result was a perfect cultural and culinary fusion.
Today, Brazilian immigrants have helped spread the popularity of Pão de Queijo worldwide, and its naturally gluten-free quality has made it a favorite discovery for those avoiding wheat.
Why This Recipe Works
Having tested countless versions of Brazilian cheese bread over the years, I find this recipe particularly successful for home bakers for several reasons:
- Balanced cheese ratio: The combination of mozzarella and Parmesan provides both stretchiness and flavor depth without overwhelming the delicate dough.
- Accessible ingredients: While traditional recipes might call for specific Brazilian cheeses, this version uses widely available options without sacrificing authenticity.
- Straightforward technique: The method is simplified without cutting corners on the essential steps that create the signature texture.
- Perfect yield: Making 16 rolls gives you enough to serve a group while ensuring each piece is the ideal size for that perfect ratio of crisp exterior to chewy interior.
Final Thoughts on Brazilian Cheese Bread
There’s something magical about pulling a tray of these golden puffs from the oven, watching steam escape as you tear one open to reveal the stretchy interior. In a world of complicated recipes and hard-to-source ingredients, Brazilian cheese bread stands out for its simplicity, distinctive texture, and adaptability.
Whether you’re an experienced baker looking to explore global recipes, someone cooking for gluten-free friends, or simply a cheese lover seeking your next obsession, Pão de Queijo deserves a place in your culinary repertoire.
The best part? Once you’ve made them once, you’ll find yourself coming back to this recipe again and again, likely developing your own special variations along the way. That’s the true mark of a great recipe—it becomes part of your cooking identity, evolving as you do in the kitchen.
So heat your oven, gather your ingredients, and prepare to experience one of Brazil’s most beloved culinary treasures. Your kitchen will smell amazing, and everyone who tastes these warm, cheesy delights will be begging for your secret recipe!