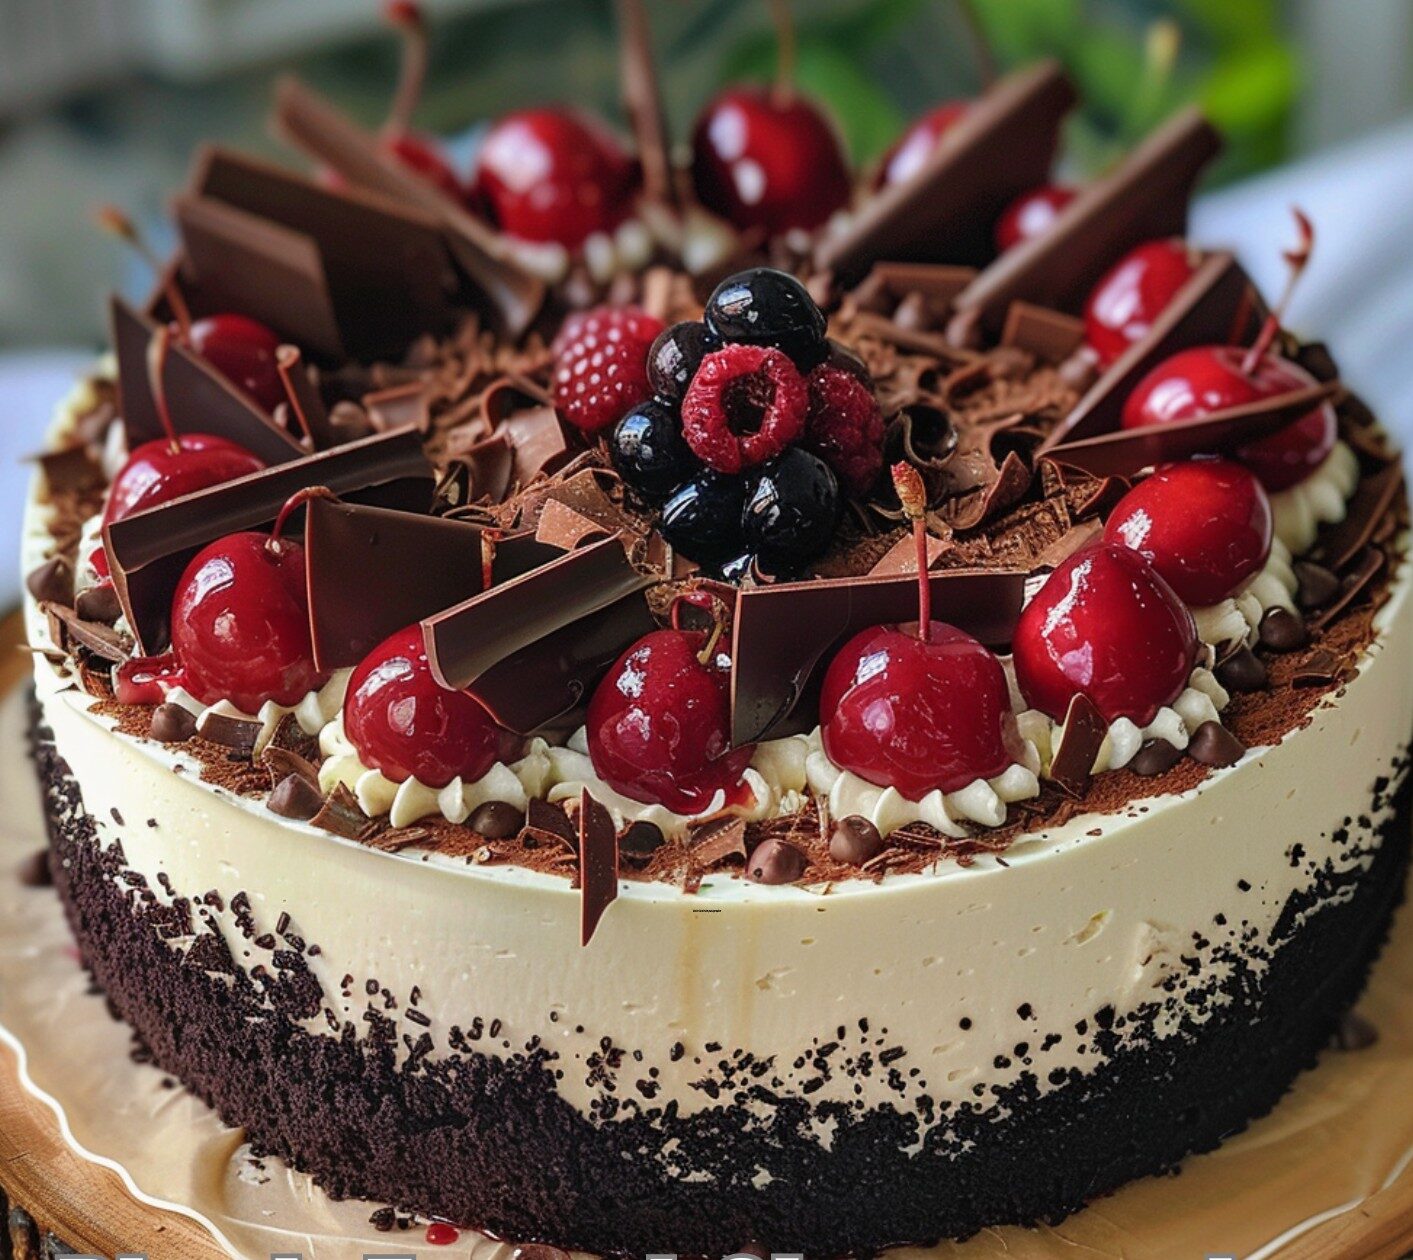
If you’ve ever dreamed of combining the rich elegance of cheesecake with the classic flavors of Black Forest cake, prepare to have your dessert dreams come true. This Black Forest Cheesecake is an absolute showstopper—a chocolate cheesecake base topped with sweet-tart cherry filling and clouds of whipped cream. It’s the kind of dessert that makes people stop mid-conversation and just stare in awe.
My love affair with this black forest cheesecake recipe began at a dinner party where I was tasked with bringing dessert. I wanted something impressive but didn’t want to tackle the complexity of a traditional multi-layer Black Forest cake. Then it hit me—why not combine my two favorite desserts?
The result was this magnificent chocolate cherry cheesecake that had everyone asking for the recipe before they’d even finished their slice. Furthermore, it’s become my signature dessert for special occasions and celebrations.
Understanding the Black Forest Tradition
Before we dive into this chocolate cherry cheesecake recipe, let’s talk about what makes something “Black Forest.” Traditional Black Forest cake, or Schwarzwälder Kirschtorte in German, comes from the Black Forest region of Germany. Specifically, it features layers of chocolate cake soaked in kirsch (cherry brandy), filled with cherry preserves and whipped cream, and decorated with cherries and chocolate shavings.
This baked chocolate cheesecake captures all those essential elements in cheesecake form. While we’re not using kirsch in the basic recipe (though I’ll show you how to add it if you want!), we maintain the chocolate-cherry-cream trinity that defines Black Forest desserts. Consequently, the result is a dessert that’s easier to make than traditional layer cake but equally impressive. Moreover, cheesecake form makes it more stable for transporting.
The beauty of cheesecake is its make-ahead nature. Unlike traditional cake that’s best served fresh, cheesecake actually improves after chilling overnight. Therefore, this makes it perfect for entertaining—all the work is done ahead of time, leaving you free to enjoy your guests. Additionally, you can make it up to two days in advance.
Essential Ingredients for Black Forest Cheesecake
Let’s gather everything you’ll need to create this stunning chocolate cherry dessert:
For the Chocolate Cookie Crust:
- 24 Oreo cookies (about 2 cups of crumbs, including the cream filling)
- 5 tablespoons unsalted butter, melted
Chocolate Cheesecake Filling:
- 32 ounces (four 8-ounce packages) cream cheese, softened to room temperature
- 1¼ cups granulated sugar
- ⅓ cup unsweetened cocoa powder
- ¼ teaspoon salt
- 4 large eggs, at room temperature
- 1 cup sour cream, at room temperature
- 8 ounces good-quality dark chocolate, melted and cooled slightly
- 2 teaspoons vanilla extract
Cherry Topping:
- 1 can (21 ounces) cherry pie filling, or
- 2 cups fresh or frozen dark sweet cherries
- ½ cup granulated sugar (if using fresh cherries)
- 2 tablespoons cornstarch
- 2 tablespoons water
- 1 teaspoon vanilla extract
Whipped Cream Topping:
- 2 cups heavy cream, cold
- ¼ cup powdered sugar
- 1 teaspoon vanilla extract
Garnish:
- Chocolate shavings or curls
- Additional cherries
- Cocoa powder for dusting
Quality ingredients make all the difference in this chocolate cherry cheesecake. Use full-fat cream cheese (never reduced fat for cheesecake!), good-quality dark chocolate (I prefer 60-70% cacao), and real vanilla extract. For the cherries, dark sweet cherries work best, but you can use tart cherries if you adjust the sugar accordingly. Additionally, room temperature ingredients blend more smoothly and create a creamier texture.

Step-by-Step Guide to Perfect Black Forest Cheesecake
Let me walk you through creating this masterpiece:
Preparing Your Pan
Wrap the outside of a 9-inch springform pan tightly with heavy-duty aluminum foil, covering the bottom and going up the sides. This prevents water from seeping in during the water bath. Spray the inside with cooking spray. Preheat your oven to 325°F (160°C). Additionally, this foil barrier is crucial for preventing leaks—don’t skip this step!
Making the Oreo Crust
Place the Oreos in a food processor and pulse until they’re fine crumbs (you don’t need to remove the cream filling—it adds flavor!). Add the melted butter and pulse until the mixture looks like wet sand. Press this firmly into the bottom and about 1 inch up the sides of your prepared springform pan. I use the bottom of a measuring cup to really pack it in. Bake for 10 minutes, then remove and let cool while you make the filling. Meanwhile, this brief baking sets the crust so it doesn’t fall apart later.
Creating the Chocolate Cheesecake Filling
In a large bowl or stand mixer, beat the cream cheese on medium speed for 3-4 minutes until it’s completely smooth with no lumps. Scrape down the sides of the bowl frequently. In a separate bowl, whisk together the sugar, cocoa powder, and salt, then add this to the cream cheese. Beat until well combined and fluffy. At this point, the mixture should be light and airy.
Add the eggs one at a time, mixing on low speed after each addition just until incorporated. Don’t overmix after adding the eggs—this can incorporate too much air and cause cracks. Add the sour cream and vanilla, mixing gently until combined. Finally, fold in the melted chocolate until the batter is uniformly dark and silky. Furthermore, gentle folding at this stage prevents overbeating.
Setting Up the Water Bath
Pour the cheesecake batter over the prepared crust. Place your foil-wrapped springform pan inside a larger roasting pan. Pull out your oven rack slightly, place the roasting pan on it, then carefully pour hot (not boiling) water into the roasting pan until it comes about halfway up the sides of the springform pan. Specifically, the water bath creates gentle, even heat that prevents cracks and ensures a creamy texture. Therefore, don’t skip this crucial step.
Baking
Bake for 65-75 minutes. Specifically, the cheesecake is done when the edges are set but the center still has a slight jiggle (about 3 inches in diameter) when you gently shake the pan. Don’t overbake—the center will firm up as it cools. Turn off the oven, crack the oven door, and let the cheesecake cool in the oven for 1 hour. This gradual cooling prevents cracks. Additionally, sudden temperature changes can cause the top to crack.
Chilling
After the hour in the oven, remove the cheesecake from the water bath and run a knife around the edge to loosen it from the pan (don’t remove the ring yet). Let it cool to room temperature, then refrigerate for at least 6 hours or overnight. This chilling time is crucial—the cheesecake needs to set completely. Furthermore, overnight chilling produces the best flavor and texture.
Making the Cherry Topping
If using canned cherry pie filling, you can use it straight from the can. If making your own: Combine cherries, sugar, and water in a saucepan over medium heat. Make a slurry by mixing cornstarch with 2 tablespoons of water, then add to the cherries. Cook, stirring, until the mixture thickens and the cherries are tender (about 8-10 minutes). Remove from heat, stir in vanilla, and let cool completely. Meanwhile, the homemade version tastes fresher and less artificial.
Making the Whipped Cream
Just before serving, whip the heavy cream with the powdered sugar and vanilla until stiff peaks form. This should take 3-4 minutes with an electric mixer. Don’t overbeat or you’ll end up with butter! Additionally, cold cream whips better, so make sure it’s well-chilled.
Decorating
Remove the cheesecake from the springform pan and place on your serving plate. Pipe or spread the whipped cream around the edge of the cheesecake, leaving the center open. Spoon the cherry topping into the center. Garnish with chocolate shavings and additional cherries. Slice and enjoy! Finally, for the cleanest slices, dip your knife in hot water between cuts.
Expert Tips for Perfect Chocolate Cherry Cheesecake
After making this black forest cheesecake countless times, I’ve learned some crucial tricks. First, all your ingredients (except the chocolate) must be at room temperature. This is non-negotiable for smooth, lump-free cheesecake. Take your cream cheese, eggs, and sour cream out of the fridge at least 2 hours before you start baking. Furthermore, cold ingredients don’t blend smoothly and can leave lumps.
Second, don’t skip the water bath. I know it seems fussy, but it’s the secret to creamy, crack-free cheesecake. Specifically, the steam from the water creates a humid environment that keeps the top from drying out and cracking. If you’re nervous about leaks, use an oven bag instead of foil—place your springform pan inside the bag, fold the top down, and place in the roasting pan with water. Additionally, this method provides extra insurance against leaks.
Third, resist the urge to open the oven door during baking. Temperature fluctuations can cause cracks. Additionally, please, don’t test the cheesecake with a toothpick like you would a regular cake—that creates holes. Use the jiggle test instead. The edges should be set, but the center should still wobble slightly when gently shaken.
Finally, patience is key. Let the cheesecake cool gradually and chill completely. Rushing this process will result in a loose, runny center. Trust me, waiting overnight is worth it! In fact, many professional bakers insist on a 24-hour chill time. Therefore, plan to make this dessert a day before you need it.
Delicious Variations for Your Black Forest Cheesecake
Once you’ve mastered the classic version, try these creative twists:
Traditional and Boozy Options
Boozy Black Forest Cheesecake: Add 3 tablespoons of kirsch (cherry brandy) to the cheesecake filling and brush the cooled cheesecake with more kirsch before adding the toppings. This is the traditional Black Forest flavor. Furthermore, the kirsch adds an authentic German touch that adults appreciate.
No-Bake and Size Variations
No-Bake Black Forest Cheesecake: Use a no-bake cheesecake base by mixing cream cheese, powdered sugar, cocoa powder, and whipped topping. No oven required! Just chill to set. Additionally, this version is perfect for hot summer days when you don’t want to heat up the kitchen.
Mini Black Forest Cheesecakes: Make individual cheesecakes in a muffin tin lined with paper liners. Adjust baking time to 20-25 minutes. Perfect for parties! Moreover, individual servings make portion control easier.
Flavor Variations
White Chocolate Cherry Cheesecake: Replace the dark chocolate with white chocolate and use white chocolate Oreos for the crust. Keep the cherry topping for contrast. However, white chocolate is sweeter, so you may want to reduce the sugar slightly.
Raspberry Black Forest: Substitute raspberries for the cherries, or use half cherries and half raspberries for a mixed berry version. Alternatively, layer both fruits for beautiful color contrast.
Serving and Presentation Tips
This chocolate cherry cheesecake is already stunning, but presentation can take it to the next level. For clean slices, dip your knife in hot water and wipe it clean between each cut. This gives you those beautiful, professional-looking slices. Additionally, warm water prevents the filling from sticking to the blade.
Serve each slice on a white plate with a drizzle of chocolate sauce around the plate and a fresh cherry on the side. Specifically, the contrast of the white plate against the dark cheesecake is gorgeous. For an extra special touch, dust the plate lightly with cocoa powder. Furthermore, a sprig of mint adds a fresh, elegant note.
This black forest cheesecake pairs wonderfully with coffee, espresso, or even a glass of port wine for an elegant dinner party dessert. Meanwhile, the rich chocolate and tart cherries can handle bold flavors. Additionally, champagne or prosecco creates a celebratory pairing for special occasions.
Storage and Make-Ahead Instructions
One of the best things about this chocolate cheesecake recipe is how well it keeps and how perfectly it’s suited to making ahead. Specifically, the cheesecake itself can be made up to 3 days in advance—just store it covered in the refrigerator without the toppings. Add the cherry topping and whipped cream just before serving. Therefore, you can break up the work and reduce day-of stress.
Store leftover cheesecake covered in the refrigerator for up to 5 days. However, the whipped cream will soften a bit over time, so if you know you’ll have leftovers, consider only decorating half the cake and keeping the other half plain. You can always add fresh whipped cream and cherries when you’re ready to serve more. Additionally, plain cheesecake actually keeps longer than decorated cheesecake.
You can also freeze black forest cheesecake! Wrap individual slices tightly in plastic wrap, then aluminum foil, and freeze for up to 2 months. Thaw overnight in the refrigerator before serving. Don’t freeze the whipped cream topping—add that fresh after thawing. Furthermore, frozen cheesecake maintains its texture remarkably well.
Nutritional Information
Per slice (based on 12 slices):
- Calories: 585
- Total Fat: 41g
- Saturated Fat: 24g
- Cholesterol: 165mg
- Sodium: 395mg
- Total Carbohydrates: 51g
- Dietary Fiber: 2g
- Sugars: 38g
- Protein: 9g
Yes, this is an indulgent dessert! But it’s meant for special occasions, and one slice is incredibly satisfying. Additionally, the richness means a little goes a long way.
Troubleshooting Common Cheesecake Problems
Cracking Issues
Problem: The cheesecake cracked. Solution: Cracks happen for several reasons—overbaking, too much air beaten into the batter, or cooling too quickly. Follow the gentle mixing instructions, use the water bath, and cool gradually. Furthermore, cracks are mostly cosmetic and don’t affect taste—the cherry topping covers them anyway!
Texture Problems
Problem: The cheesecake is runny in the center. Solution: It wasn’t baked long enough or wasn’t chilled sufficiently. Remember, it should still jiggle slightly in the very center when you remove it from the oven. Additionally, make sure to chill it for at least 6 hours, preferably overnight.
Problem: The crust is soggy. Solution: Make sure you baked the crust before adding the filling, and ensure your springform pan was properly wrapped so no water leaked in. Furthermore, letting the crust cool before adding filling helps prevent sogginess.
Problem: The chocolate seized in the filling. Solution: Make sure the chocolate was cooled slightly before adding to the batter. Too-hot chocolate can cause the cream cheese to curdle. Additionally, fold the chocolate in gently rather than beating vigorously.
My Personal Journey with This Recipe
This black forest cheesecake has become my signature dessert for special occasions. I’ve made it for anniversaries, Valentine’s Day dinners, Christmas celebrations, and countless birthday parties. Each time, it receives the same reaction: stunned silence followed by enthusiastic compliments. Furthermore, people often say it’s the best cheesecake they’ve ever had.
What I love most about this chocolate cherry cheesecake is that it looks incredibly impressive but is actually quite forgiving to make. Yes, there are several steps, but none of them are particularly difficult. If you can make a regular cheesecake, you can make this. Additionally, if you’ve never made cheesecake before, this is a great recipe to start with because the dark chocolate color hides any minor imperfections.
I’ll never forget the first time my mother-in-law tried this dessert. She’s a traditionalist who was skeptical about “messing with” Black Forest cake by turning it into cheesecake. But after one bite, she was converted. “This is even better than the cake,” she admitted. Coming from her, that was high praise indeed. Therefore, this recipe has won over even the most traditional dessert lovers.
Whether you’re celebrating something special or just want to treat yourself to an extraordinary dessert, this black forest cheesecake is worth the effort. Take your time, follow the steps carefully, and prepare to impress everyone who’s lucky enough to get a slice. Happy baking!