Every year when the first snowflakes begin to fall, I know it’s time to start my annual Christmas cookie tradition. Among all the cookies I bake during the holiday season, my twisted Christmas cookies hold a special place in my heart. I learned this recipe from my grandmother, who would spend entire December afternoons rolling delicate ropes of dough in colored sugar, twisting them into beautiful spirals that looked like miniature candy canes or elegant pinwheels. The first time I made these twisted cookies in my own kitchen, the familiar scent of almond and butter transported me back to her warm, flour-dusted kitchen, and I felt her presence with me as I carefully twisted each cookie.
These twisted Christmas cookies are more than just a dessert – they’re an edible work of art that brings joy to every holiday cookie platter. With their festive swirls of color, delicate almond flavor, and satisfying buttery texture, they’re guaranteed to be the star of any cookie exchange or holiday gathering.
Why These Twisted Christmas Cookies Are Simply Magical
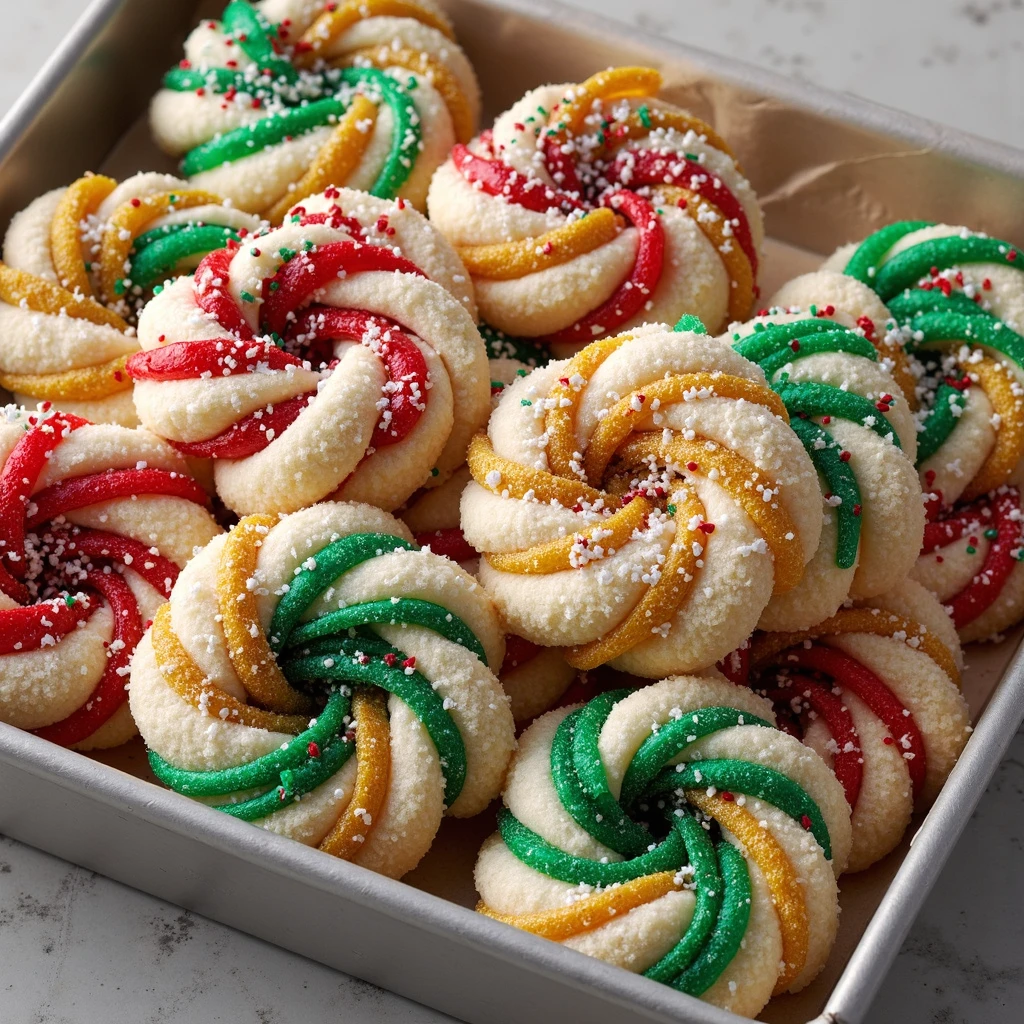
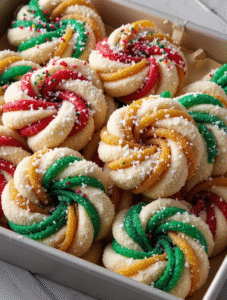
When you look at the image of these stunning twisted Christmas cookies, you immediately see why they’re so special. Each cookie features a beautiful pinwheel design with swirls of red, green, and white dough, all generously coated in sparkling sugar crystals that catch the light like freshly fallen snow. The cookies are perfectly shaped into neat spirals, and their vibrant colors make them instantly festive. They look like they came from an expensive bakery, yet they’re surprisingly simple to make at home.
What makes these Christmas cookie twists so irresistible is their unique texture. The outside is delicately crisp with a satisfying sugar crunch, while the inside remains tender and buttery. The subtle almond flavor is enhanced by a hint of citrus, creating a sophisticated taste that appeals to both children and adults alike.
Essential Ingredients for Twisted Christmas Cookies
Cookie Dough:
- 1 cup (2 sticks) unsalted butter, softened
- 1¼ cups granulated sugar
- 1 large egg, room temperature
- 2 teaspoons almond extract
- 1 teaspoon vanilla bean paste or vanilla extract
- 3 cups all-purpose flour
- 1 teaspoon cornstarch
- 1 teaspoon baking powder
- 1 teaspoon fine salt
Colors:
- Red gel food coloring
- Green gel food coloring
- OR natural food coloring alternatives
Vanilla Sugar Coating:
- 2 cups granulated sugar
- 1 vanilla bean, seeds scraped (or 2 teaspoons vanilla extract mixed into the sugar)
Almond Citrus Icing (Optional):
- 2 cups powdered sugar
- 3-4 tablespoons fresh orange or lemon juice
- ½ teaspoon almond extract
- Zest of 1 orange or lemon
Decoration:
- Christmas sprinkles (red, green, and white)
- Sanding sugar in festive colors
- Edible glitter (optional)
Step-by-Step Instructions for Making Twisted Christmas Cookies
Preparing the Cookie Dough
In a large bowl or stand mixer fitted with a paddle attachment, cream together the softened butter and granulated sugar on medium-high speed for 3-4 minutes. The mixture should become noticeably lighter in color and look fluffy. This creaming process is crucial for creating tender, melt-in-your-mouth Christmas cookies.
Add the egg, almond extract, and vanilla bean paste to the butter mixture. Beat on medium speed until everything is fully incorporated and the mixture is smooth. Scrape down the sides and bottom of the bowl with a rubber spatula to ensure even mixing.
In a separate bowl, whisk together the flour, cornstarch, baking powder, and salt. With the mixer on low speed, gradually add the dry ingredients to the wet mixture, mixing just until the dough comes together. Avoid overmixing, as this can make the twisted cookies tough instead of tender.
Dividing and Coloring the Dough
Divide your cookie dough into three equal portions. This is where your twisted Christmas cookies start to become festive. Leave one portion white, and place the other two portions in separate bowls.
Add red gel food coloring to one portion and green gel food coloring to the other. Use gel coloring rather than liquid, as it provides more vibrant color without adding extra moisture that could affect the dough’s texture. Knead each colored portion until the color is evenly distributed throughout. You want bright, cheerful colors that will look beautiful when twisted together.
Wrap each portion of dough (white, red, and green) separately in plastic wrap and refrigerate for at least 1 hour, or up to 24 hours. Chilled dough is much easier to work with and holds its shape better during twisting and baking.
Creating the Vanilla Sugar
While your dough chills, prepare your vanilla sugar coating. If using a vanilla bean, split it lengthwise and scrape out the seeds. Mix the vanilla seeds (or vanilla extract) with the granulated sugar in a shallow bowl or rimmed baking sheet. The vanilla adds an extra layer of flavor to these twisted Christmas cookies that makes them truly special.
Rolling and Twisting the Cookies
This is the fun part where your artistic skills come into play. Remove your chilled dough from the refrigerator. Working with small portions (about 1 teaspoon of each color), roll each piece between your palms and then on a clean work surface into thin ropes about 5-6 inches long and ¼ inch thick.
For classic two-tone twisted cookies, place one red rope and one white rope side by side. Gently twist them together, pinching the ends to seal. For three-color pinwheel cookies, lay strips of red, white, and green dough side by side on a piece of parchment paper, roll them together into a log, and slice into rounds.
As you create each twisted cookie, immediately roll it in the vanilla sugar, coating all sides generously. Place the sugar-coated cookies on a parchment-lined baking sheet, spacing them about 2 inches apart. If making candy cane shapes, curve the top of each twist to create that classic hook.
For pinwheel cookies, roll out portions of each colored dough into rectangles of equal size on parchment paper. Stack the layers, roll tightly into a log, wrap in parchment, and chill for 30 minutes. Roll the chilled log in vanilla sugar or sprinkles, then slice into ⅓-inch rounds.
Baking Your Twisted Christmas Cookies
Preheat your oven to 350°F. Before baking, you can press additional sprinkles onto the sugar-coated twisted cookies for extra festive flair.
Bake the cookies for 10-12 minutes, or until they’re set and just barely beginning to turn golden on the bottom edges. The tops should look dry and the cookies should feel firm when gently touched. Be careful not to overbake – these twisted Christmas cookies should remain pale with just a hint of color to maintain their tender texture.
Remove from the oven and let the cookies cool on the baking sheet for 5 minutes before transferring to a wire rack to cool completely.
Making the Almond Citrus Icing
For an extra-special finish, prepare the almond citrus icing while your twisted cookies cool. In a medium bowl, whisk together the powdered sugar, fresh citrus juice, almond extract, and zest until smooth. The icing should be thick enough to coat the back of a spoon but thin enough to drizzle.
Once the cookies are completely cool, drizzle the icing over them in decorative patterns, or dip the tops of the cookies into the icing for a more generous coating. The citrus adds a bright, fresh note that complements the almond flavor beautifully.
Tips for Perfect Twisted Christmas Cookies Every Time
Keep Your Dough Cold
Working with cold dough is the secret to successful twisted Christmas cookies. If the dough becomes too warm and sticky while you’re working, pop it back in the refrigerator for 15 minutes. Cold dough is easier to roll into smooth ropes and holds its twisted shape better during baking.
Uniform Rope Thickness
For the most attractive twisted cookies, make sure your dough ropes are the same thickness throughout their length. This ensures even baking and a professional appearance. If one rope is thicker than the other, the twists won’t look as neat.
Use Gel Food Coloring
Gel food coloring is far superior to liquid coloring for cookie dough. It provides more vibrant, true colors without adding extra liquid that can change the dough’s consistency. A little goes a long way, so start with a small amount and add more as needed.
Don’t Skip the Chilling
Chilling the dough before rolling is non-negotiable for twisted Christmas cookies. It prevents the colors from bleeding together, makes the dough easier to handle, and helps the cookies maintain their shape in the oven.
Nutritional Information
Per serving (2 cookies):
- Calories: 185
- Total Fat: 8g
- Saturated Fat: 5g
- Cholesterol: 28mg
- Sodium: 95mg
- Total Carbohydrates: 27g
- Dietary Fiber: 0g
- Sugars: 18g
- Protein: 2g
Presentation Ideas for Twisted Christmas Cookies
These beautiful twisted Christmas cookies deserve an equally beautiful presentation. Arrange them on a festive platter in a fan or circular pattern, alternating colors for maximum visual impact. The sugar coating catches the light beautifully, making them sparkle like little jewels.
For gift-giving, stack twisted cookies in clear cellophane bags tied with red and green ribbons. Place a small piece of parchment paper between layers to prevent them from sticking together.
Create a stunning cookie tree by standing twisted cookies upright in a foam cone covered with green tissue paper. Secure each cookie with a dab of royal icing or a toothpick.
For a cookie exchange, present your twisted Christmas cookies in vintage tins or decorative boxes lined with parchment paper. Include a small card with the recipe so others can recreate these beautiful treats.
Perfect Pairings for Your Christmas Cookie Twists
These festive cookies pair wonderfully with:
- Hot beverages: Coffee, hot chocolate, or spiced tea complement the almond flavor
- Milk: Classic cold milk is perfect for dunking these tender twisted cookies
- Dessert wine: Sweet Moscato or Riesling enhances the citrus notes
- Eggnog: The creamy, spiced eggnog is a perfect holiday companion
Delicious Variations of Twisted Christmas Cookies
Peppermint Twist Cookies
Add ½ teaspoon peppermint extract to the dough and crush candy canes to roll the twisted cookies in for a minty variation.
Chocolate Orange Twist Cookies
Make one portion chocolate dough by adding 3 tablespoons cocoa powder, and add orange zest to all portions for a chocolate-orange combination.
Lemon Lavender Twist
Add dried culinary lavender to the vanilla sugar and use lemon extract in the dough for an elegant, aromatic cookie.
Gingerbread Spice Twist
Add 1 teaspoon each of cinnamon, ginger, and nutmeg to the dough for a spiced version that tastes like gingerbread.
Substitutions and Dietary Modifications
Making Them Gluten-Free
Use a 1:1 gluten-free flour blend in place of all-purpose flour. The cookies may be slightly more delicate but will still taste delicious.
Dairy-Free Option
Substitute the butter with an equal amount of vegan butter or coconut oil. The flavor will be slightly different but the texture will remain similar.
Natural Food Coloring
Use beet juice for red, spinach or matcha powder for green. Natural colors may be less vibrant but provide the same festive look without artificial dyes.
Lower Sugar Version
Reduce the sugar in the dough by ¼ cup and skip the sugar coating. Brush the twisted cookies with egg wash and sprinkle lightly with sanding sugar instead.
Storage and Freezing Instructions
Store twisted Christmas cookies in an airtight container at room temperature for up to 1 week. Place parchment paper between layers to prevent sticking.
For longer storage, freeze unbaked cookie dough logs wrapped tightly in plastic wrap and aluminum foil for up to 3 months. Thaw in the refrigerator before slicing and baking.
You can also freeze baked cookies for up to 2 months. Layer them between parchment paper in an airtight container. Thaw at room temperature for 1 hour before serving.
Troubleshooting Common Twisted Cookie Issues
Colors Bleeding Together
This happens when the dough is too warm. Keep everything well-chilled and work quickly. If colors start to blend, refrigerate the dough again before continuing.
Cookies Spreading Too Much
Your dough may be too warm, or you may need to chill the shaped cookies on the baking sheet for 10 minutes before baking.
Difficult to Roll Dough
If the dough is cracking when you try to roll it, let it sit at room temperature for 5-10 minutes. If it’s too sticky, chill it longer.
Sugar Not Sticking
Make sure you’re rolling the twisted cookies in sugar immediately after shaping, while the dough’s surface is still slightly moist. Press gently to help the sugar adhere.
My Personal Cooking Tip
Here’s my grandmother’s secret to making the most beautiful twisted Christmas cookies: she always rolled her dough ropes on a very clean, smooth surface lightly dusted with powdered sugar instead of flour. The powdered sugar dissolves during baking and doesn’t leave white streaks on the colored dough. This small detail makes a big difference in the final appearance.
Another tip I’ve learned over years of making these cookies is to prepare a large batch of dough and freeze portions for later. When unexpected guests arrive during the holidays, I can pull out frozen dough, let it thaw for 30 minutes, and have fresh, beautiful twisted Christmas cookies ready in under an hour.
Finally, if you’re making these with children, assign each person a color and let them create their own twisted patterns. Some of my favorite memories are of my own children giggling as they invented new twist designs. These cookies aren’t just about perfection – they’re about creating joy and memories during the most wonderful time of the year.
Important Notes for Your Twisted Christmas Cookies
Keep Dough Cold: This is the #1 rule for success. If dough gets warm and sticky, refrigerate it for 15 minutes before continuing. Cold dough twists beautifully and holds its shape.
Gel Food Coloring Only: Never use liquid food coloring as it adds too much moisture and changes the dough consistency. Gel colors provide vibrant hues without affecting texture.
Uniform Thickness: Roll your dough ropes to the same thickness throughout for even baking and professional appearance. Use a ruler if needed!
Don’t Overbake: These cookies should remain pale with just a hint of golden color on the bottom. Overbaking makes them hard instead of tender.
Vanilla Sugar is Special: Making vanilla sugar with real vanilla beans elevates these cookies from good to extraordinary. It’s worth the extra step!
Frequently Asked Questions About Twisted Christmas Cookies
Can I make the dough ahead of time?
Absolutely! The dough can be refrigerated for up to 3 days or frozen for up to 3 months. Thaw frozen dough in the refrigerator overnight before using.
Why are my cookies spreading during baking?
The dough is too warm. Make sure to chill shaped cookies on the baking sheet for 10 minutes before baking, and ensure your oven is fully preheated.
Can I use natural food coloring instead of gel?
Yes! Use beet juice for red and spinach juice or matcha powder for green. The colors will be less vibrant but still festive. You may need to add a bit more flour if the natural colorings are very liquid.
How do I prevent the colors from bleeding together?
Work with well-chilled dough and don’t handle the twisted cookies too much. If colors start to blend, refrigerate immediately and work more quickly.
My dough is cracking when I try to roll it. What should I do?
Let the dough sit at room temperature for 5-10 minutes to soften slightly. If it’s still too dry, knead in a tiny bit of milk, one teaspoon at a time.
Can I make these cookies without almond extract?
Yes, you can use all vanilla extract instead. However, the almond extract gives these twisted Christmas cookies their signature flavor, so I recommend trying it if possible.
How do I store these cookies to keep them fresh?
Store in an airtight container at room temperature for up to 1 week. Place parchment paper between layers to prevent sticking. They actually soften slightly over time, becoming even more delicious.
Can I freeze baked twisted cookies?
Yes! Layer them between parchment paper in an airtight container and freeze for up to 2 months. Thaw at room temperature for 1 hour before serving.
What if I don’t have vanilla beans for the vanilla sugar?
Simply mix vanilla extract into granulated sugar and let it dry for a few minutes, or use regular granulated sugar with a small sprinkle of vanilla powder.
Can I make these gluten-free?
Yes, use a 1:1 gluten-free flour blend. The cookies may be slightly more delicate, but they’ll still taste wonderful and look beautiful.
Conclusion: Creating Holiday Magic, One Twist at a Time
The aroma of these twisted Christmas cookies baking fills the house with warmth and nostalgia. Each bite carries the love of generations past and the hope of traditions continuing into the future. Whether you’re baking them for a cookie exchange, gifting them to neighbors, or enjoying them with your own family around the Christmas tree, these beautiful twisted cookies add a special touch of magic to the holiday season.
What makes this recipe truly special isn’t just the beautiful presentation or the delicious almond-citrus flavor – it’s the memories you create while making them. There’s something deeply satisfying about taking simple dough and transforming it into these festive works of art. The process of rolling, twisting, and coating each cookie becomes almost meditative, a peaceful moment of creativity in the midst of holiday bustle.
As you embark on your own twisted cookie adventure, remember that perfection isn’t the goal – joy is. Some twists will be neater than others, some colors more vibrant, but every single cookie will be made with love and care. And that’s what the holidays are truly about. So gather your loved ones, turn on some festive music, and start twisting. Your kitchen is about to become a holiday workshop, and these beautiful cookies will be the delicious proof of time well spent. Happy holidays and happy baking!