There’s something magical about the first batch of cookies coming out of the oven—the warm, buttery aroma that fills your kitchen, the anticipation as they cool on the rack, and that first bite that transports you somewhere wonderful. For me, Buttery Raspberry Crumble Cookies have always been that special treat. I remember the first time I made these delicate, jam-filled wonders; it was a rainy Saturday afternoon, and I was craving something sweet yet not overly complicated. What emerged from my oven that day was nothing short of spectacular—tender, buttery cookies with a sweet raspberry center and a delightful crumbly texture that literally melts in your mouth.
These raspberry crumble cookies are the perfect balance of sophistication and simplicity. They look like they came from a fancy bakery, yet they’re surprisingly easy to make at home. Whether you’re baking for a holiday gathering, a tea party, or simply treating yourself to something special, these buttery raspberry crumble cookies will quickly become your go-to recipe.
Why You’ll Love These Raspberry Crumble Cookies
What makes these cookies so irresistible? It’s the combination of textures and flavors that work in perfect harmony. The buttery cookie base provides a rich, melt-in-your-mouth foundation, while the raspberry jam adds a bright, fruity contrast that cuts through the richness. The crumbly edges give each bite a delightful texture that’s both tender and slightly crisp.
These raspberry cookies are also incredibly versatile. You can make them with different jam flavors, adjust the sweetness to your preference, or even add a touch of lemon zest to the dough for extra complexity. They’re perfect for any occasion—from casual coffee breaks to elegant dinner parties.
The Secret to Perfect Buttery Crumble Cookies
The key to achieving that perfect crumbly texture in these raspberry cookies lies in the butter-to-flour ratio and the mixing technique. Unlike chewy cookies that benefit from vigorous mixing, these delicate beauties need a gentler touch. Cold butter is incorporated into the dry ingredients until the mixture resembles coarse crumbs, creating that signature texture that gives these cookies their name.
Another important factor is not overworking the dough. Once the ingredients come together, resist the temptation to knead or over-mix. This ensures your raspberry crumble cookies remain tender and literally melt in your mouth with every bite.
Ingredients for Buttery Raspberry Crumble Cookies
For the Cookie Dough:
- 2 cups all-purpose flour
- 1/2 cup granulated sugar
- 1/4 cup powdered sugar
- 1 cup cold unsalted butter, cubed
- 1 large egg yolk
- 1 teaspoon vanilla extract
- 1/4 teaspoon salt
- 1/2 teaspoon baking powder
For the Filling:
- 1/2 cup high-quality raspberry jam
- 1 tablespoon lemon juice (optional, for brightness)
For Finishing:
- 2 tablespoons granulated sugar for sprinkling

Step-by-Step Instructions for Making Raspberry Cookies
Preparing the Cookie Dough
Begin by preheating your oven to 350°F (175°C) and lining two baking sheets with parchment paper. This preparation step is crucial for ensuring your raspberry crumble cookies bake evenly and don’t stick.
In a large mixing bowl, whisk together the all-purpose flour, granulated sugar, powdered sugar, salt, and baking powder. This dry mixture forms the base of your buttery cookies. Add the cold, cubed butter to the flour mixture. Using a pastry cutter or your fingertips, work the butter into the flour until the mixture resembles coarse crumbs. This process should take about 3-4 minutes. The mixture should look sandy with some pea-sized butter pieces remaining.
In a small bowl, whisk together the egg yolk and vanilla extract. Pour this mixture over the crumbly dough and stir gently with a wooden spoon until the dough just begins to come together. Don’t worry if it seems a bit dry—that’s exactly what you want for these raspberry crumble cookies.
Shaping Your Raspberry Crumble Cookies
Take about 1.5 tablespoons of dough and roll it into a ball between your palms. Place it on the prepared baking sheet. Using your thumb or the back of a small spoon, create a deep indentation in the center of each cookie ball. Make sure the indentation is wide and deep enough to hold a generous teaspoon of raspberry jam without overflowing during baking.
If your raspberry jam is particularly thick, you can thin it slightly with a teaspoon of lemon juice. This not only makes it easier to work with but also adds a subtle brightness that complements the buttery cookie base. Spoon about 1/2 to 3/4 teaspoon of raspberry jam into each indentation, being careful not to overfill.
Baking the Perfect Raspberry Cookies
Space your raspberry crumble cookies about 2 inches apart on the baking sheets, as they will spread slightly during baking. Just before placing them in the oven, sprinkle the edges of each cookie lightly with granulated sugar. This creates a delicate, sweet crust that adds another dimension of flavor and texture.
Bake the cookies for 14-16 minutes, or until the edges are lightly golden. The centers may still look slightly pale—this is perfect. The raspberry jam will bubble slightly during baking, which is normal and actually creates a beautiful glossy finish.
Remove the cookies from the oven and let them cool on the baking sheet for 5 minutes before transferring them to a wire rack. This cooling period allows the cookies to set properly and prevents them from breaking apart. The raspberry crumble cookies will continue to firm up as they cool.
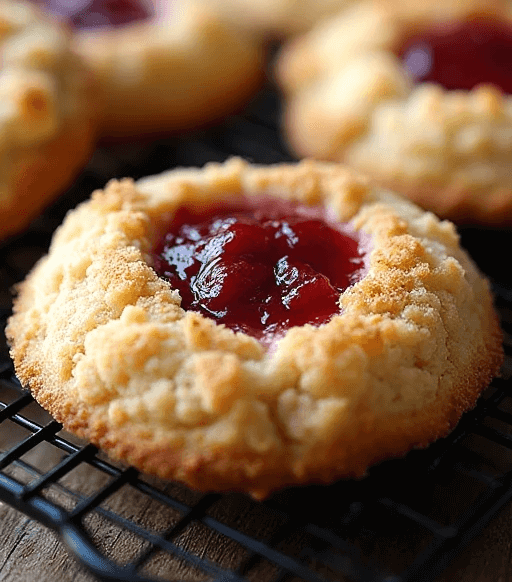
The Visual Appeal of Raspberry Crumble Cookies
Imagine a cooling rack filled with golden, tender cookies, each one crowned with a glistening pool of ruby-red raspberry jam. The edges of these buttery cookies have a delicate, crumbly texture that catches the light, while the jam centers create beautiful pockets of color. These raspberry crumble cookies look absolutely stunning—almost too beautiful to eat—with their rustic, homemade charm and bakery-worthy appearance.
Recipe Variations and Creative Twists
Different Jam Flavors for Your Crumble Cookies
While raspberry is classic and absolutely delicious, these buttery crumble cookies work beautifully with other jam flavors. Try strawberry for a sweeter option, apricot for something more sophisticated, or even a mixed berry jam for complexity. Lemon curd creates a tangy, refreshing variation that’s perfect for spring and summer.
Adding Extra Flavor to Raspberry Cookies
Consider adding 1 teaspoon of almond extract to the dough for an extra layer of flavor that pairs beautifully with raspberry. A tablespoon of lemon zest mixed into the dough creates a bright, citrusy note that complements the jam perfectly. For a more decadent version, add 1/4 cup of finely ground almonds to the dough mixture.
Gluten-Free Raspberry Crumble Cookies
You can make these cookies gluten-free by substituting the all-purpose flour with a good-quality gluten-free flour blend (one that includes xanthan gum). The texture will be slightly different but still wonderfully crumbly and delicious.
Tips for Perfect Raspberry Crumble Cookies Every Time
Keep Your Butter Cold: This is perhaps the most important tip. Cold butter creates those lovely crumbly pockets that make these cookies so special. If your kitchen is warm, chill the dough for 15 minutes before shaping.
Don’t Overfill the Centers: It’s tempting to add lots of jam, but restraint is key. Too much filling will overflow during baking and create a mess. Stick to about 1/2 to 3/4 teaspoon per cookie.
Quality Matters: Use good-quality jam with a high fruit content. The flavor of the jam really shines in these simple cookies, so it’s worth investing in a premium brand or using homemade preserves.
Storage Tips: Store your raspberry crumble cookies in an airtight container at room temperature for up to 5 days. They also freeze beautifully for up to 3 months. Just thaw at room temperature before serving.
Nutritional Information for Raspberry Cookies
Per cookie (based on 24 cookies):
- Calories: 135
- Total Fat: 8g
- Saturated Fat: 5g
- Cholesterol: 30mg
- Sodium: 35mg
- Total Carbohydrates: 15g
- Dietary Fiber: 0.5g
- Sugars: 7g
- Protein: 1.5g
Serving Suggestions and Presentation Ideas
These buttery raspberry crumble cookies are stunning on their own, but presentation can elevate them even further. Arrange them on a vintage cake stand or a rustic wooden board for a beautiful display. They pair wonderfully with afternoon tea, especially Earl Grey or chamomile, which complement the raspberry flavor beautifully.
For special occasions, dust the cooled cookies lightly with powdered sugar just before serving. You can also drizzle them with a simple white chocolate glaze for an extra-special touch. These raspberry cookies make excellent gifts when packaged in a pretty tin or box lined with parchment paper.
Perfect Pairings with Raspberry Crumble Cookies
Beverage Pairings: These cookies pair beautifully with hot tea, especially black teas with floral notes. Earl Grey, English Breakfast, or a delicate white tea all work wonderfully. For coffee lovers, try them with a smooth, medium-roast coffee or a creamy latte. A glass of cold milk is also a classic and delicious pairing.
Dessert Wine Pairings: If you’re serving these raspberry cookies as part of a dessert course, consider pairing them with a sweet dessert wine. A light Moscato, a sparkling Prosecco, or even a raspberry liqueur would complement these buttery treats beautifully.
Why These Raspberry Crumble Cookies Are Perfect for Any Occasion
Whether you’re hosting a holiday gathering, planning a bridal shower, or simply want to treat your family to something special, these buttery raspberry crumble cookies are always a hit. They strike the perfect balance between impressive and achievable, making them ideal for both novice and experienced bakers.
The recipe is also easily scalable—double or triple it for larger gatherings. The cookies can be made ahead and stored, which makes them perfect for busy holiday seasons when you’re preparing multiple dishes.
My Personal Touch for Perfect Raspberry Cookies
Here’s my secret tip that I’ve learned over years of making these raspberry crumble cookies: after removing them from the oven while they’re still warm, use the back of a small spoon to gently press the jam back into the indentation if it has spread too much. This creates a perfectly centered, professional-looking jam pocket. Also, don’t be afraid to experiment with jam combinations—a swirl of raspberry and blueberry jam creates a stunning visual effect and adds depth to the flavor profile.
These buttery raspberry crumble cookies have become a beloved tradition in my home, and I hope they’ll become one in yours too. There’s something deeply satisfying about making cookies from scratch, especially ones that turn out this beautiful and delicious. Happy baking!
SEO Block:
Focus Keyphrase: Buttery Raspberry Crumble Cookies
SEO Title: Buttery Raspberry Crumble Cookies Recipe – Easy & Delicious
Slug: buttery-raspberry-crumble-cookies
Keyphrase Synonyms: raspberry cookies, raspberry crumble cookies, buttery cookies, jam-filled cookies
Meta Description: Learn to make buttery raspberry crumble cookies that melt in your mouth with delicious jam centers.
Classic Christmas Toffee: A Nostalgic Holiday Tradition
The holidays have a way of bringing back cherished memories, and for me, nothing captures the magic of Christmas quite like the smell of toffee bubbling on the stove. I’ll never forget the first time I made Classic Christmas Toffee—it was a few days before Christmas, and I wanted to create homemade gifts for my neighbors. As the butter and sugar caramelized together, filling my kitchen with the most intoxicating aroma, I knew I had discovered something special. When I poured that glossy, amber mixture onto the baking sheet, topped it with chocolate and crunchy pecans, and let it set, I felt like a true candy maker. The result was absolutely spectacular: layers of buttery toffee, smooth chocolate, and toasted nuts that disappeared from the gift tins almost as fast as I could make them.
This Classic Christmas Toffee recipe is what holiday baking dreams are made of. It’s elegant enough to give as gifts yet simple enough to make on a busy December afternoon. The combination of buttery, crunchy toffee, rich chocolate, and toasted pecans creates a confection that’s truly irresistible.
Why This Christmas Toffee Recipe Is Simply Perfect
What makes this toffee so special is the perfect balance of flavors and textures. The buttery toffee base has a deep caramel flavor with just a hint of saltiness that makes it incredibly addictive. The chocolate layer adds richness and smoothness, while the pecans provide a satisfying crunch and nutty flavor that complements everything beautifully.
This Christmas toffee is also incredibly versatile. You can customize it with different types of chocolate, vary the nuts, or even add sea salt flakes for a gourmet touch. It’s a showstopper that always impresses, whether you’re serving it at holiday parties or packaging it as gifts.
The Art of Making Perfect Christmas Toffee
Making toffee might seem intimidating, but with a few key techniques and a candy thermometer, you’ll be creating professional-quality Christmas toffee in no time. The secret lies in cooking the butter and sugar mixture to exactly the right temperature—too low and your toffee will be soft and chewy; too high and it will taste burnt.
Temperature control is crucial for this toffee recipe. You’ll want to bring the mixture to what’s called the “hard crack” stage, which occurs at 300°F (149°C). At this temperature, the sugar syrup will form hard, brittle threads when dropped into cold water. This is what gives your Christmas toffee that perfect snap.
Ingredients for Classic Christmas Toffee
For the Toffee Base:
- 1 cup (2 sticks) unsalted butter
- 1 cup granulated sugar
- 1/4 cup water
- 1/4 teaspoon salt
- 1 teaspoon vanilla extract
For the Topping:
- 1 1/2 cups semi-sweet or dark chocolate chips
- 1 cup pecans, toasted and chopped
- 1/4 cup walnuts, toasted and chopped (optional)
- Flaky sea salt for sprinkling (optional)
Step-by-Step Guide to Making Christmas Toffee
Preparing Your Workspace for Toffee Making
Before you begin cooking, preparation is key. Line a 9×13-inch baking pan with aluminum foil, making sure it extends over the edges for easy removal later. Lightly butter the foil or spray it with cooking spray. This preparation step ensures your Christmas toffee will release easily once it’s set.
Have all your ingredients measured and ready to go. Once you start cooking the toffee, things move quickly, and you won’t have time to measure ingredients. Toast your pecans and walnuts in a dry skillet over medium heat for 3-4 minutes until fragrant, then chop them roughly. Set aside to cool.
Cooking the Perfect Toffee Base
In a heavy-bottomed saucepan (preferably light-colored so you can see the color of the toffee as it cooks), combine the butter, sugar, water, and salt. Place over medium heat and stir constantly with a wooden spoon until the butter melts and the sugar dissolves completely. This should take about 5 minutes.
Once everything is melted and combined, stop stirring and insert your candy thermometer. Let the mixture cook, undisturbed, until it reaches 300°F (149°C). This will take approximately 10-12 minutes. The toffee will go through several color changes—from pale yellow to light amber to a deep, rich caramel color. Watch it carefully during the last few minutes, as it can go from perfect to burnt very quickly.
As the temperature approaches 300°F, you’ll notice the bubbling will slow down and the mixture will become thicker. When the thermometer reads exactly 300°F, immediately remove the pan from the heat and quickly stir in the vanilla extract. Be careful—the mixture will bubble up when you add the vanilla.
Pouring and Setting Your Christmas Toffee
Working quickly but carefully (the mixture is extremely hot), pour the toffee onto your prepared baking sheet. Use a heatproof spatula to spread it into an even layer, about 1/4-inch thick. Don’t worry about making it perfectly even—rustic is beautiful when it comes to homemade toffee.
Immediately sprinkle the chocolate chips evenly over the hot toffee. Let them sit for 2-3 minutes to soften from the residual heat. Once the chocolate is soft and glossy, use an offset spatula or the back of a spoon to spread it into an even layer covering the entire surface of the toffee.
While the chocolate is still warm and soft, sprinkle the toasted pecans and walnuts evenly over the top, pressing them gently into the chocolate so they adhere. If you’re using sea salt flakes, sprinkle them lightly over the nuts for a sophisticated sweet-and-salty finish.
The Final Step: Setting and Breaking Christmas Toffee
Let your Christmas toffee cool at room temperature for about 30 minutes, then transfer it to the refrigerator for at least 2 hours, or until completely set and firm. Once fully hardened, remove the toffee from the pan by lifting the foil edges. Peel away the foil carefully.
Place the large toffee sheet on a cutting board. Using a large, sharp knife, score the toffee into serving-size pieces. Then, using your hands or a knife, break the toffee along these score lines into irregular pieces. The rustic, broken appearance is part of the charm of homemade Christmas toffee.
The Beautiful Layers of Christmas Toffee
Picture a stunning cross-section of this Classic Christmas Toffee: a thick layer of golden, buttery toffee forms the base, its amber color catching the light. Above it sits a smooth, rich layer of chocolate—dark and glossy. Crowning it all is a generous scattering of toasted pecans and walnuts, their rough texture contrasting beautifully with the smooth chocolate. When broken into pieces, each irregular shard reveals these gorgeous layers, making the toffee as beautiful to look at as it is delicious to eat.
Creative Variations for Your Christmas Toffee
Dark Chocolate Christmas Toffee
For a more sophisticated flavor profile, use dark chocolate (70% cacao) instead of semi-sweet. The slight bitterness of dark chocolate balances beautifully with the sweet, buttery toffee and creates a more grown-up treat.
White Chocolate Peppermint Toffee
Create a festive variation by using white chocolate chips and crushing candy canes to sprinkle on top instead of nuts. This peppermint Christmas toffee is perfect for the holidays and makes a beautiful gift.
Almond Joy Toffee
Use milk chocolate, toasted sliced almonds, and a sprinkle of toasted coconut flakes for a candy-bar-inspired version of this classic Christmas toffee.
Sea Salt Caramel Toffee
Add an extra 1/4 teaspoon of flaky sea salt mixed into the toffee before pouring, and finish with more sea salt flakes on top. This salted toffee has become incredibly popular and adds a gourmet touch.
Expert Tips for Perfect Christmas Toffee Every Time
Use a Candy Thermometer: This is non-negotiable. Guessing the temperature will result in inconsistent results. A reliable candy thermometer ensures your toffee reaches the perfect hard crack stage every time.
Watch the Color, Not Just the Temperature: As you approach 300°F, start watching the color of your toffee closely. You want a deep amber color—if it’s too light, it won’t have that rich caramel flavor; too dark and it will taste burnt.
Work Quickly: Once your toffee reaches temperature, work quickly to pour and spread it. The mixture sets fast as it cools.
Humidity Matters: Toffee-making is best done on dry days. High humidity can affect how the toffee sets and can make it sticky rather than crisp.
Storage is Key: Store your Christmas toffee in an airtight container with wax paper between layers. It will keep for up to 3 weeks at room temperature, though it rarely lasts that long!
Nutritional Information for Christmas Toffee
Per piece (based on 24 pieces):
- Calories: 185
- Total Fat: 13g
- Saturated Fat: 7g
- Cholesterol: 20mg
- Sodium: 45mg
- Total Carbohydrates: 18g
- Dietary Fiber: 1g
- Sugars: 16g
- Protein: 2g
Gift-Giving Ideas with Christmas Toffee
This Christmas toffee makes absolutely wonderful homemade gifts. Package the pieces in clear cellophane bags tied with festive ribbons, or arrange them in decorative tins lined with parchment paper. You can also layer the toffee pieces in mason jars for a rustic, charming presentation.
For an extra-special touch, create custom labels with the recipe name and a “made with love” note. Include a small card with storage instructions (keep in a cool, dry place in an airtight container). Your friends and family will be thrilled to receive such a thoughtful, delicious gift.
Serving Suggestions for Christmas Toffee
While this toffee is perfect on its own as a sweet treat, it also makes a wonderful addition to dessert boards. Arrange pieces of Christmas toffee alongside fresh fruit, cheese, and other confections for an elegant holiday spread. It’s also delicious crumbled over ice cream or incorporated into homemade cookie recipes.
Coffee and Toffee Pairings: The rich, caramel notes in this Christmas toffee pair beautifully with coffee. Try it with a bold espresso, a smooth French roast, or a creamy latte. The combination of coffee and toffee is truly heavenly.
Wine Pairings: For a sophisticated after-dinner treat, serve this toffee with a tawny port, a late harvest Riesling, or even a rich, full-bodied red wine like Cabernet Sauvignon.
Why This Classic Christmas Toffee Is a Holiday Essential
There’s something magical about homemade candy during the holidays. This Classic Christmas Toffee brings together everything we love about holiday treats—it’s rich, indulgent, beautiful, and makes people smile. The process of making it is almost as enjoyable as eating it, especially when you’re making it to share with loved ones.
This toffee recipe also has wonderful flexibility. You can make it weeks in advance and store it, which makes holiday preparation much easier. It’s also a great recipe to make with kids (with supervision around the hot sugar, of course)—they love watching the transformation from simple ingredients to glossy, golden toffee.
Troubleshooting Common Christmas Toffee Problems
Toffee Is Too Soft: This usually means it didn’t reach the proper temperature. Make sure your candy thermometer is accurate (test it in boiling water—it should read 212°F at sea level). Cook the mixture until it reaches a full 300°F.
Toffee Separated: Sometimes the butter can separate from the sugar. This is often due to temperature fluctuations. Stir constantly during the initial melting phase, and once the mixture comes to a boil, maintain steady heat.
Chocolate Didn’t Set: If your chocolate topping remains soft, the toffee may not have been hot enough when you added the chips, or your room might be too warm. Refrigerate the toffee to help the chocolate set properly.
My Secret to Exceptional Christmas Toffee
After making this Christmas toffee countless times, I’ve discovered a few tricks that elevate it from good to absolutely exceptional. First, I always use European-style butter, which has a higher fat content and creates richer, more flavorful toffee. Second, I add just a tiny pinch of espresso powder to the chocolate layer—it doesn’t make the toffee taste like coffee, but it deepens and intensifies the chocolate flavor in the most wonderful way. Finally, I always finish with those flaky sea salt flakes. The contrast of sweet, buttery toffee with that pop of salt creates an addictive combination that keeps people reaching for “just one more piece.”
This Classic Christmas Toffee has become a non-negotiable part of my holiday tradition. I hope it brings as much joy to your kitchen as it has to mine!