There’s something irresistible about the combination of crispy exteriors and gooey, cheesy centers that makes potato cheese balls an absolute crowd-pleaser. After years of perfecting various appetizer recipes, I can confidently say that these golden-brown delights stand out as one of the most satisfying snacks you can prepare at home. Whether you’re hosting a gathering, looking for an after-school treat for the kids, or simply craving something indulgent for yourself, these crispy potato cheese balls deliver on all fronts.
What Makes These Potato Cheese Balls Special?
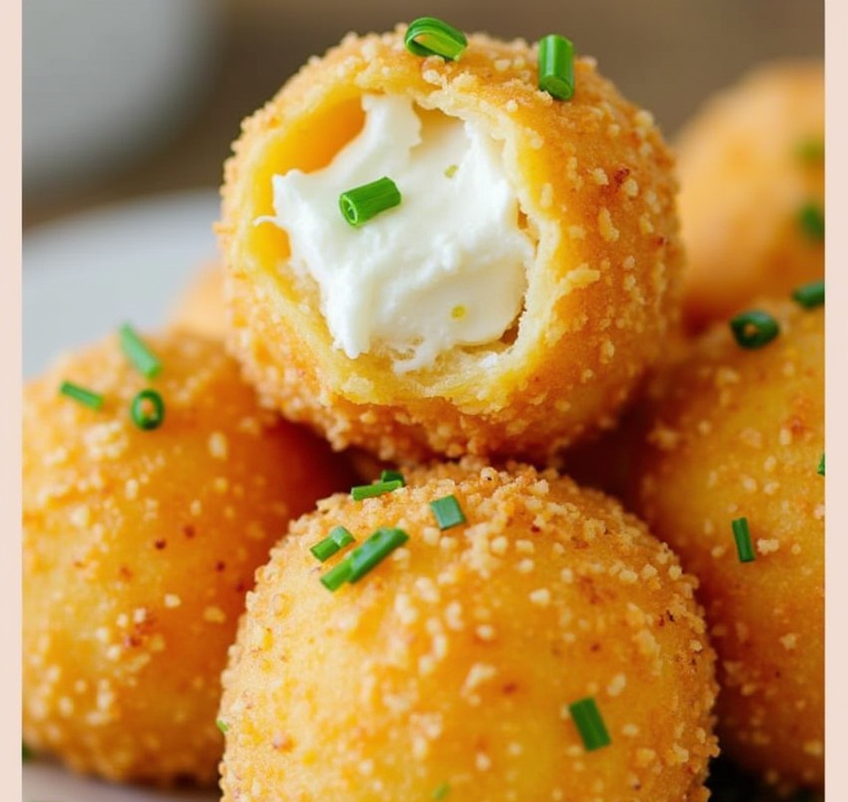
Unlike store-bought frozen options, homemade potato cheese balls offer that perfect balance of textures and flavors that simply can’t be matched. The exterior provides a satisfying crunch that gives way to creamy, seasoned potato and then—the moment everyone waits for—that stretchy, melted cheese center that creates those Instagram-worthy cheese pulls.
What I love most about this recipe is its versatility. You can adjust the seasonings to suit your taste preferences, experiment with different cheese varieties, and even prepare them ahead of time for quick frying when unexpected guests arrive. They’re economical too, often using ingredients you already have in your pantry and refrigerator.
Essential Ingredients for Perfect Potato Cheese Balls
For the Potato Mixture:
- 3 medium-sized potatoes (approximately 500g)
- 1 tablespoon finely chopped fresh coriander leaves (cilantro)
- ½ teaspoon red chili flakes (adjust according to spice preference)
- Salt to taste (approximately ½-¾ teaspoon)
- ¼ teaspoon freshly ground black pepper
- ½ teaspoon dried oregano
- ¼ cup grated mozzarella cheese (plus additional mozzarella cheese cubes for filling)
For the Coating:
- 2 tablespoons all-purpose flour
- 2 tablespoons cornflour (cornstarch)
- ¼ teaspoon salt
- ¼ teaspoon black pepper powder
- ¼ cup water
- 1 cup breadcrumbs (preferably panko for extra crispiness)
- Oil for deep frying

Choosing the Right Ingredients: A Closer Look
Selecting the Perfect Potatoes
For this recipe, starchy potatoes like Russets or Idaho potatoes work best as they mash smoothly and hold their shape well. Waxy potatoes tend to become gluey when mashed, which isn’t ideal for our cheese balls. The starch content helps create that perfect binding texture that will hold your cheese filling without falling apart during frying.
Cheese Considerations
While the recipe calls for mozzarella, which provides that classic stretchy cheese pull, don’t be afraid to experiment. A sharp cheddar adds a tangy flavor dimension, while pepper jack introduces a pleasant heat. For an elevated version, consider using a combination of mozzarella with a bit of Gruyère or fontina for depth of flavor. Just ensure whatever cheese you use has good melting properties.
Breadcrumb Options
Panko breadcrumbs are my top recommendation for the crispiest exterior, but regular breadcrumbs work well too. For an extra flavor boost, consider Italian seasoned breadcrumbs or even crushing some flavored crackers to use as part of your coating mixture.
Step-by-Step Preparation Process
Preparing the Potato Mixture
- Prepare the potatoes: Wash the potatoes thoroughly and peel them. Cut them into evenly sized pieces (about 1-inch cubes) to ensure they cook uniformly.
- Cook the potatoes: Place the potato pieces in a medium-sized pot and cover with cold water. Add a pinch of salt to the water. Bring to a boil over medium-high heat, then reduce to a simmer and cook until the potatoes are fork-tender, approximately 15-20 minutes.
- Drain and dry: Once cooked, drain the potatoes thoroughly in a colander. Return them to the hot, empty pot for a minute or two, stirring gently. This step helps evaporate excess moisture, which is crucial for achieving the right consistency.
- Mash thoroughly: Transfer the potatoes to a large bowl and mash them until completely smooth. Make sure there are no lumps, as these can affect the texture of your final product.
- Season the mixture: Add the chopped coriander leaves, chili flakes, salt, black pepper powder, oregano, and the ¼ cup of grated mozzarella cheese to the mashed potatoes.
- Mix well: Combine all ingredients thoroughly until you have a uniform mixture. Allow it to cool enough to handle comfortably with your hands.
Forming the Cheese Balls
- Prepare the cheese: Cut mozzarella into small cubes, approximately ½-inch in size. If using string cheese, cut into ½-inch segments.
- Shape the balls: Take about 1 tablespoon of the potato mixture and flatten it in your palm. Place a cheese cube in the center, then gently fold the potato mixture around it, completely enclosing the cheese.
- Form perfect spheres: Roll between your palms to form a smooth, round ball. If the mixture sticks to your hands, lightly dampen your palms with water.
- Chill for stability: Place the formed balls on a tray lined with parchment paper and refrigerate for 15-30 minutes. This step helps them hold their shape during the coating and frying process.
Creating the Perfect Coating
- Prepare the slurry: In a small bowl, whisk together the flour, cornflour, salt, pepper powder, and water until you have a smooth, lump-free batter with a consistency similar to pancake batter.
- Set up your coating station: Place the breadcrumbs in a separate shallow dish. Arrange your workflow with the chilled potato balls, the slurry, and the breadcrumbs in sequence.
- Coat the balls: Take each chilled potato ball, dip it into the slurry ensuring it’s completely covered, then roll it in the breadcrumbs, pressing gently to adhere the crumbs to all surfaces.
- Double-coating option: For an extra crispy exterior, you can repeat the process – dip the breaded ball back into the slurry and then into the breadcrumbs again.
Frying to Golden Perfection
- Heat the oil: In a deep, heavy-bottomed pan or fryer, heat oil to 350°F (175°C). If you don’t have a thermometer, test the oil by dropping in a small piece of bread – it should sizzle and turn golden in about 30 seconds.
- Fry in batches: Carefully lower a few potato cheese balls into the hot oil, being careful not to overcrowd the pan. Fry until they achieve a beautiful golden-brown color, approximately 2-3 minutes, turning occasionally for even cooking.
- Drain excess oil: Remove the fried balls using a slotted spoon and place them on paper towels to absorb excess oil.
- Keep warm if necessary: If frying in multiple batches, you can keep the finished cheese balls warm in an oven preheated to 200°F (95°C) until ready to serve.
Serving Suggestions and Pairings
These crispy potato cheese balls are versatile and can be presented in various ways:
As a Standalone Appetizer
Serve hot with a selection of dipping sauces such as:
- Tangy marinara sauce
- Cooling mint-yogurt dip
- Spicy sriracha mayonnaise
- Zesty cilantro-lime crema
As Part of a Larger Spread
Include them in:
- An appetizer platter alongside other finger foods
- Game day snack selections
- Kids’ party buffets
- Holiday entertaining menus
Meal Accompaniments
They also work wonderfully as:
- A side dish with grilled meats
- An accompaniment to soups and salads
- A unique alternative to traditional sides like fries or onion rings
Troubleshooting Common Issues
Problem: Cheese balls breaking apart when frying
Solution: This usually happens when the potato mixture is too wet or the balls haven’t been chilled enough. Make sure to dry your potatoes well after boiling and allow adequate chilling time before frying.
Problem: Cheese leaking out during frying
Solution: Ensure the cheese cube is completely encased in the potato mixture with no thin spots. Also, don’t overheat the oil – if it’s too hot, the exterior will cook too quickly while the inside remains too cool to hold the cheese.
Problem: Coating falling off during frying
Solution: Make sure your slurry is the right consistency – not too thick or too thin. Also, press the breadcrumbs firmly onto the balls and allow a brief resting time after coating before frying.
Problem: Balls turning too dark before cooking through
Solution: Your oil is likely too hot. Reduce the temperature and make sure your potato balls aren’t too large, as bigger sizes take longer to heat through to the center.
Make-Ahead Tips and Storage
Preparation in Advance:
- The potato mixture can be prepared up to a day ahead and refrigerated.
- Formed balls (without coating) can be refrigerated for up to 24 hours.
- Completely prepared but unfried balls can be frozen for up to 3 months.
Freezing Instructions:
- Place the breaded balls on a baking sheet, not touching each other.
- Freeze until solid, about 2-3 hours.
- Transfer to a freezer-safe container or ziplock bag.
- When ready to use, fry directly from frozen, adding about 1-2 minutes to the frying time.
Reheating Leftovers:
- For the best texture, reheat in an oven preheated to 350°F (175°C) for 5-7 minutes.
- Avoid microwaving as this can make them soggy and cause the cheese to become tough.
Healthier Adaptation Options
While traditional deep-fried potato cheese balls are an indulgent treat, there are ways to create a lighter version:
Baking Method:
- Preheat your oven to 425°F (220°C).
- Place the breaded balls on a baking sheet lined with parchment paper.
- Spray or brush lightly with oil.
- Bake for approximately 15-20 minutes, turning halfway through, until golden and crispy.
Air Fryer Version:
- Preheat your air fryer to 380°F (193°C).
- Lightly spray the breaded balls with cooking oil.
- Cook in batches for about 8-10 minutes, shaking the basket halfway through.
Ingredient Substitutions:
- Use whole wheat flour instead of all-purpose flour
- Incorporate mashed cauliflower to replace some of the potato
- Try reduced-fat cheese options (though they won’t melt as well)
- Use crushed baked tortilla chips or baked breadcrumbs for the coating
Customization Ideas: Making the Recipe Your Own
The basic potato cheese ball recipe is wonderfully adaptable. Here are some exciting variations to try:
Flavor Variations:
- Mediterranean: Add feta cheese, chopped olives, and a pinch of dried basil to the potato mixture
- Indian-Inspired: Incorporate garam masala, peas, and finely chopped green chilies
- Loaded Baked Potato: Mix in bacon bits, chopped chives, and use cheddar cheese for the filling
- Jalapeño Popper: Add diced jalapeños to the potato mixture and use cream cheese for the center
Texture Enhancements:
- Add finely diced bell peppers for color and crunch
- Incorporate corn kernels for sweet pops of flavor
- Mix in some crispy fried onions for an interesting texture contrast
Why Everyone Loves These Potato Cheese Balls
There’s a reason why recipes like this become family favorites and are passed down through generations. The combination of comforting potato, melted cheese, and crispy exterior creates a sensory experience that’s simply irresistible. They’re economical to make, adaptable to what you have on hand, and bring smiles to faces young and old.
I’ve served these at everything from casual family movie nights to elegant cocktail parties (just add a small skewer for easy handling), and they never fail to disappear quickly, often with requests for the recipe. They represent comfort food at its finest – simple ingredients transformed into something special through proper technique and a bit of culinary love.
Final Tips for Potato Cheese Ball Success
- Don’t skip the chilling step – it makes a huge difference in how well the balls hold together
- If your potato mixture seems too soft, add a tablespoon of breadcrumbs to the mixture itself
- For the absolute best flavor, use fresh herbs whenever possible
- Serve immediately after frying for the optimal contrast between the crispy exterior and molten cheese center
- Consider making a double batch and freezing half for future snack emergencies
With this detailed guide, you’re now equipped to create potato cheese balls that will rival any you’ve tried before. The combination of properly seasoned potatoes, quality cheese, and that perfect golden crust creates an appetizer that’s bound to become a staple in your recipe collection. Enjoy the process of making them, and even more, enjoy watching them disappear as soon as they hit the table!