
Description
Alright, let’s get practical. To own Classic Beef Tacos, you don’t need a professional kitchen, but a few key tools make everything sing. First, a good, heavy skillet or Dutch oven. I use my old cast iron—it holds heat like a champ and gives the beef that gorgeous, deep-brown sear. You’ll also need a sharp knife and a sturdy cutting board for your onions and aromatics. A wooden spoon or heat-resistant spatula for breaking up the meat. A small bowl for mixing your homemade easy taco seasoning ahead of time—I promise, this 2-minute step is a game-changer. For serving, a tortilla warmer isn’t mandatory, but wrapping your hot tortillas in a clean kitchen towel inside a low oven (200°F) is my secret to keeping them pliable and perfect. And for the love of all that is crispy, get a box grater if you’re using block cheese. Pre-shredded stuff has anti-caking agents that make it melt weird. Trust me.
Ingredients
Materials & Supplies (The Gear & The Good Stuff)
Alright, let’s get practical. To own Classic Beef Tacos, you don’t need a professional kitchen, but a few key tools make everything sing. First, a good, heavy skillet or Dutch oven. I use my old cast iron—it holds heat like a champ and gives the beef that gorgeous, deep-brown sear. You’ll also need a sharp knife and a sturdy cutting board for your onions and aromatics. A wooden spoon or heat-resistant spatula for breaking up the meat. A small bowl for mixing your homemade easy taco seasoning ahead of time—I promise, this 2-minute step is a game-changer. For serving, a tortilla warmer isn’t mandatory, but wrapping your hot tortillas in a clean kitchen towel inside a low oven (200°F) is my secret to keeping them pliable and perfect. And for the love of all that is crispy, get a box grater if you’re using block cheese. Pre-shredded stuff has anti-caking agents that make it melt weird. Trust me.
The Pantry & Fridge (8 servings-ish):
- For the Beef: 1 lb (500g) lean ground beef (85/15 is my sweet spot—enough fat for flavor, not so much it’s greasy). Sometimes I swap half for ground turkey or even ground pork for a richer taste.
- The Aromatic Base: 1 large yellow onion, finely diced. 3-4 cloves garlic, minced. Don’t use the jarred stuff here, friend. The 30 seconds it takes to mince fresh is worth it.
- The Flavor Bomb (Our easy taco seasoning):
* 2 tbsp chili powder (ancho if you want a smoky hint)
* 1 tbsp ground cumin
* 1 tsp smoked paprika (regular is fine, but smoked is next-level)
* 1 tsp dried oregano (crush it between your fingers as you add it!)
* 1/2 tsp garlic powder
* 1/2 tsp onion powder
* 1/2 tsp kosher salt (more to taste)
* 1/4 tsp black pepper
* 1/4 tsp cayenne pepper (optional, for a little kick. Skip if feeding kids)
* 1 tsp brown sugar (this is the secret! balances acidity and helps a crust form).
* Optional Wet Boost: 1 tbsp tomato paste (adds depth and helps thicken).
- The Liquid: 1/2 cup water or beef broth.
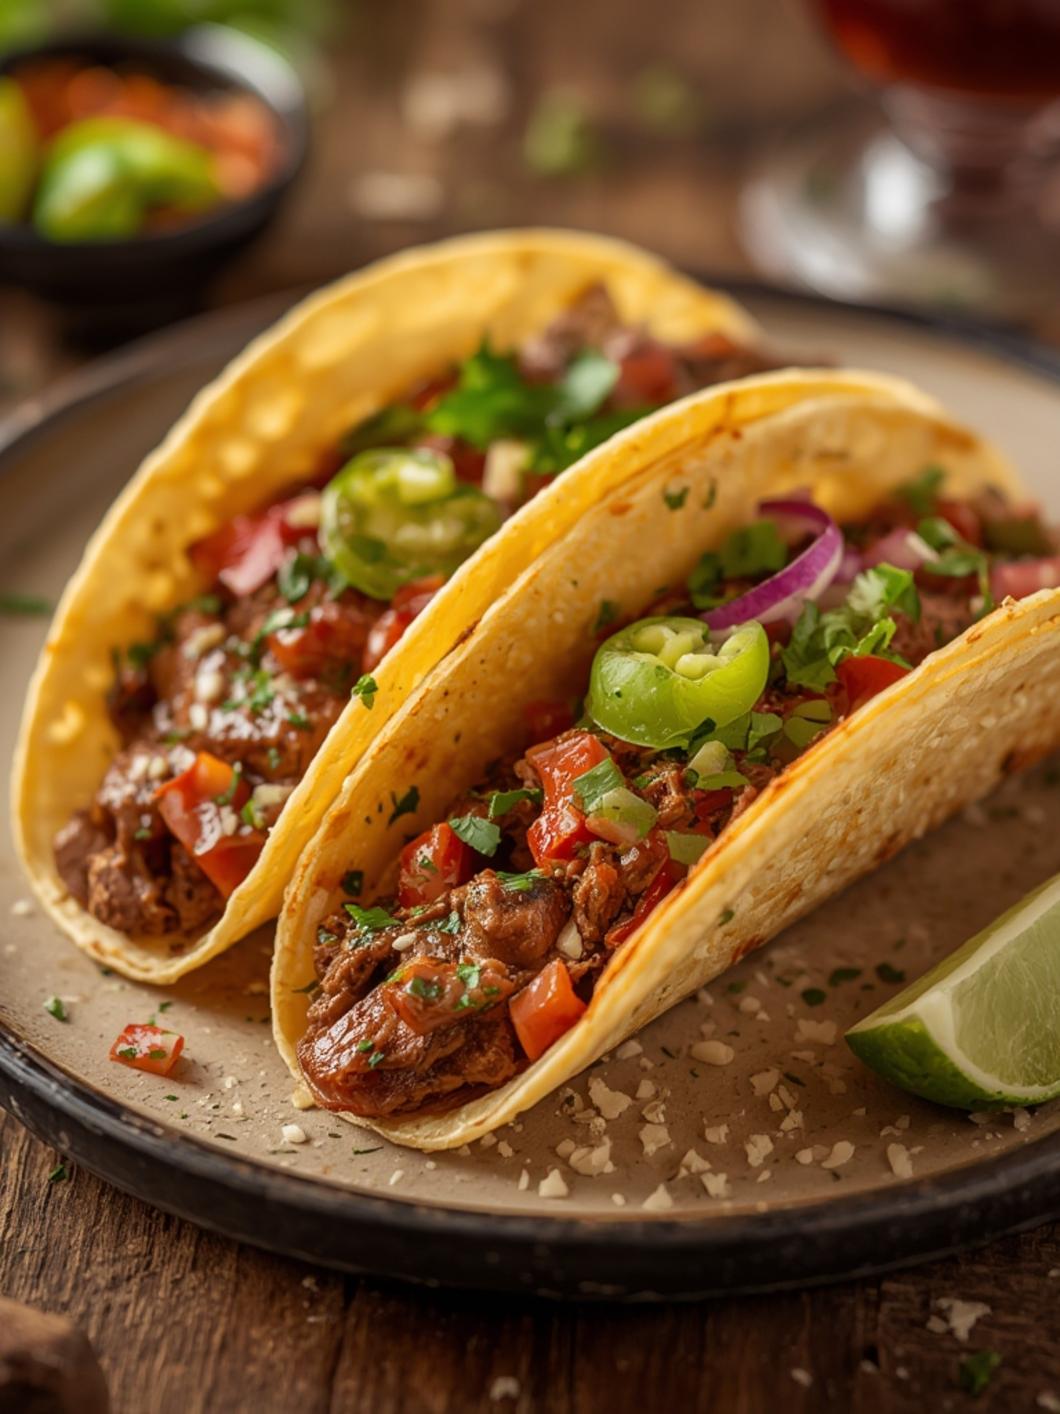
- Toppings Galore: Shredded lettuce (iceberg is classic, romaine for crunch), diced tomatoes, shredded cheese (cheddar, Monterey Jack, or a mix), sliced black olives, chopped fresh cilantro, sour cream, guacamole or sliced avocado, and lime wedges. Non-negotiable.
- The Vehicle: 8-10 small corn tortillas or flour tortillas. For the real deal, seek out fresh, locally-made corn tortillas. If they’re small, you’ll need more!
Timing / Cooking Schedule (Keepin’ It Real)
- Prep Time: 15 minutes (dicing onion, mincing garlic, mixing the easy taco seasoning). Honestly? The first time I made this, it took me double this time because I kept stopping to Google “how to mince garlic without crying.” Now I just open a window—game changer.
- Cook Time: 20 minutes (brown beef, build the sauce, simmer).
- Total Time: 35 minutes from start to finish. You can have these on the table faster than a delivery app would even answer your call.
Here’s my schedule: As soon as I start the rice or beans (if I’m making them), I mix the spices. Then I get the onions sweating while the beef comes to room temp. Everything flows. By the time the rice is done, the taco meat is ready. It’s a beautiful dance.
Step-by-Step Instructions (Let’s Get Our Hands Dirty)
Instructions
Step-by-Step Instructions (Let’s Get Our Hands Dirty)
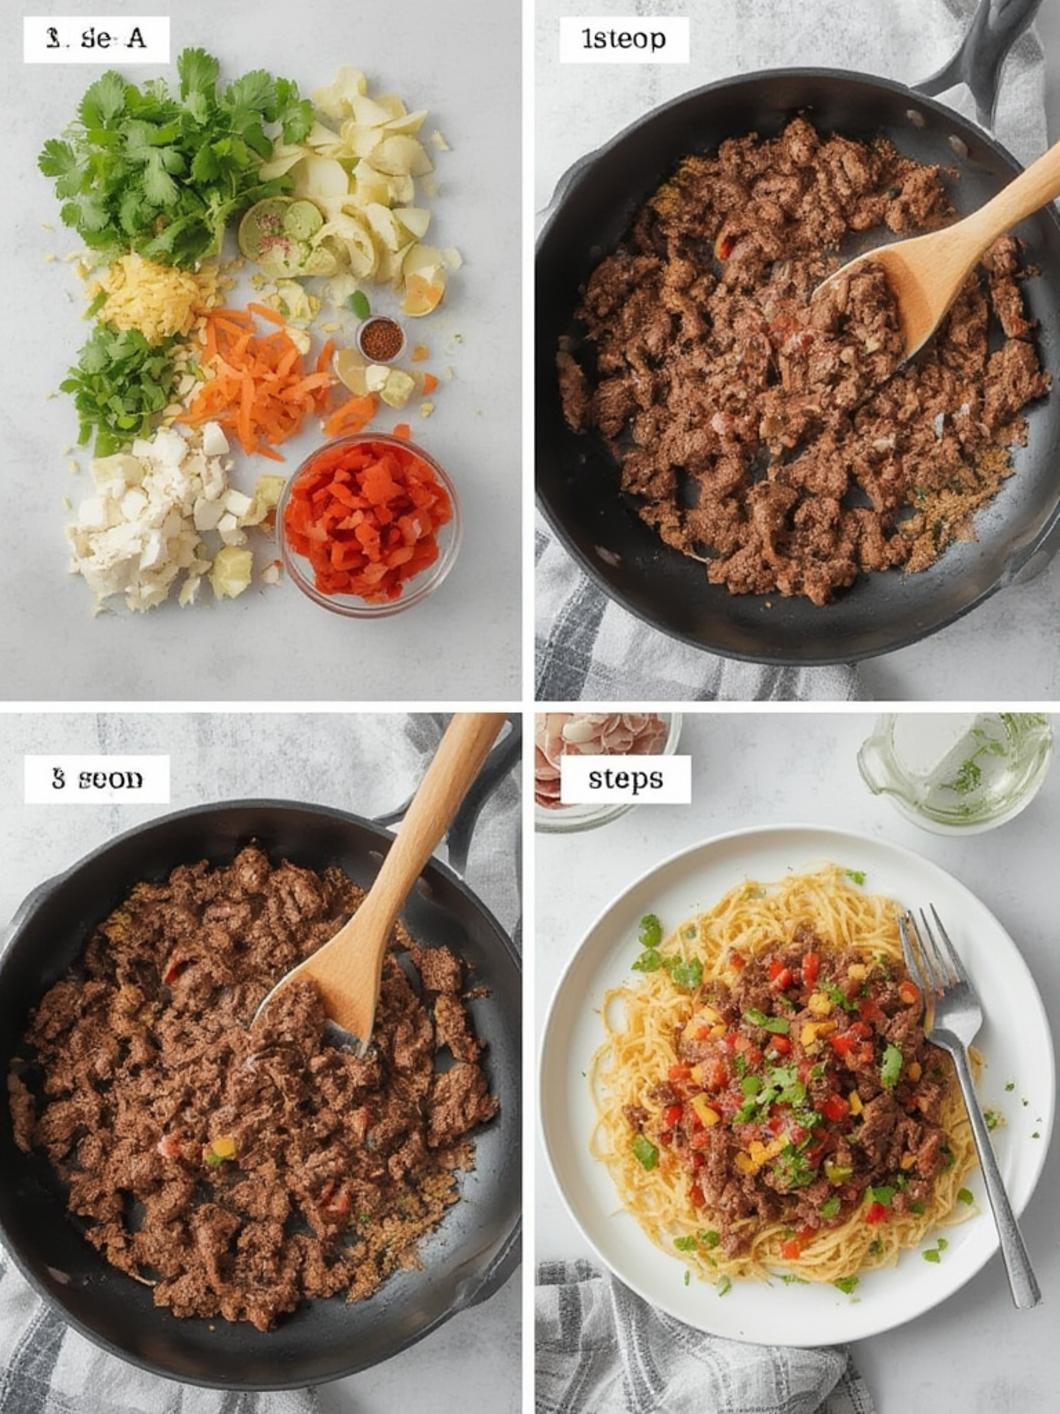
1. Build Your Spice Arsenal. In a tiny bowl, whisk together the chili powder, cumin, smoked paprika, oregano, garlic powder, onion powder, salt, black pepper, and cayenne (if using). This is your easy taco seasoning. Smell it. That’s the smell of victory. Pro Tip: I made the mistake of adding spices directly to the beef once and got clumps of pure chili powder in my bite. Never again. Always premix!
2. Sear the Beef. Crank your skillet to medium-high. Add the ground beef and cook, breaking it up with your spoon, until no pink remains and you get some delicious brown bits stuck to the pan (this is the fond—flavor gold!). Drain off excess fat if you’re using a leaner blend, but leave about a tablespoon for the next step. Story Time: I once tried to be “healthy” and used 99% lean ground beef. It was dry, sad, and flavorless. The fat is your friend here. It carries the spice!
3. Sweat the Aromatics. Reduce heat to medium. Add the diced onion and a pinch of salt to the beef fat. Cook for 3-4 minutes until onions soften and turn translucent. Push them to the side, add the minced garlic to the center of the pan, and cook for 30 seconds until fragrant before mixing it in. Burnt garlic is bitter garlic. Personal Fail: I added the garlic with the onions once and walked away. I came back to a pan of brown, acrid bits. Now I set a timer. 30 seconds, stir, done.
4. Spice It Up! Sprinkle your pre-mixed easy taco seasoning and the brown sugar over the beef and onion mixture. Stir constantly for 1-2 minutes until everything is coated and you smell an incredible toasty aroma. This “blooms” the spices and wakes up their flavor.
5. Simmer & Thicken. Pour in the water (or broth) and add the tomato paste (if using). Scrape up any browned bits from the bottom of the pan with your spoon. Bring to a simmer, then reduce heat to low. Let it bubble gently, uncovered, for 5-7 minutes, stirring occasionally, until the liquid reduces and the mixture thickens to a moist, spoonable consistency. It should look juicy, not soupy. Taste and add more salt if needed. This reduction step is key—I skipped it once and ended up with watery taco soup. Not a look.
6. Warm the Tortillas. While the meat simmers, warm your tortillas. I do 3-4 at a time in a dry skillet over medium heat for about 30 seconds per side, until they’re pliable and have light brown spots. Immediately.stack them and wrap in a towel, then tuck them in a warm drawer or low oven. This keeps them from drying out.
7. Assemble the Dream. Place a warm tortilla on a plate. Spoon a generous heap of that glorious beef mixture down the center. Then, go to town on toppings. My holy trinity: a squeeze of lime, a dollop of sour cream, and a handful of bright cilantro. The crunch of lettuce, the cool avocado, the melting cheese… it’s a texture party.
Nutritional Benefits / Advantages (Yeah, It’s Actually Good For You)
Look, I’m not calling this a health food, but a Classic Beef Taco made at home is a nutritional hero compared to its fast-food cousin. First, you control the fat. Using lean beef and draining excess means you’re getting solid protein without the mystery oils. Second, the beef is a fantastic source of iron and B vitamins, especially if you choose a grass-fed option when you can. Third, the spices are superheroes. Cumin aids digestion, chili powder is packed with antioxidants, and oregano is anti-inflammatory. My doctor actually raised an eyebrow when I told him I eat something involving ground beef and cheese every single week. But he admitted, when I broke down the ingredients—lean protein, veggies from toppings, healthy fats from avocado and lime—he said it’s a perfectly balanced meal. The key is the homemade easy taco seasoning—no preservatives, no weird fillers, just pure spice. And loading up on fresh cilantro, lettuce, and tomato makes it a veggie-packed delight. It’s a complete meal that satisfies without weighing you down (unless you eat eight, which I may have done on a few Tuesdays).
Tips, Alternative Methods or Cooking Advice (Your Wise Friend in the Kitchen)
- The Charred Onion Trick: For a deeper flavor, after dicing your onion, toss it in a dry skillet over medium heat for 5-7 minutes until you get some blackened edges. This adds a subtle smokiness without a grill.
- Beef Substitutes: 100% ground turkey works, but it’s lean. Add an extra teaspoon of olive oil to the pan and a splash of Worcestershire sauce for umami. Ground pork makes it decadently rich. Even crumbled firm tofu or a plant-based ground “meat” can work—just cook it a bit longer to get texture.
- Cheese Hack: Skip the pre-shredded. Buy a block of Monterey Jack and a block of sharp cheddar. Grate them yourself and mix. The melt is ten times better.
For Crispy Shell Lovers: If you must* use those crunchy shells from the bag, warm them in the oven according to the package, but never stuff them while they’re hot. Wait 2 minutes. Hot shell + juicy meat = instant sog. Wait. You’ll thank me.
- Make It a Bowl: No tortillas? No problem. Pile the beef over a bed of cilantro-lime rice with all your toppings. It’s a taco in a bowl and it’s delicious.
Common Mistakes to Avoid (My Most Embarrassing Moments)
Oh, where to start? The Salty Meat Catastrophe of 2019. I was rushing, eyeballed my salt, and went full “salt-bae” on the simmering beef. It was inedible. I tried to fix it by adding more beef (wasteful!) and a whole can of drained beans. It just became salty, bean-y meat slop. The fix? Rinse and restart. I drained the beef, rinsed it quickly under hot water in a colander to wash off some salt, then started the sauté step over with fresh onions and spices. It took extra time, but it saved dinner. Lesson: mix your salt into the dry seasoning before it hits the meat. That way, it’s distributed evenly. Never add straight salt at the end without tasting first!
Another one: Soggy Tortilla Siege. I used to heat my tortillas, then pile on all the toppings and let them sit for 5 minutes while I made guac. By serve time, the bottom tortilla was a damp, tearing mess. Now, my rule is “warm, fill, serve.” Tortilla goes from pan to plate to mouth in under 2 minutes. The towel-in-the-oven trick keeps a batch warm and ready for rapid assembly.