
Description
Creating these spectacular pastries requires quality ingredients, but nothing too difficult to source. Each component plays a crucial role in achieving that perfect King Hawaiian Cheesecake Danish texture and flavor.
Ingredients
Sweet Hawaiian-Style Danish Dough:
- 3 cups all-purpose flour, plus extra for dusting – provides structure while remaining tender
- ¼ cup granulated sugar – adds the signature sweetness
- 2¼ teaspoons instant yeast (1 packet) – creates lift and airiness
- 1 teaspoon salt – balances the sweetness and enhances flavors
- ¾ cup warm whole milk (110°F) – activates yeast and adds richness
- ¼ cup pineapple juice, warmed – infuses tropical flavor throughout
- 2 large eggs – binds ingredients and adds richness
- ⅓ cup unsalted butter, melted – creates tender, flaky layers
- 1 teaspoon vanilla extract – adds warmth and depth
- 1 cup cold unsalted butter, for laminating – creates those gorgeous flaky layers
Creamy Cheesecake Filling:
- 16 ounces cream cheese, softened to room temperature – the star of the filling
- ½ cup granulated sugar – sweetens perfectly without overpowering
- 1 large egg – helps the filling set during baking
- 2 tablespoons sour cream – adds tanginess and smooth texture
- 1 tablespoon all-purpose flour – prevents the filling from being too runny
- 1 teaspoon vanilla extract – complements the cream cheese beautifully
- Zest of 1 lemon – brightens the filling with subtle citrus notes
Tropical Topping and Glaze:
- 1 cup fresh pineapple chunks – adds juicy, tropical sweetness
- 1 cup fresh strawberries, sliced – provides color and fresh berry flavor
- 1 cup powdered sugar – creates the glossy glaze
- 2–3 tablespoons pineapple juice – thins the glaze and adds flavor
- ½ teaspoon vanilla extract – rounds out the glaze
- Shredded coconut for garnish (optional) – adds texture and tropical flair
Instructions
Step-by-Step Instructions for Perfect King Hawaiian Cheesecake Danish
Creating these beautiful pastries involves several steps, but breaking the process down makes it entirely manageable. I’ll guide you through each stage with detailed instructions to ensure your success.
Preparing Your Hawaiian-Style Danish Dough
Begin by creating the sweet, enriched dough that gives this King Hawaiian Cheesecake Danish its distinctive character. In a large mixing bowl, combine the flour, sugar, instant yeast, and salt, whisking them together thoroughly. This initial mixing ensures even distribution of the yeast throughout the flour.
In a separate bowl, whisk together the warm milk, warm pineapple juice, eggs, melted butter, and vanilla extract. The liquids should feel pleasantly warm to the touch but not hot—if they’re too hot, they’ll kill the yeast. Pour this mixture into the dry ingredients and stir with a wooden spoon until a shaggy dough forms.
Turn the dough out onto a lightly floured surface and knead for about 8-10 minutes until it becomes smooth, elastic, and slightly sticky. Alternatively, use a stand mixer fitted with a dough hook and knead on medium speed for 6-7 minutes. The dough should pass the “windowpane test”—when you stretch a small piece thin enough to see light through it without tearing.
Place the dough in a lightly greased bowl, cover with plastic wrap, and let it rise in a warm, draft-free location for about 1-1.5 hours, or until doubled in size. Meanwhile, prepare your laminating butter by placing the cold butter between two sheets of parchment paper and pounding it with a rolling pin into a flat rectangle about ½ inch thick. Refrigerate this butter layer until needed.
Laminating Your King Hawaiian Cheesecake Danish Dough
Once your dough has risen, punch it down gently to release the air and turn it out onto a lightly floured surface. Roll it into a large rectangle approximately 12×18 inches. This laminating process creates those beautiful, flaky layers that make Danish pastries so irresistible.
Place your prepared butter rectangle in the center of the dough. Fold the sides of the dough over the butter like a letter, encasing it completely. Turn the dough 90 degrees, then roll it out again into a long rectangle. Fold it into thirds again (this is called a “turn”), wrap it in plastic wrap, and refrigerate for 30 minutes.
Repeat this rolling and folding process two more times, refrigerating for 30 minutes between each turn. This creates multiple layers of butter and dough that will puff up beautifully during baking. While this process requires patience, it’s absolutely essential for achieving the characteristic flaky texture of your King Hawaiian Cheesecake Danish.
After the final turn and rest period, your laminated dough is ready to shape. Roll it out on a lightly floured surface into a large rectangle about ¼ inch thick. Using a sharp knife or pizza cutter, cut the dough into rectangles approximately 4×5 inches each. You should get about 12 pieces.
Creating the Luscious Cheesecake Filling
While your dough is chilling during one of the rest periods, prepare the spectacular cheesecake filling that makes this King Hawaiian Cheesecake Danish truly unforgettable. In a large mixing bowl, beat the softened cream cheese with an electric mixer on medium speed until completely smooth and fluffy, about 2-3 minutes. Scrape down the sides of the bowl frequently to ensure even mixing.
Add the sugar and continue beating until light and fluffy, another 2 minutes. Then, add the egg, sour cream, flour, vanilla extract, and lemon zest. Beat on low speed initially to prevent splattering, then increase to medium and beat until the mixture is perfectly smooth and creamy with no lumps remaining. The flour helps stabilize the filling so it doesn’t run out of the pastries during baking.
Transfer this filling to a piping bag or a large zip-top bag with one corner snipped off. This makes portioning the filling onto your pastries much easier and neater. If you’re not ready to assemble immediately, refrigerate the filling until needed—it can be prepared up to 24 hours in advance.
Assembling Your King Hawaiian Cheesecake Danish
Now comes the exciting part—assembling your beautiful King Hawaiian Cheesecake Danish pastries! Line two large baking sheets with parchment paper or silicone baking mats. Place your cut dough rectangles on the prepared sheets, spacing them about 2 inches apart to allow for expansion during baking.
For each pastry, fold the corners inward slightly to create a shallow well in the center, or make diagonal cuts about 1 inch long at each corner and fold those strips back. These techniques create a border that helps contain the filling. Pipe or spoon about 2-3 tablespoons of the cheesecake filling into the center of each pastry, spreading it slightly but leaving the borders clear.
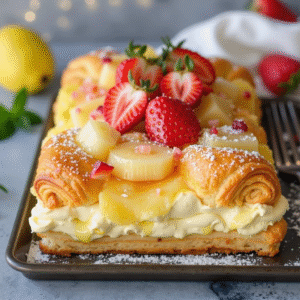
Arrange several pieces of fresh pineapple and strawberry slices on top of the cheesecake filling, pressing them in gently. The fruit not only looks beautiful but also adds fresh, bright flavor to each bite. At this point, cover the assembled pastries loosely with plastic wrap and let them rise in a warm place for 30-45 minutes until slightly puffy.
Preheat your oven to 375°F (190°C) during the final 15 minutes of rising time. Just before baking, you can brush the exposed dough edges with a beaten egg wash (one egg beaten with 1 tablespoon of water) for extra golden color, though this step is optional.
Bake the King Hawaiian Cheesecake Danish for 18-22 minutes, until the pastry is golden brown and the cheesecake filling is set but still slightly jiggly in the center. The pastries will continue cooking slightly from residual heat after you remove them from the oven, so don’t overbake or the filling will become dry.
Adding the Finishing Touches to Your King Hawaiian Cheesecake Danish
Allow your baked pastries to cool on the baking sheets for 10 minutes, then carefully transfer them to a wire rack. While they’re cooling, prepare the simple but stunning glaze that adds the final touch of sweetness and shine to your King Hawaiian Cheesecake Danish.
In a small bowl, whisk together the powdered sugar, pineapple juice, and vanilla extract until smooth. The consistency should be thick but pourable—similar to honey. If it’s too thick, add more pineapple juice a teaspoon at a time. If it’s too thin, add more powdered sugar.
Drizzle this glaze generously over the still-warm pastries, allowing it to cascade down the sides and pool slightly around the fruit. The warmth of the pastries helps the glaze set into a beautiful, glossy finish. If desired, sprinkle some shredded coconut over the glaze while it’s still wet for added tropical flair and textural contrast.
These King Hawaiian Cheesecake Danish pastries are best enjoyed slightly warm or at room temperature within the first day of baking. However, they’re still absolutely delicious the next day as well, especially when reheated briefly in a 300°F oven for 5-7 minutes.
Nutritional Information for King Hawaiian Cheesecake Danish
Understanding the nutritional content helps you enjoy these treats mindfully. Per pastry (recipe makes 12):
- Calories: 425
- Total Fat: 24g
- Saturated Fat: 15g
- Cholesterol: 95mg
- Sodium: 285mg
- Total Carbohydrates: 47g
- Dietary Fiber: 1g
- Sugars: 22g
- Protein: 7g
While these King Hawaiian Cheesecake Danish pastries are certainly indulgent, they’re perfect for special occasions and weekend treats. The combination of protein from the eggs and cream cheese along with the carbohydrates from the dough provides sustained energy to start your day.